Oil painting for beginners, the easy way! Follow along or watch the VIDEO as Daniel Folta of Evolve Artist teaches the 3 exercises every beginner artist needs and guides us through the process of making a simple three-dimensional painting with form and depth.
Whether this is your first time starting out, or if you're just returning to the basics, this article is going to be packed with information to give a solid foundation into oil painting for beginners and a straightforward process to making any painting in monotone.
Introduction

At Evolve Artist, we teach oil painting for beginners, walking them through our step-by-step process and bringing them consistent results.
My name is Daniel. At Evolve Artist, we consistently get artists to pro-level painting skills in about one year at just one hour a day. If you want to learn about our simple process to learn oil painting for beginners, read on. We've got a lot of ground to cover.
Oil Painting for Beginners Art Supplies List
Now before we begin, you’ll need the basic supplies to start painting. Here’s a list of the minimum supplies needed in oil painting for beginners as a list of the supplies I am using in this tutorial.
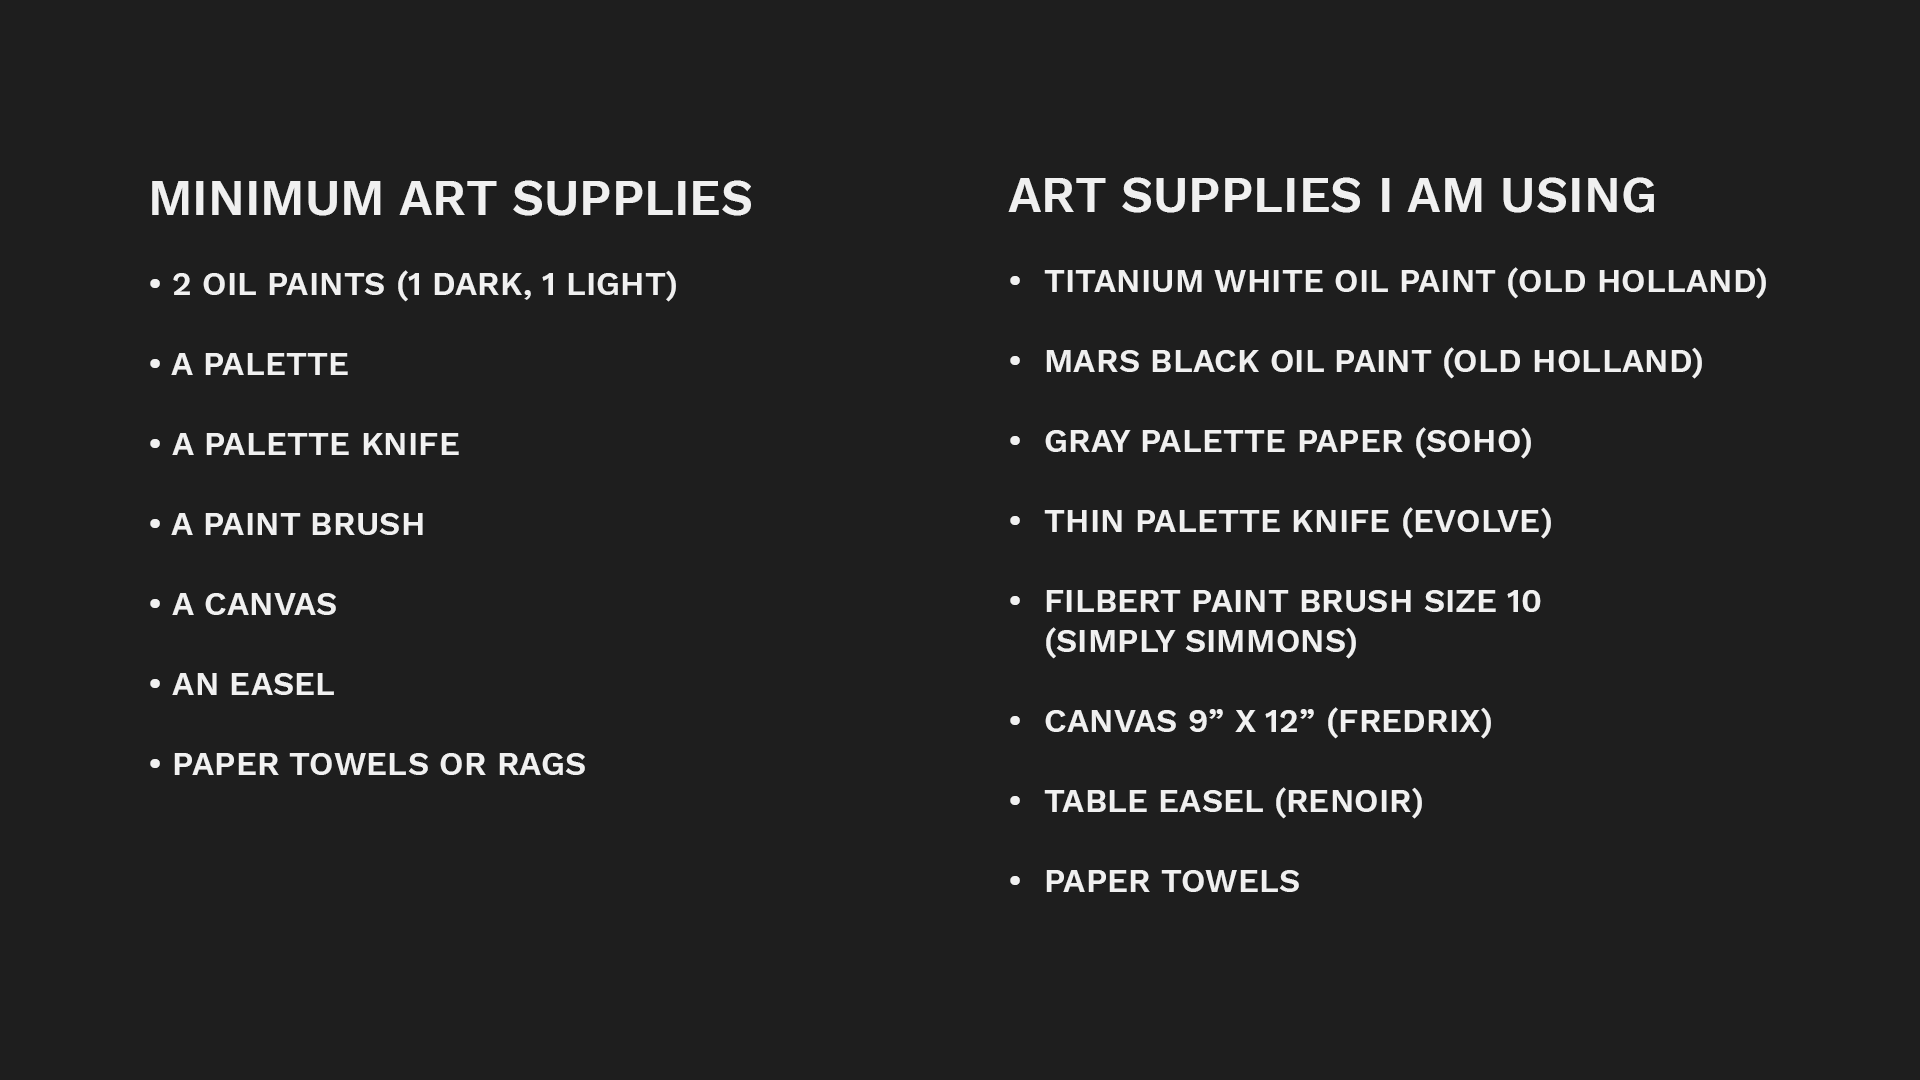
The first step to oil painting for beginners is to gather the minimum art supplies you’ll need to get started.
The Minimum Art Supplies You’ll Need
- 2 oil paints (1 Dark, 1 Light). I highly recommend you use high-quality oil paint if you are serious about learning.
- Palette
- Palette Knife
- Paint Brush
- Canvas
- Easel
- Paper towels or rags
Art Supplies I Am Using
- Titanium White Oil Paint (Old Holland)
- Mars Black Oil Paint (Mars Black)
- Gray Palette Paper (Soho)
- Thin Palette Knife (Blick)
- Filbert Paint Brush Size 10 (Simply Simmons)
- Canvas 9”x12” (Fredrix)
- Table Easel (Renoir)
- Carbon Transfer Paper (Amazon)
Exercise #1: How to Mix Oil Paint with a Palette Knife
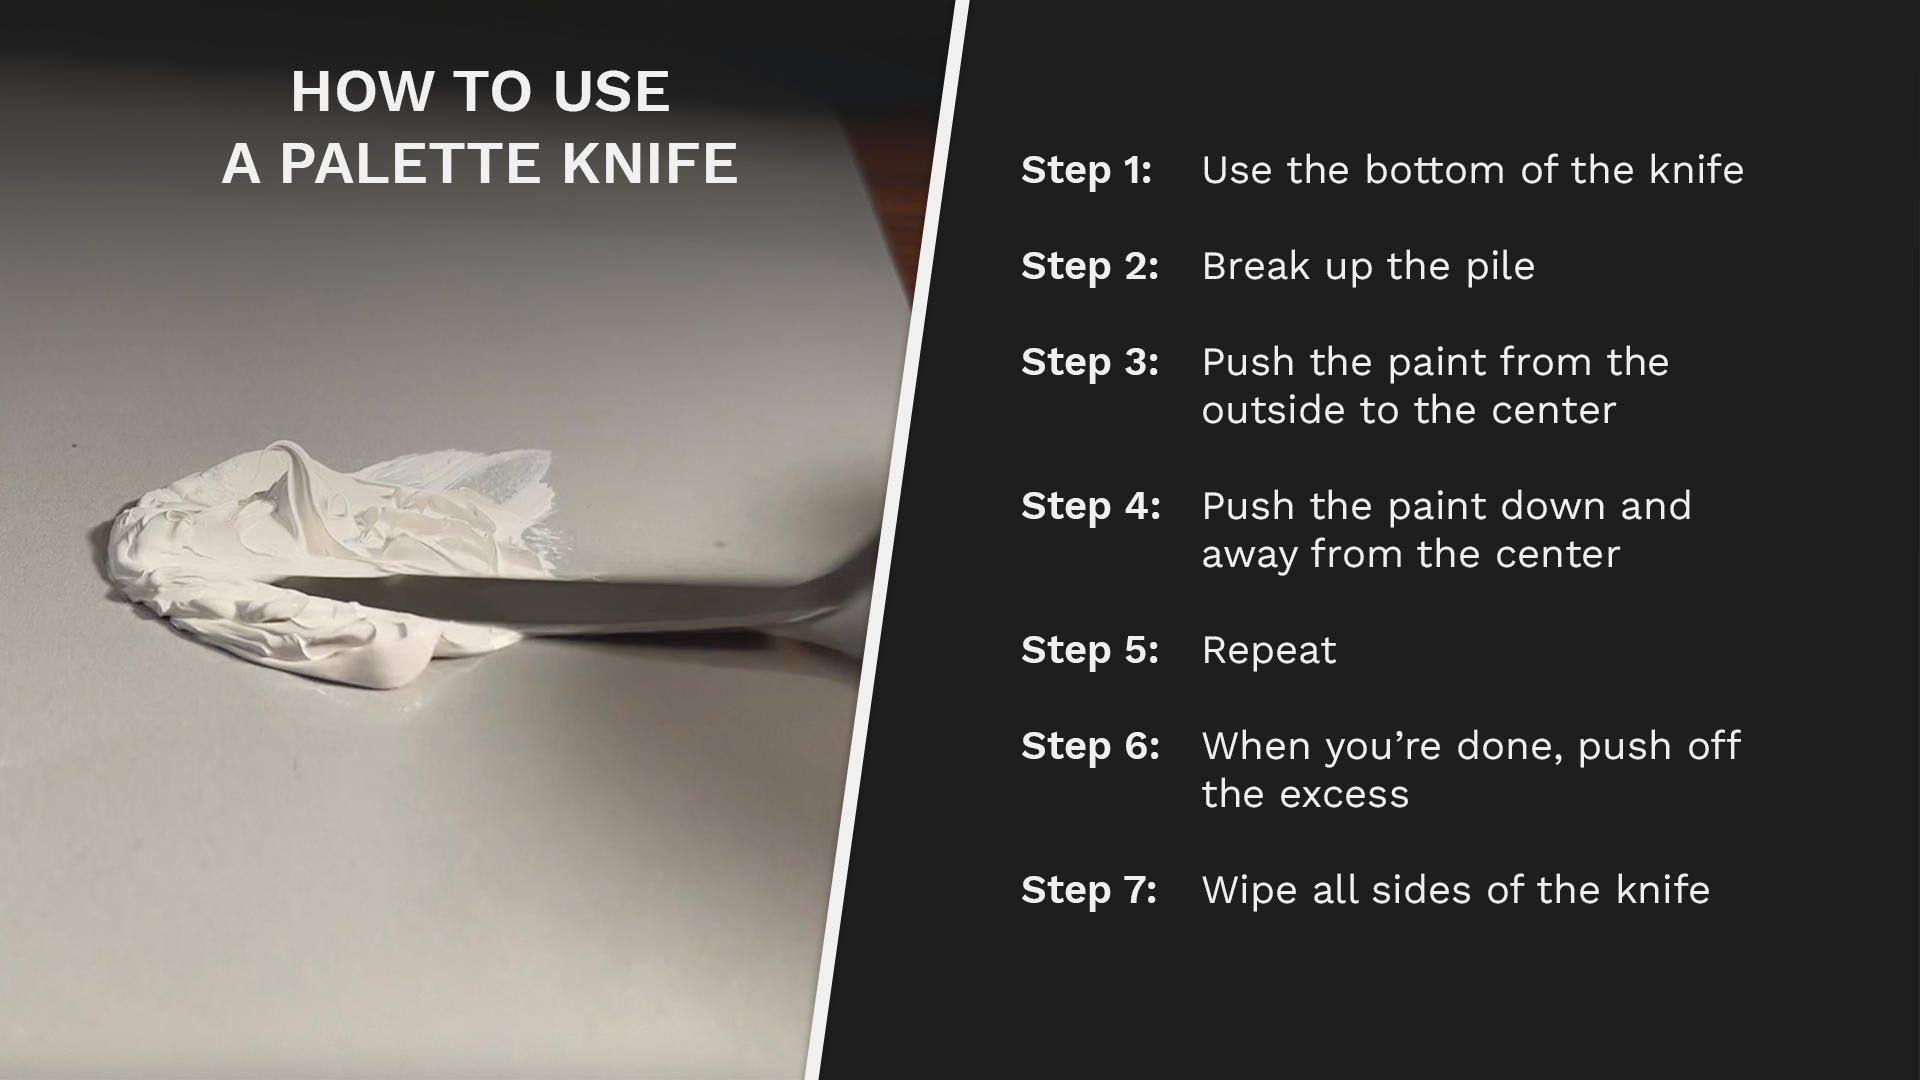
The first skill to learn in oil painting for beginners is how to use a palette knife.
The first exercise in oil painting for beginners is to learn how to mix your paint. First, you must learn how to use your palette knife. I can't overstate the value of getting familiar with your tools.
The fastest way to learn is one simple skill at a time and then to stack each skill on top of the other. So don't bite off more than you can chew, especially in the beginning. So we’ll start by learning how to use a palette knife.
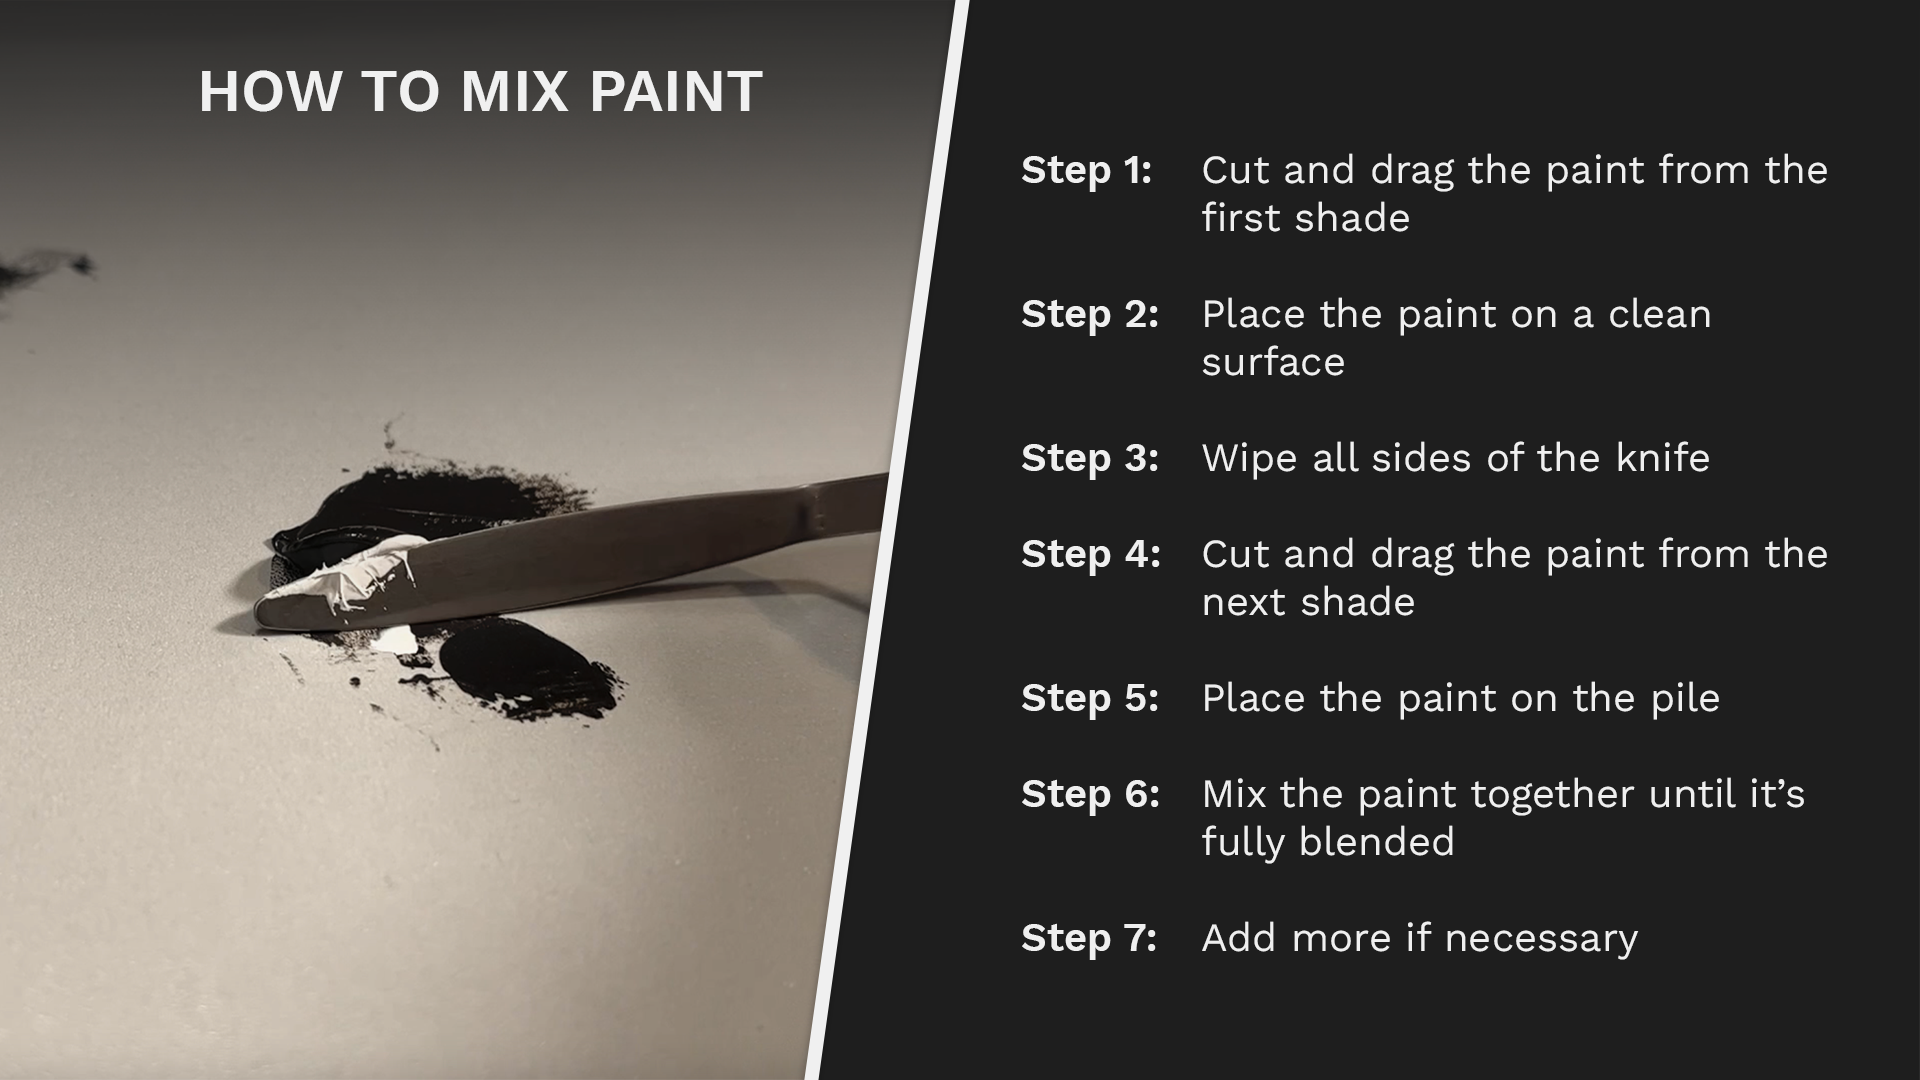
Before mixing paint together, first learn how to use your palette knife.
How to Use a Palette Knife
Step 1: Use the bottom of the knife
Step 2: Break up the pile
Step 3: Push the paint from the outside to the center
Step 4: Push the paint down and away from the center
Step 5: Repeat
Step 6: When you’re done, push off the excess
Step 7: Wipe all sides of the knife
Mixing Two Shades Together
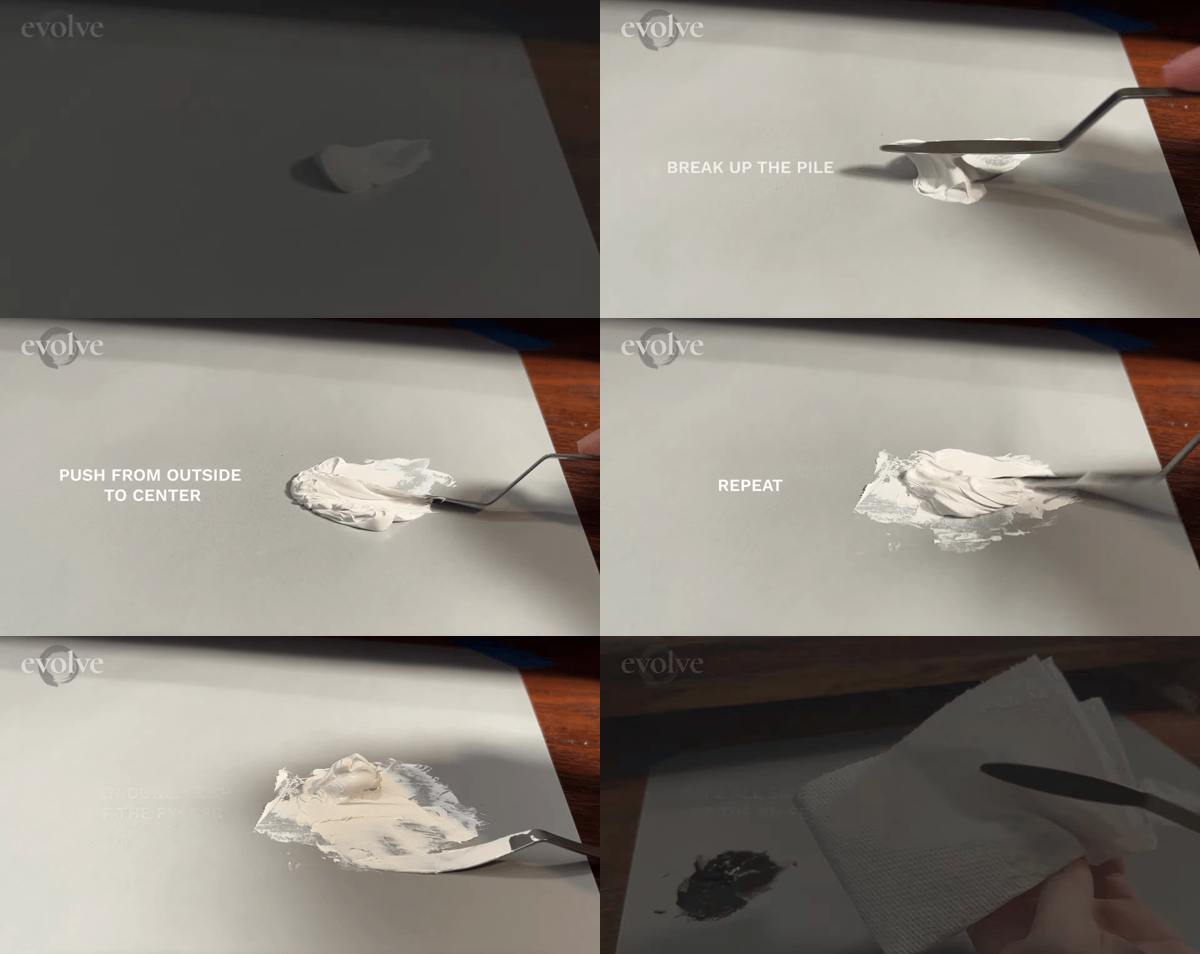
Using your palette knife, follow these simple steps to mixing two shades together.
Now let's learn how to mix two shades together. We’re going to make four piles of four shades of gray. We won’t worry about color right now because we’re only focused on our values, which are how light or dark things are.

The first exercise to master in oil painting for beginners is to learn how to mix oil paint with a palette knife.
How to Mix Oil Paint With a Palette Knife
Step 1: Cut and drag the paint from the first source shade
Step 2: Place the paint on a clean surface
Step 3: Wipe all sides of the knife
Step 4: Cut and drag the paint from the next source shade
Step 5: Place the paint on the pile
Step 6: Mix the paint together until it’s fully blended
Step 7: Add more if necessary

At Evolve Artist, we start by using only four shades which should match numbers 2, 4, 6, and 8 on a 10-value scale.
We'll be using only four values from dark to light because any more will overcomplicate the process. You'll see later on how we're going to use these same four values to make our first realistic painting.
At Evolve Artist, we believe that a true education should give the right information at the right time. With too much information it can get overwhelming. By taking it step-by-step, we prevent jumping ahead into something that we’re not ready for. Learning takes time.
Exercise #2: 3 Brush Strokes for Oil Painting for Beginners
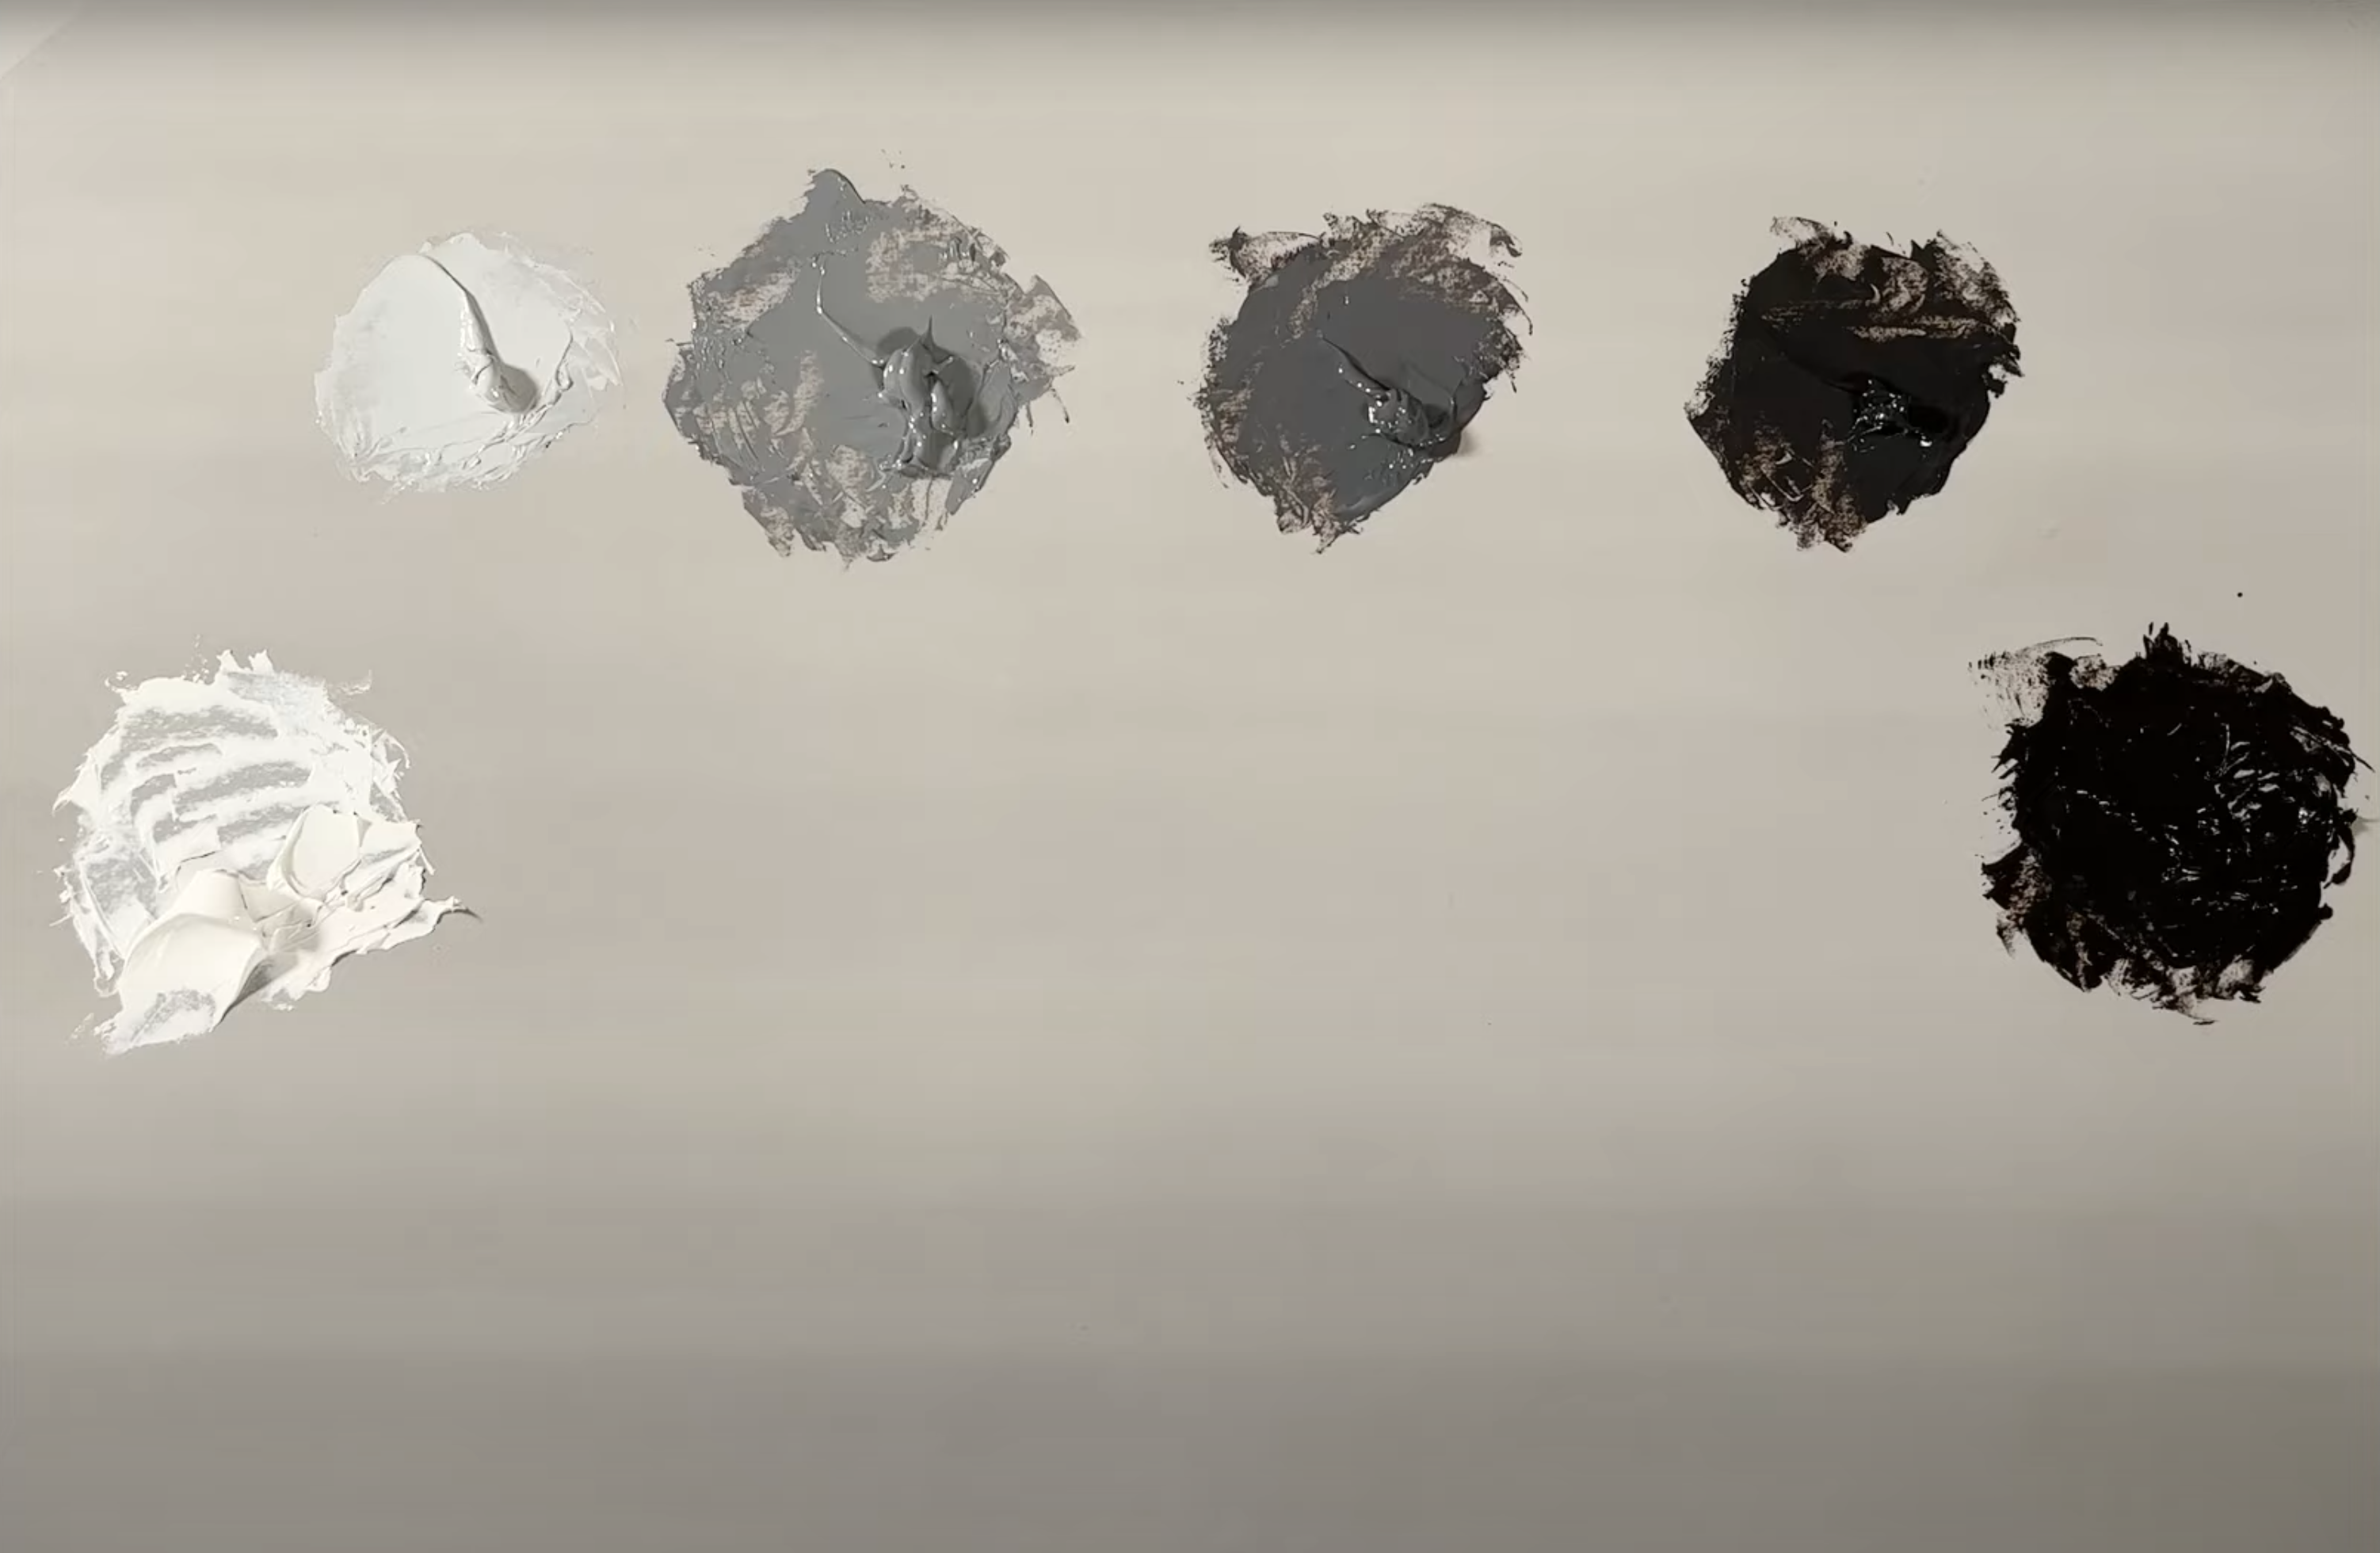
Your palette should now look like this: with four shades mixed from white and black.
Now that we have our four shades mixed, we can learn how to use a brush. We'll do that by painting some squares. Think squares are way too easy? Good. Your victory will build your confidence.
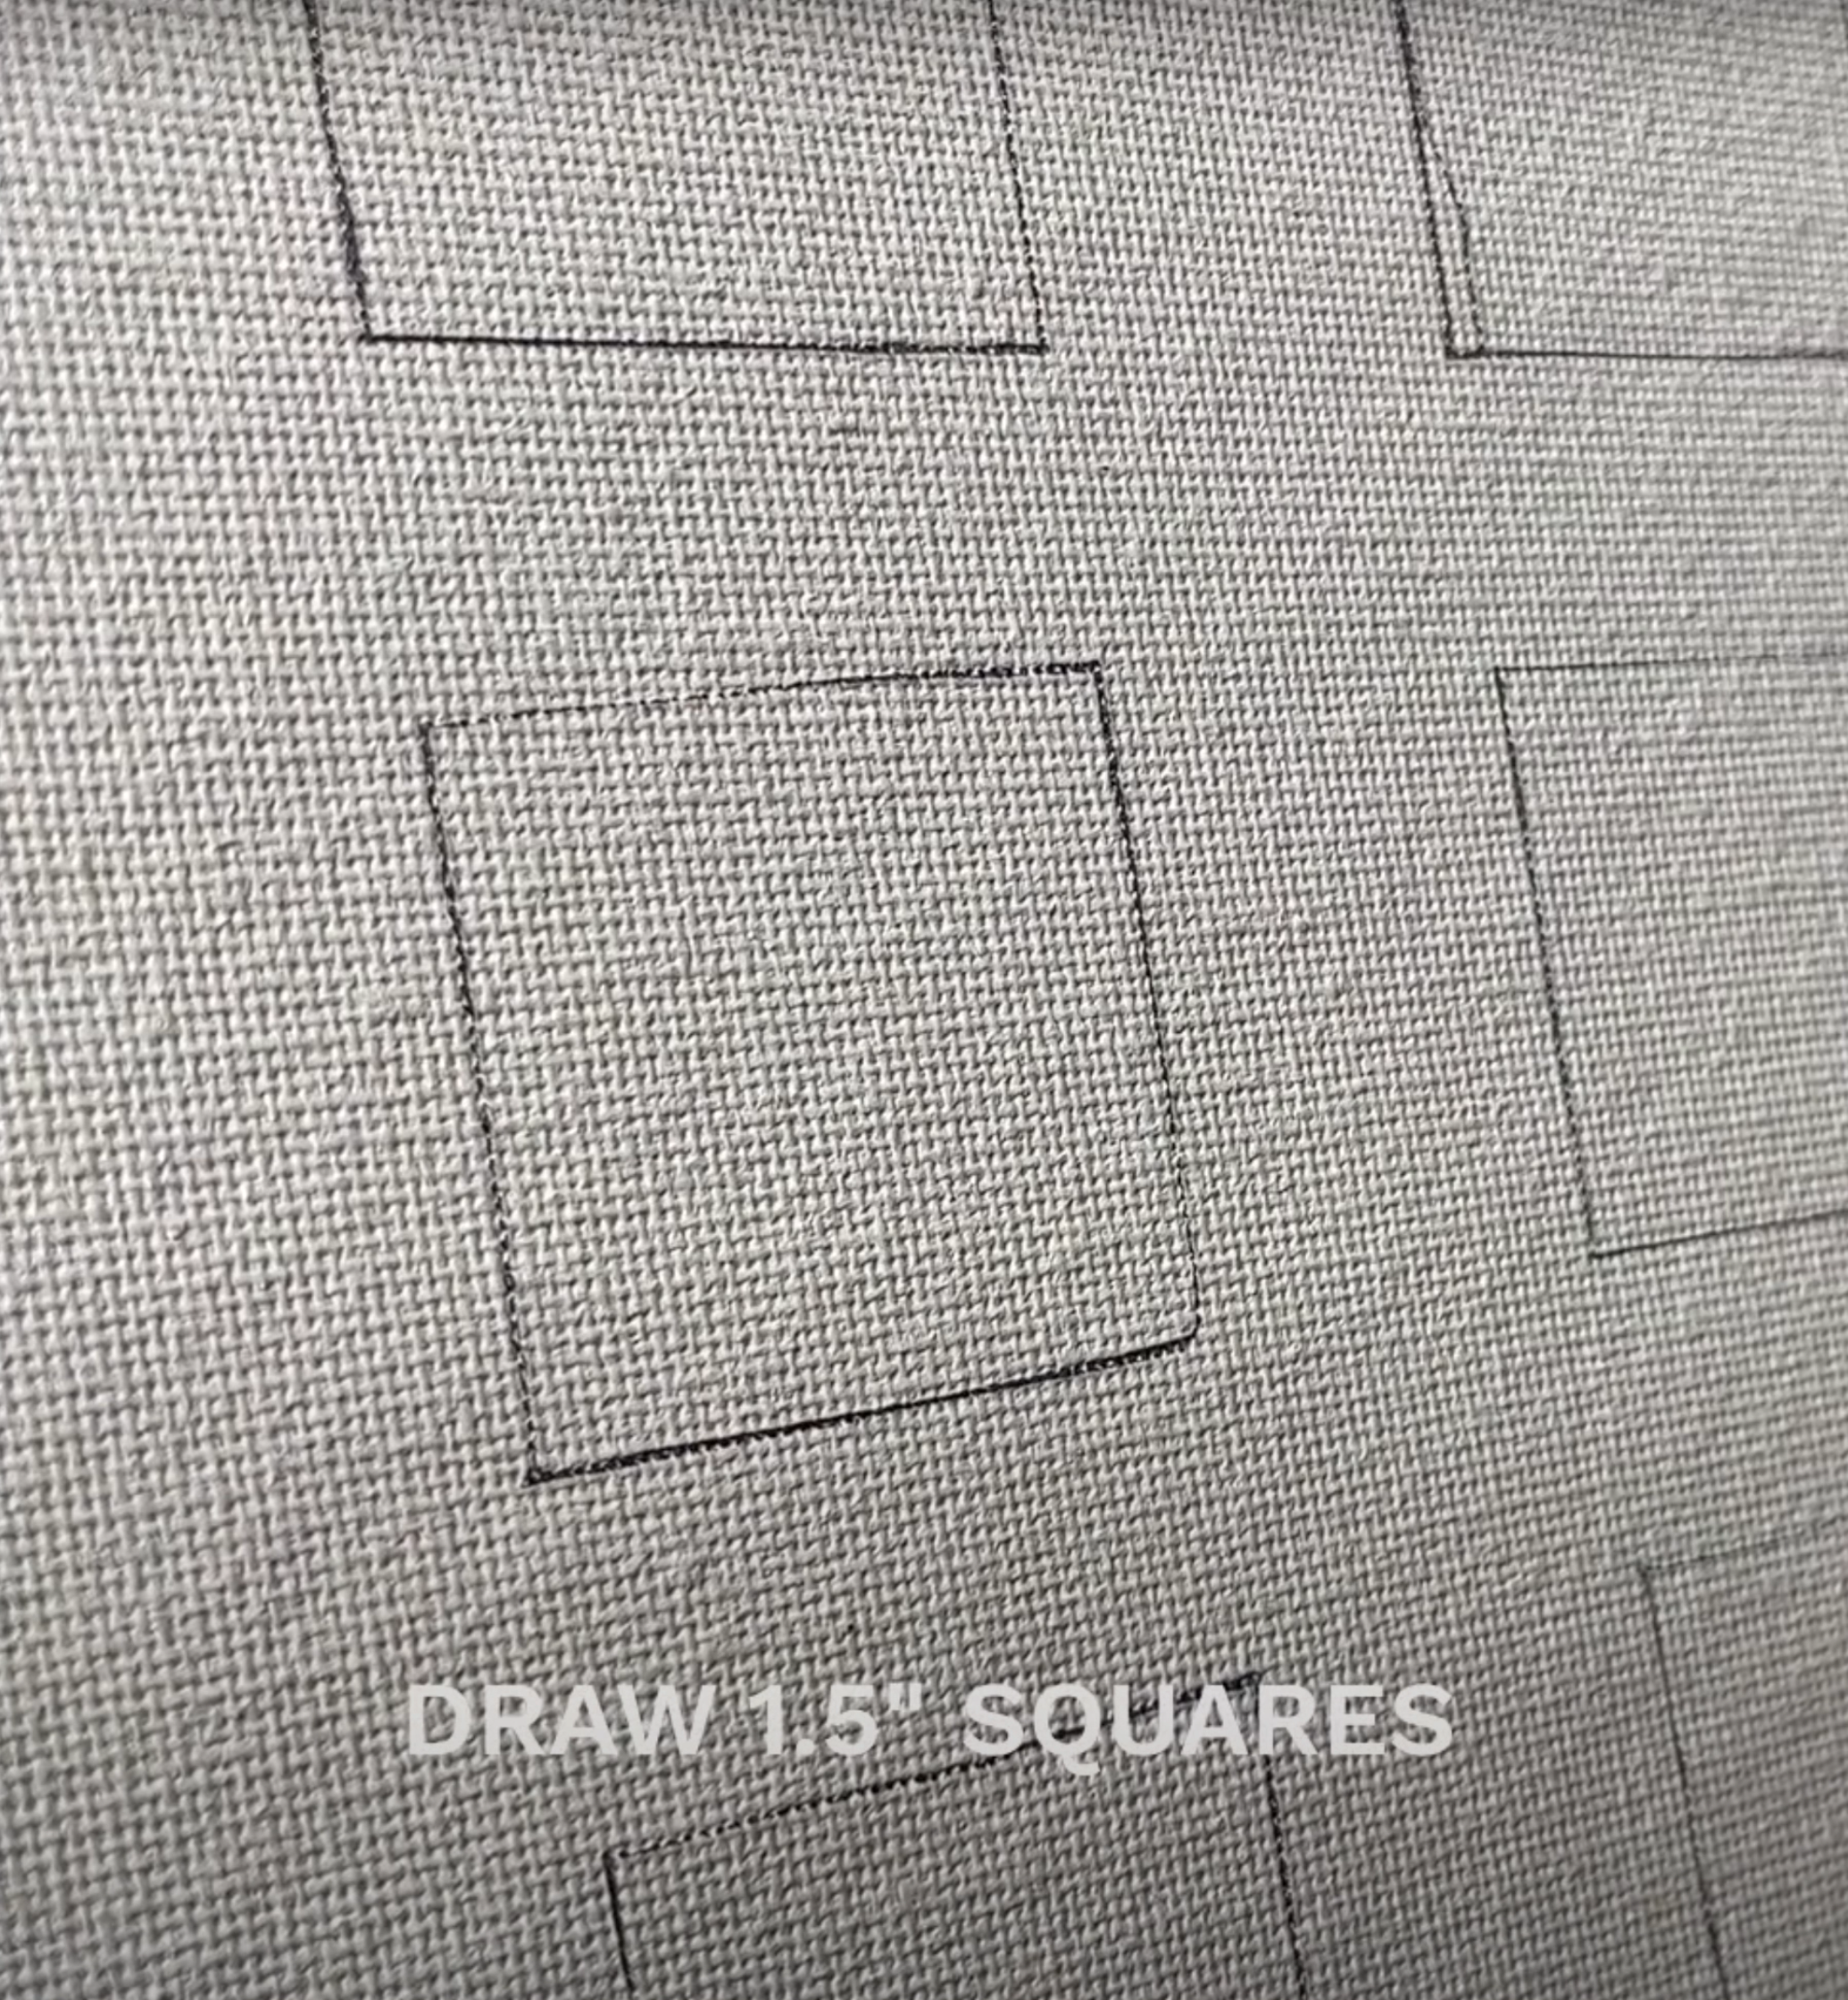
To practice the three brush strokes, set up your canvas by drawing 1.5 inch squares.
How to Put Paint on a Brush from a Palette
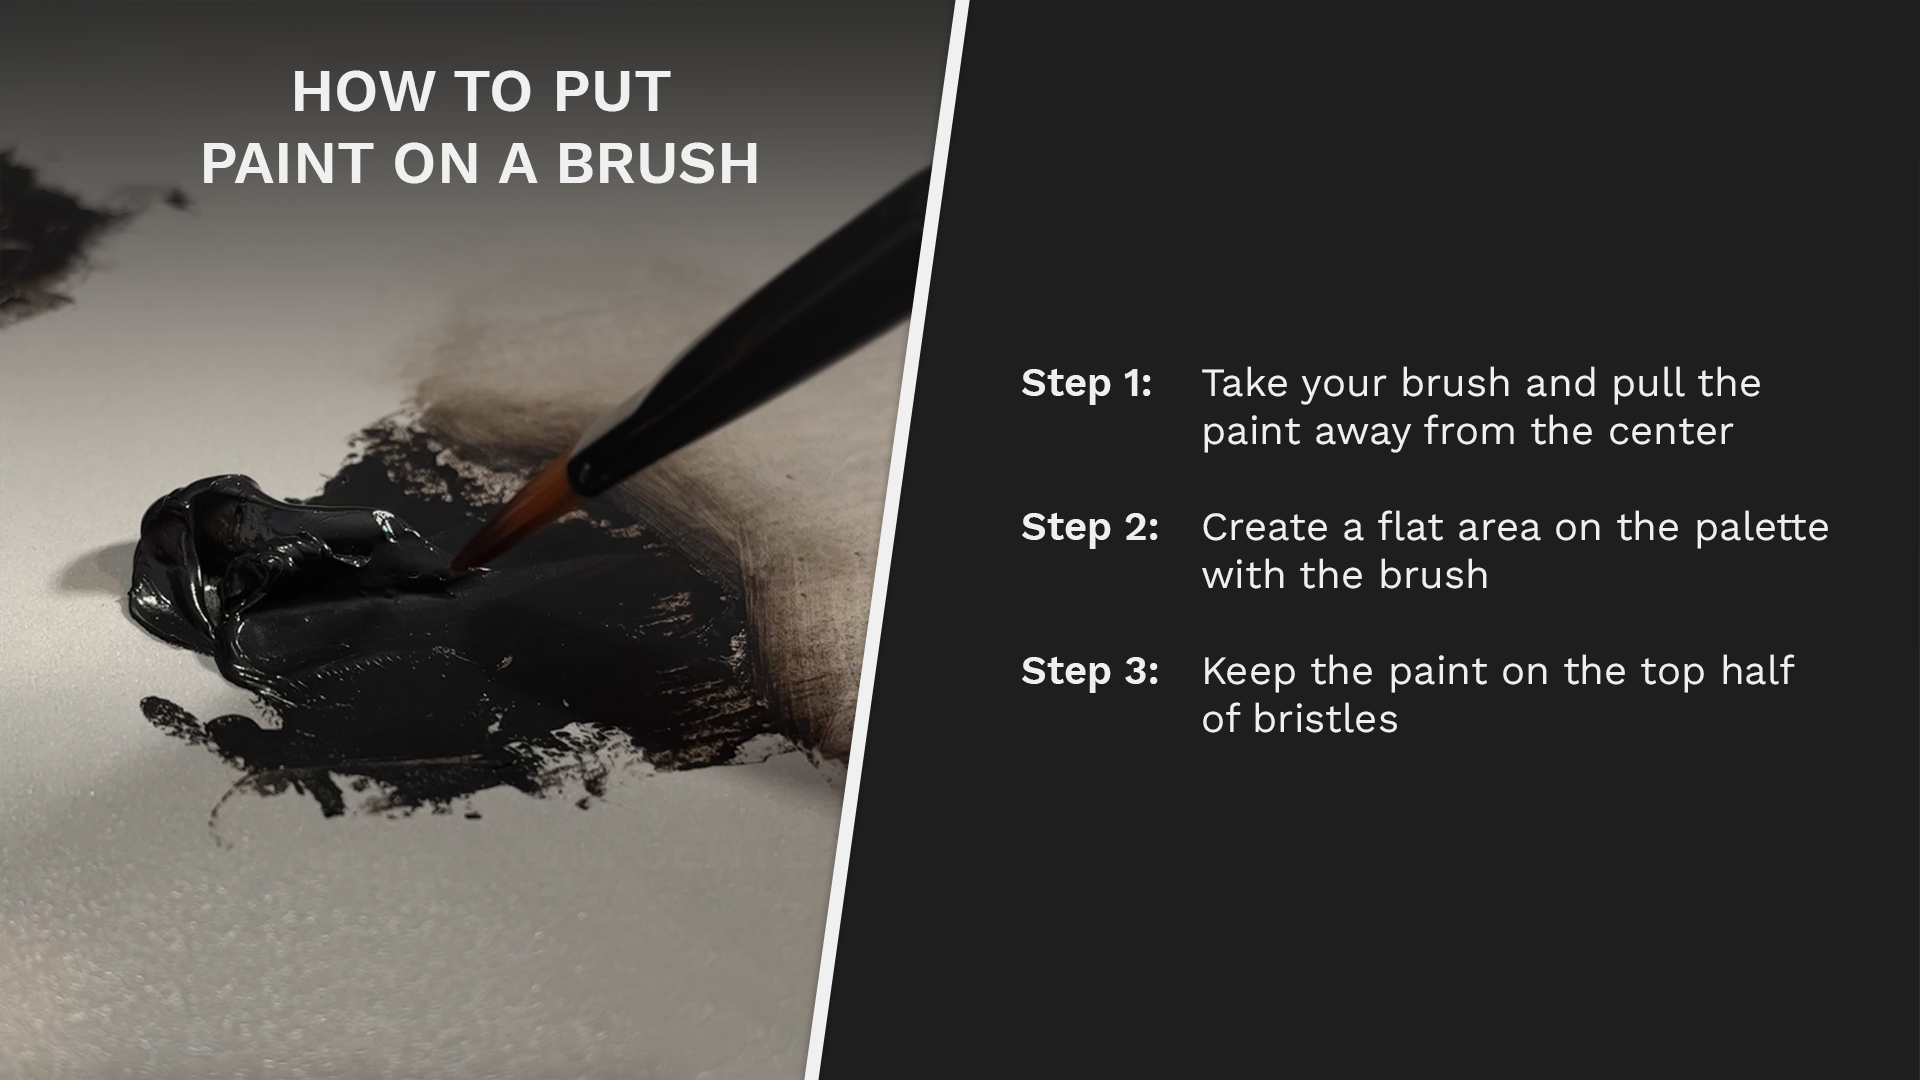
Even learning how to put paint on your brush is a skill to master when learning oil painting for beginners.
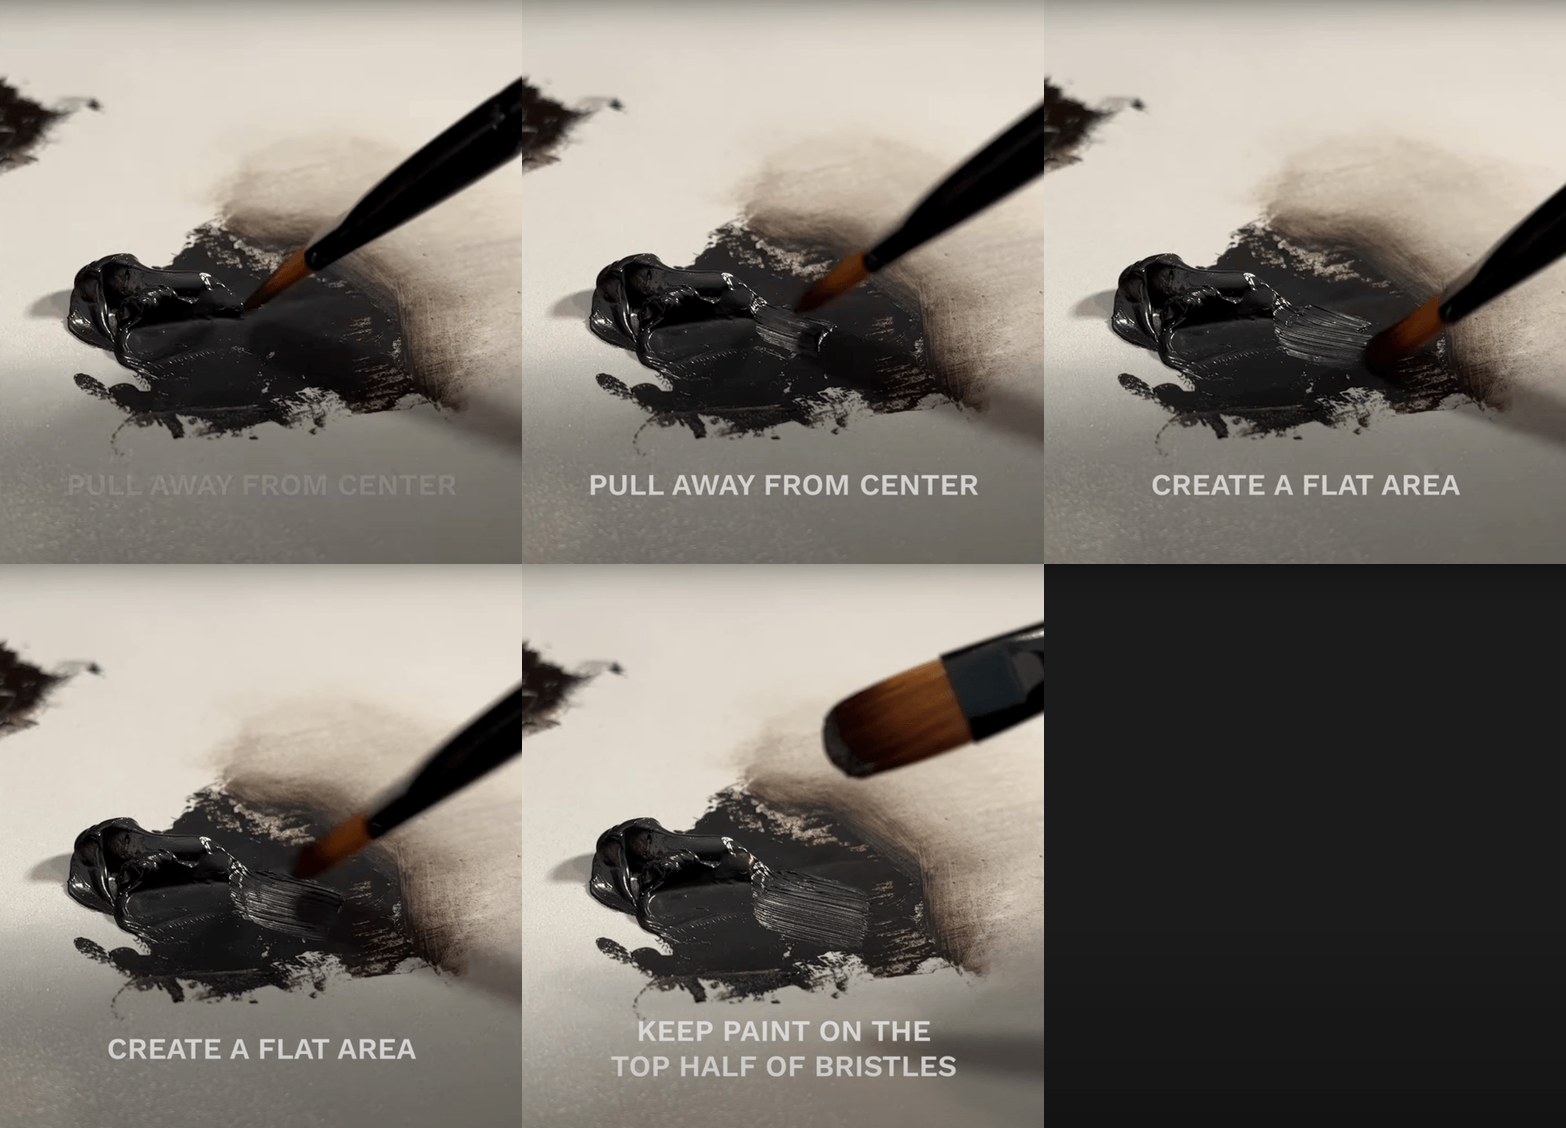
Before you begin your brush strokes, first learn how to put paint on your brush.
Step 1: Take your brush and pull the paint away from the center
Step 2: Create a flat area on the palette with the brush
Step 3: Keep the paint on the top half of bristles
Often, people get intimidated by oils because they aren't taking the time to get the basic things right (Click HERE to read more about oil painting myths). Think about how many times in a given painting that you take paint from the palette and put the paint onto the canvas. It's countless, right?
If you follow these steps one at a time, it becomes simple and easy, and you'll learn to avoid a host of problems, such as contaminated paint, spotty coverage, messy workspaces, and so much more. By taking the time to learn how to use a brush, you are developing good habits without picking up any of the bad ones.
With these three brush strokes, you can fill in just about any shape.
How to Use Brush Stroke #1
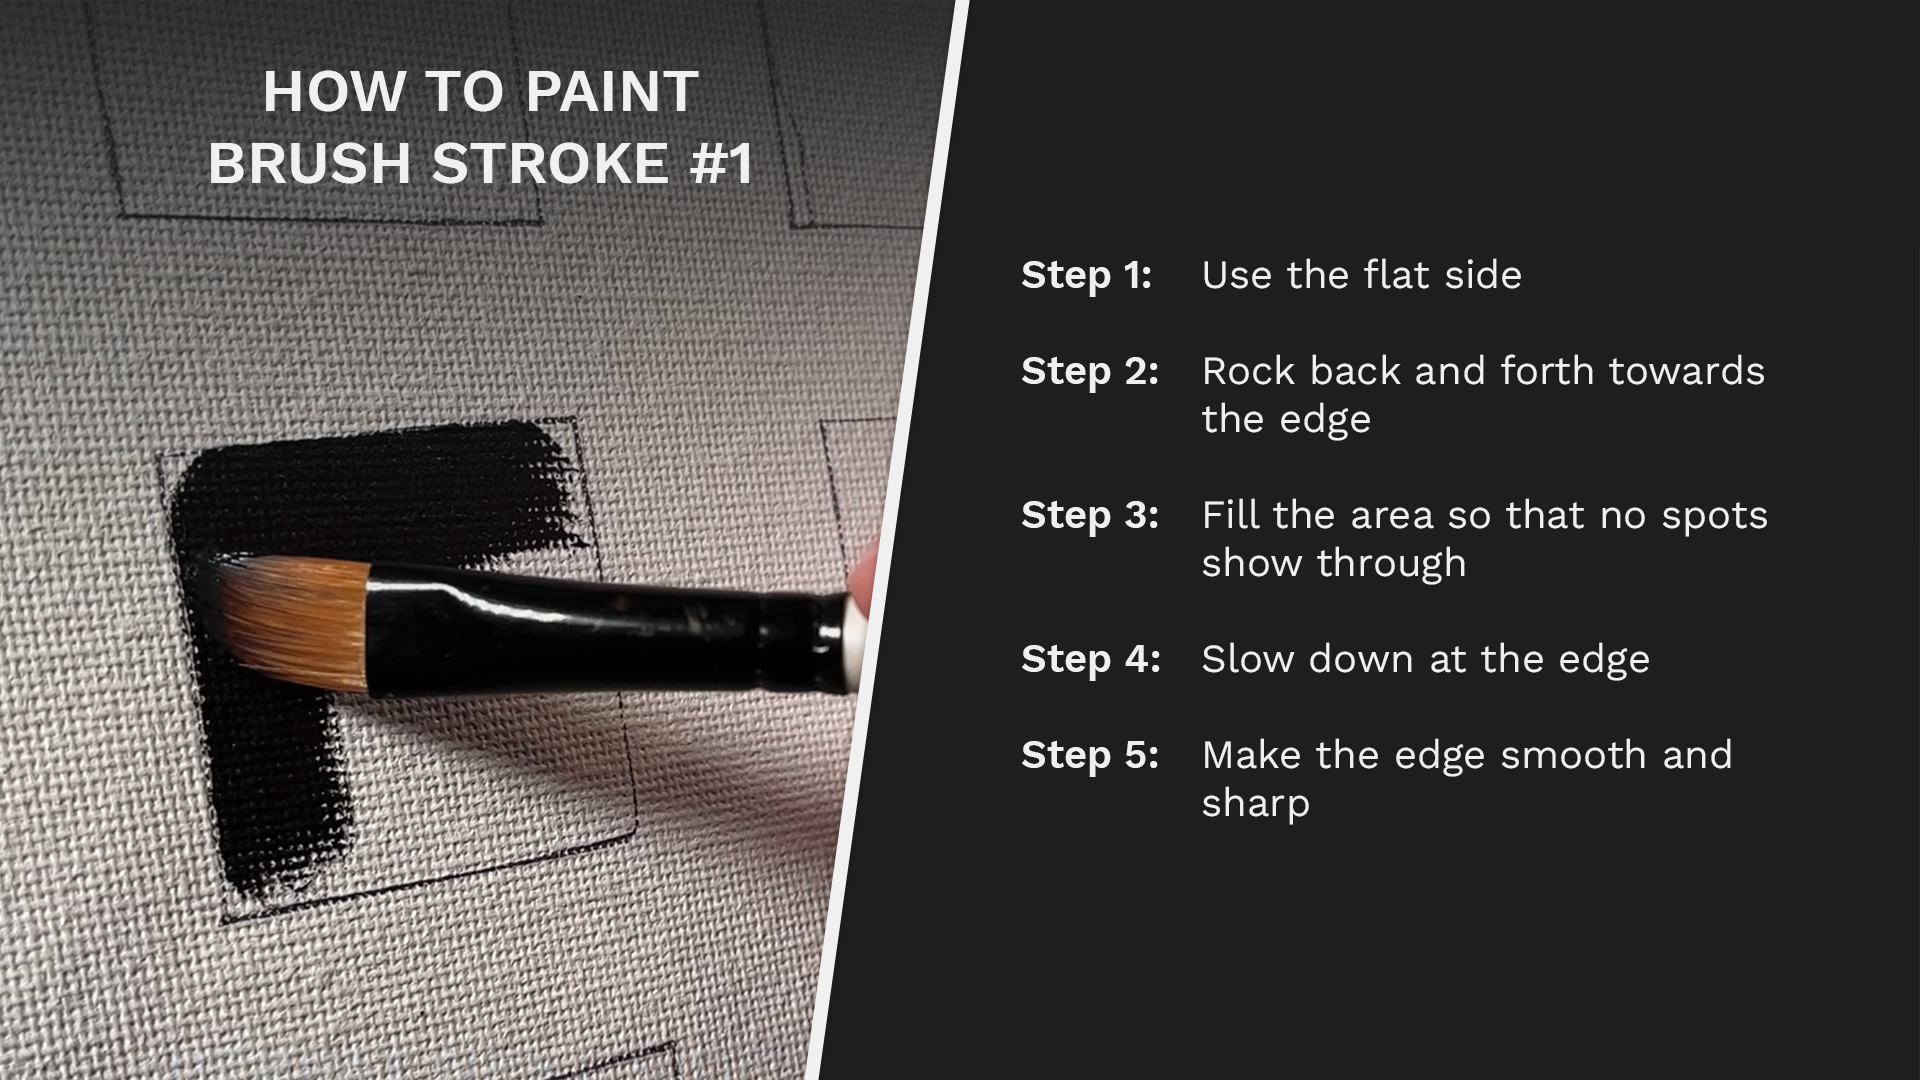
Follow these 5 steps to learn how tp paint Brush Stroke #1.
Brush Stroke #1 uses the flat side of the brush and rocks back and forth towards an edge.
Step 1: Use the flat side
Step 2: Rock back and forth towards the edge
Step 3: Fill the area so that no spots show through
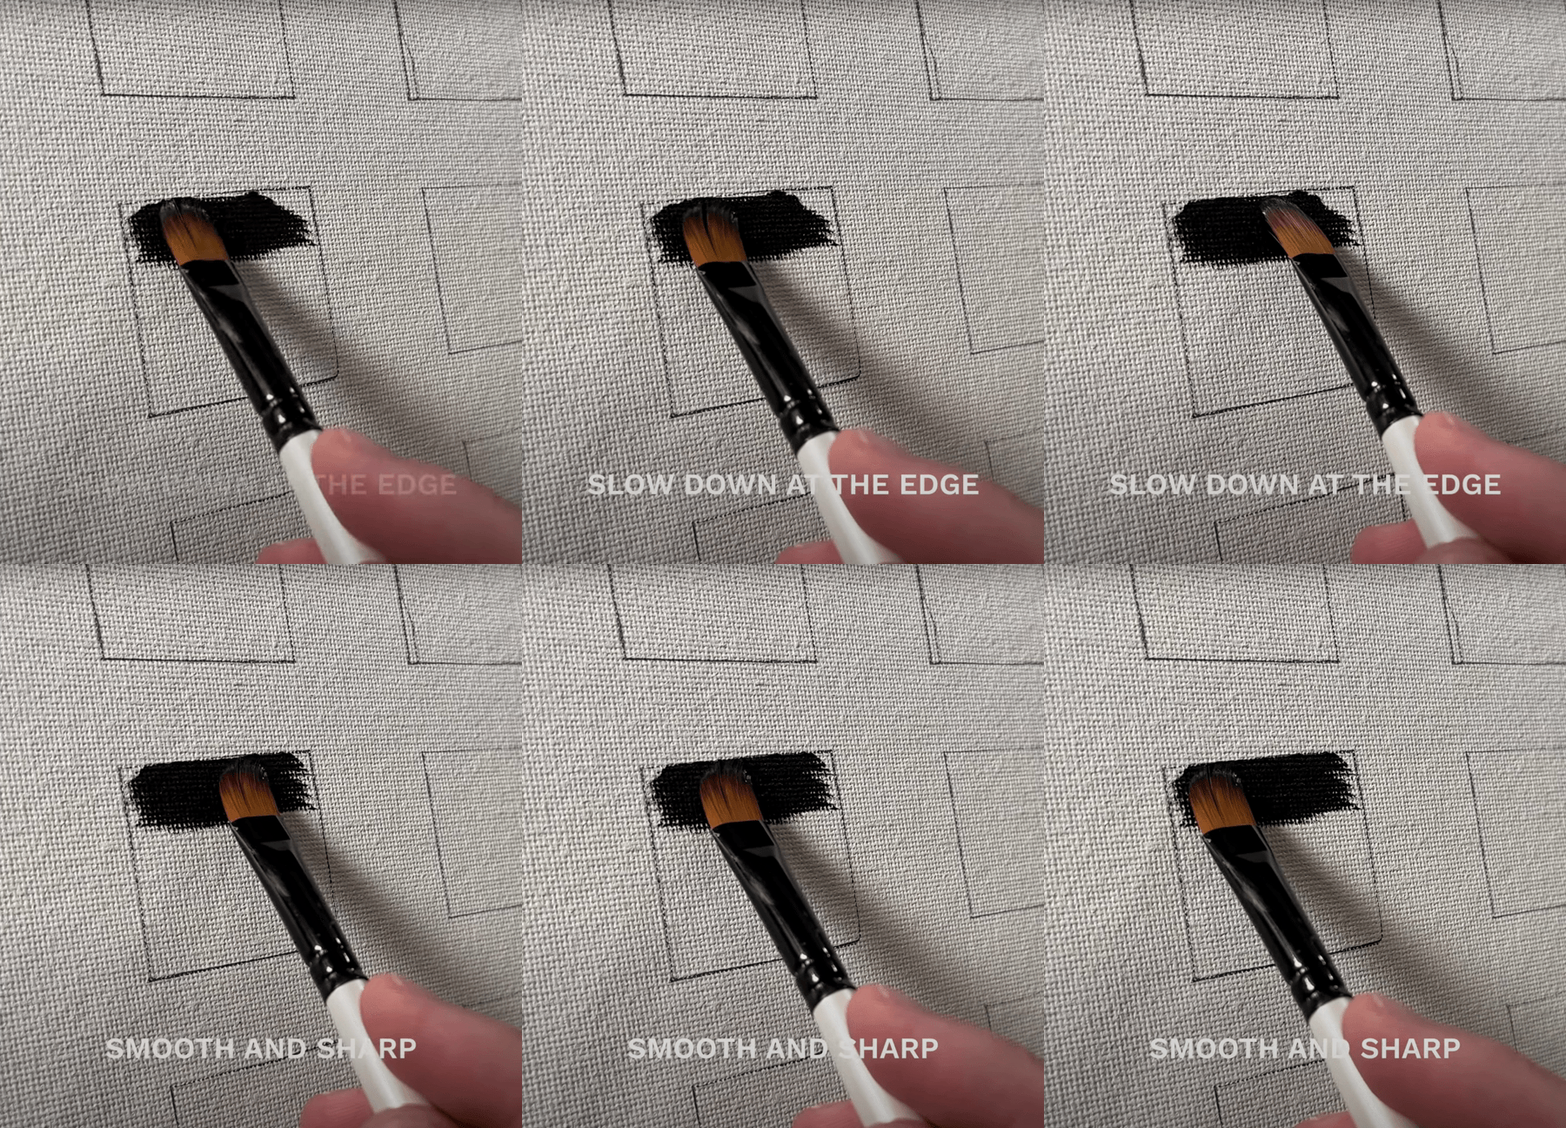
Brush Stroke #1 allows for smooth and sharp edges when painting.
Step 4: Slow down at the edge
Step 5: Make the edge smooth and sharp
Repeat Brush Stroke #1 on all edges.
Step 6: Get more paint
Step 7: Repeat the next side
Step 8: Get more paint
Step 9: Rotate the canvas
Step 10: Repeat the next side
How to Use Brush Stroke #2
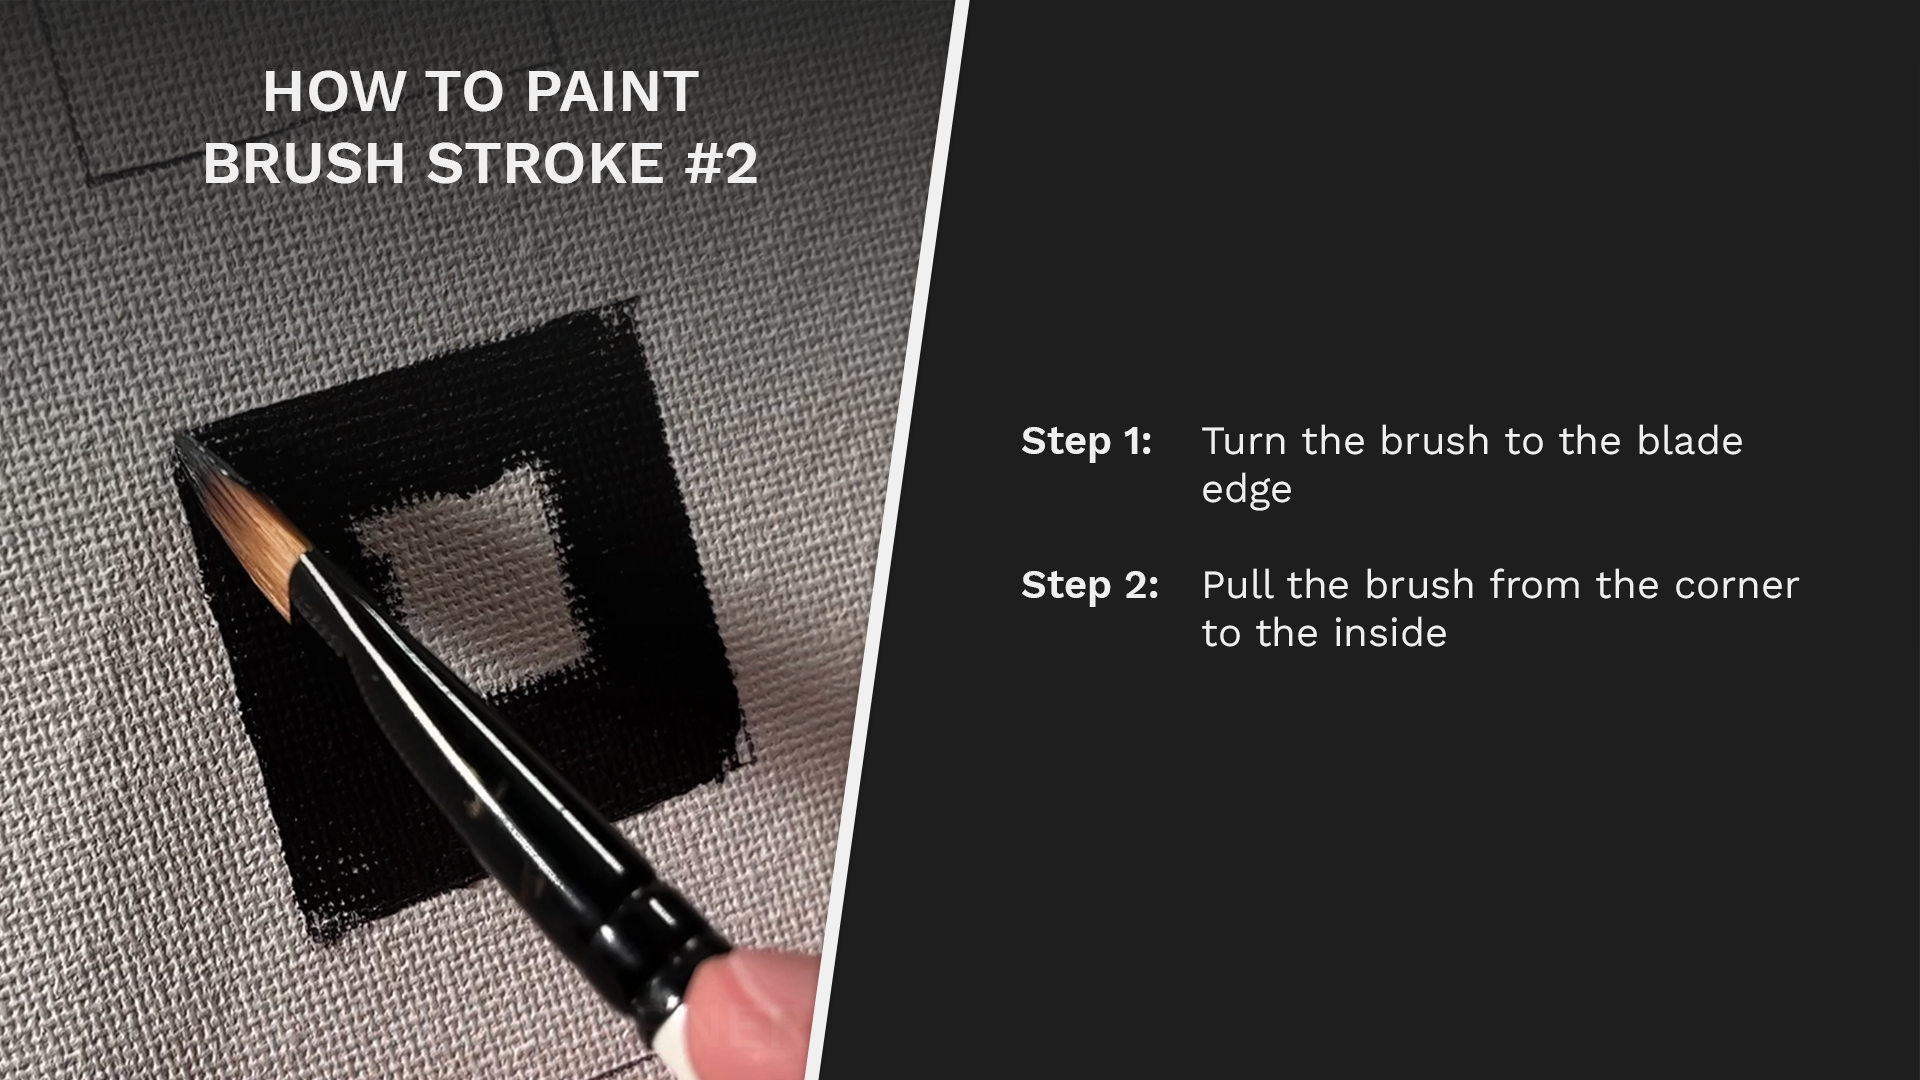
Learn Brush Stroke #2 in two simple steps using the blade edge to paint.
Brush Stroke #2 uses the blade edge to paint.
Step 1: Turn the brush to the blade edge
Step 2: Pull the brush from the corner to the inside
Step 3: Get more paint
Step 4: Repeat the next corner
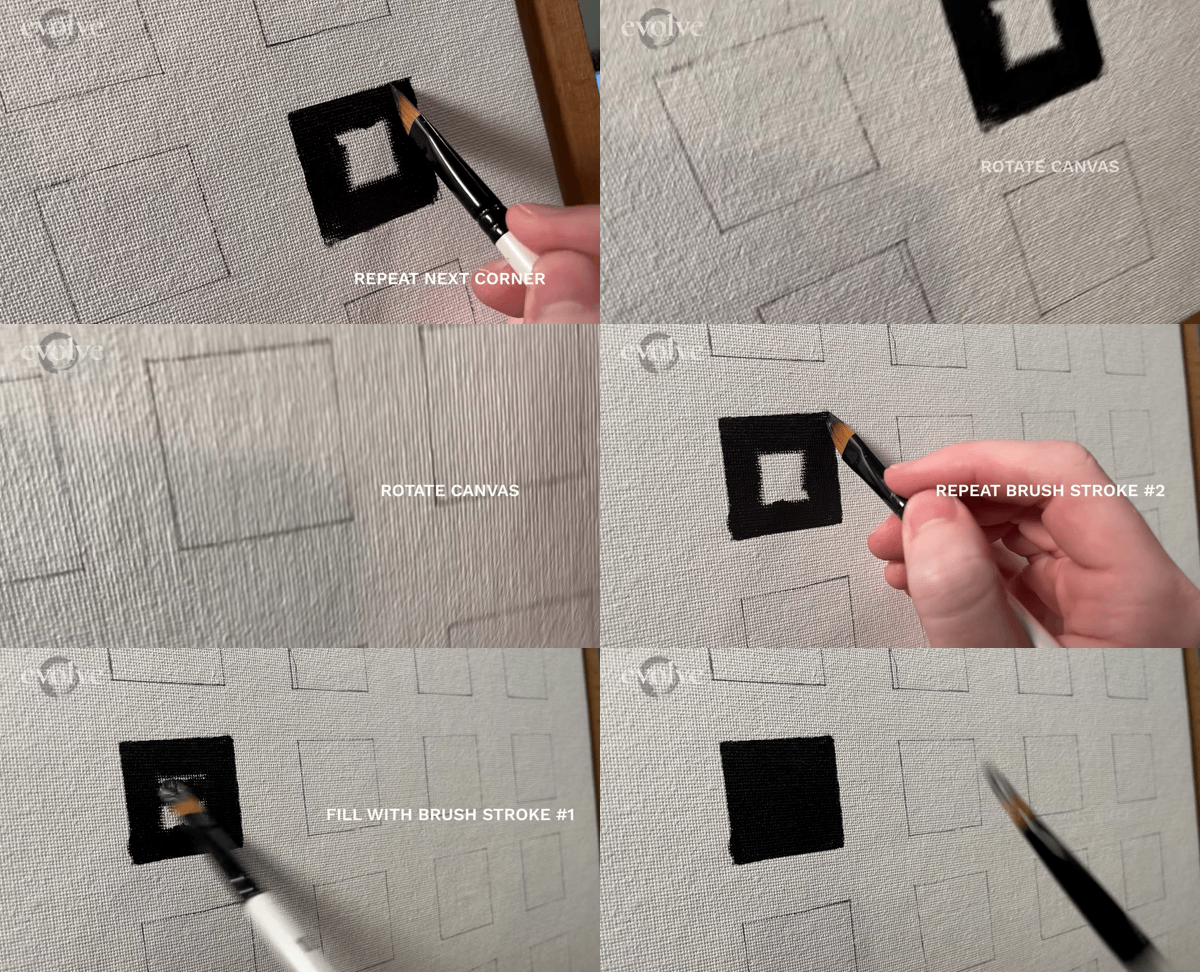
Brush Stroke #2 is effective in painting corners.
Step 5: Rotate the canvas
Step 6: Repeat brush stroke #2 on each corner
Step 7: Fill the square with brush stroke #1
How to Use Brush Stroke #3
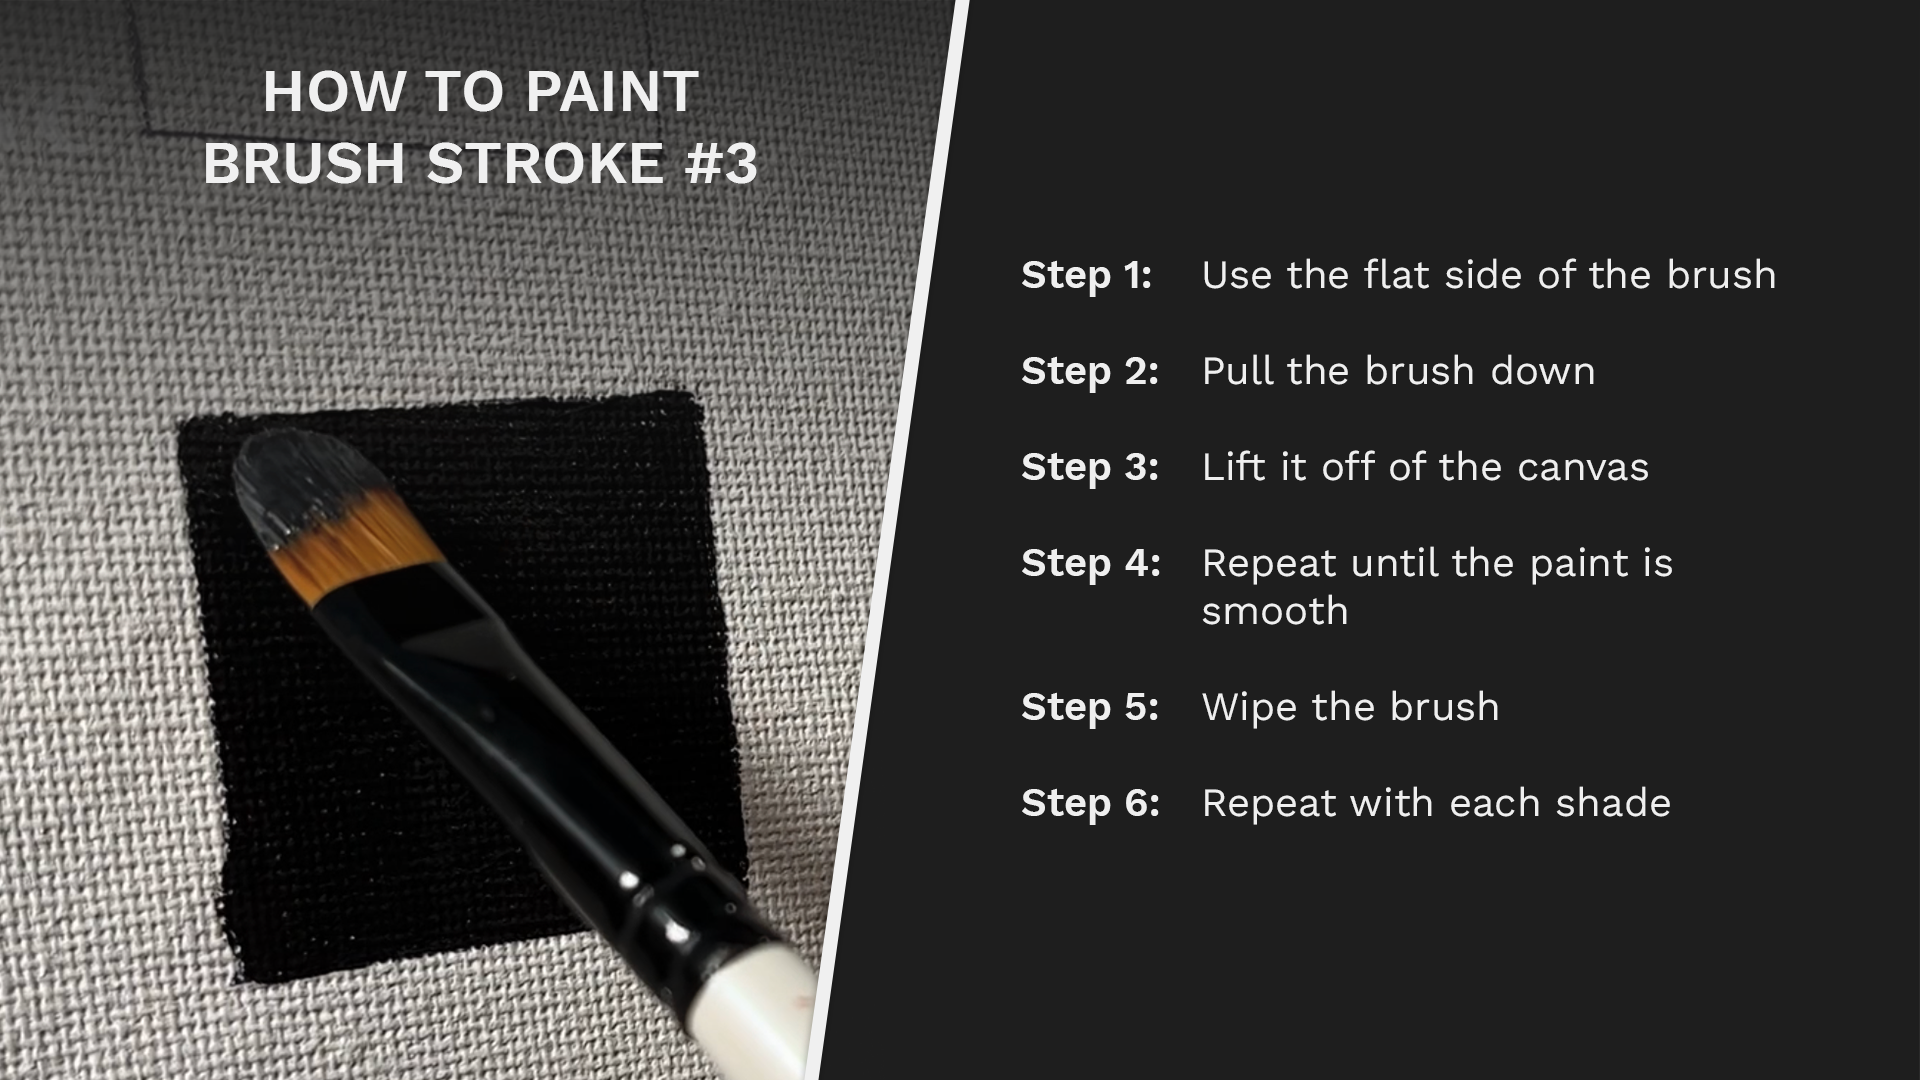
Use these 6 steps to learn Brush Stroke #3 and make your painting smooth.
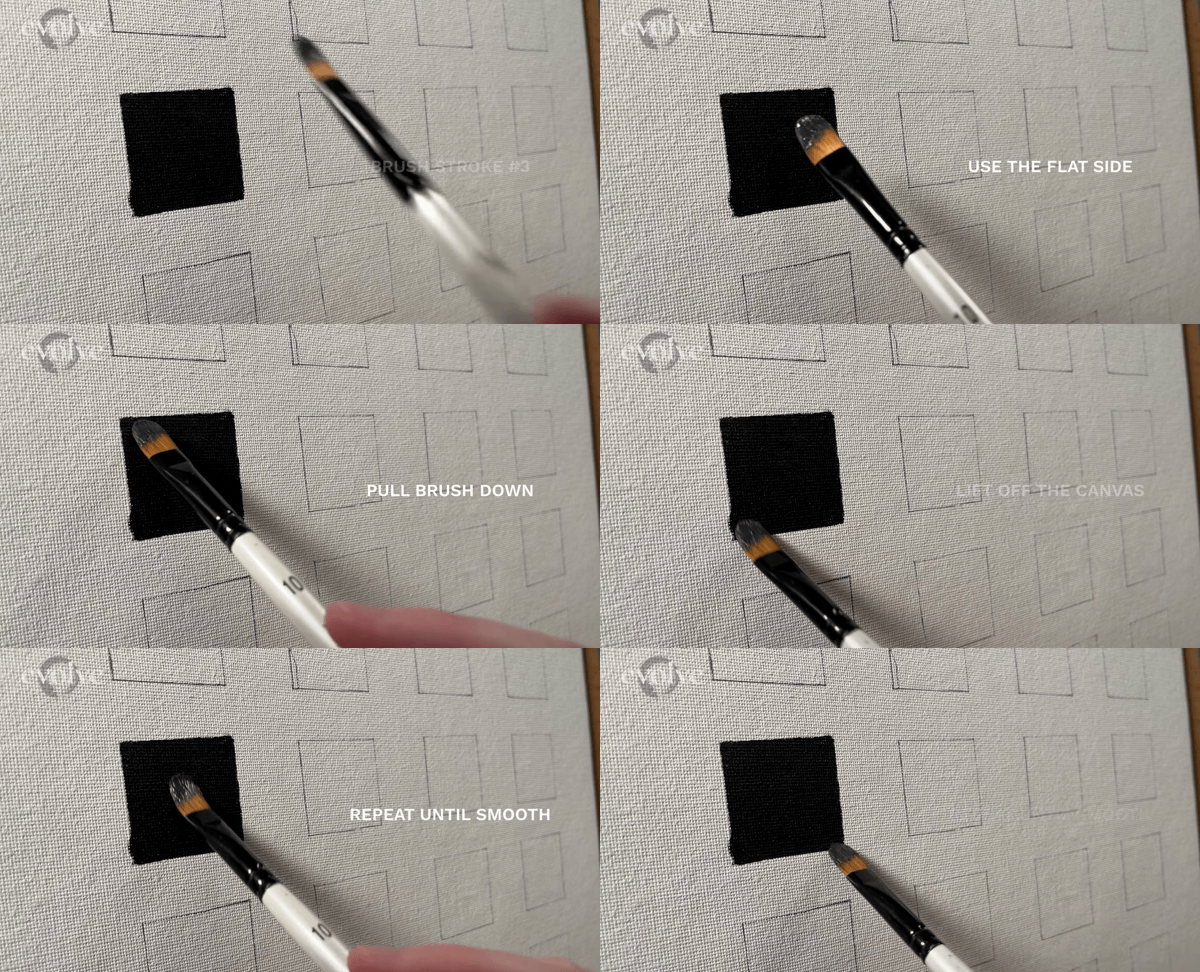
Brush Stroke #3 uses the flat side of the brush and has a pull and lift motion.
Step 1: Use the flat side of the brush
Step 2: Pull the brush down
Step 3: Lift it off of the canvas
Step 4: Repeat until the paint is smooth
Step 5: Wipe the brush
Step 6: Repeat with each shade
Exercise #3: How to Paint Gradients in Oil Painting for Beginners
If you thought the squares were easy, here is more of a challenge: painting gradients. Once you learn this, you will have the basic brush skills required to make realistic paintings. So take this exercise seriously and try to make the smoothest gradients possible.
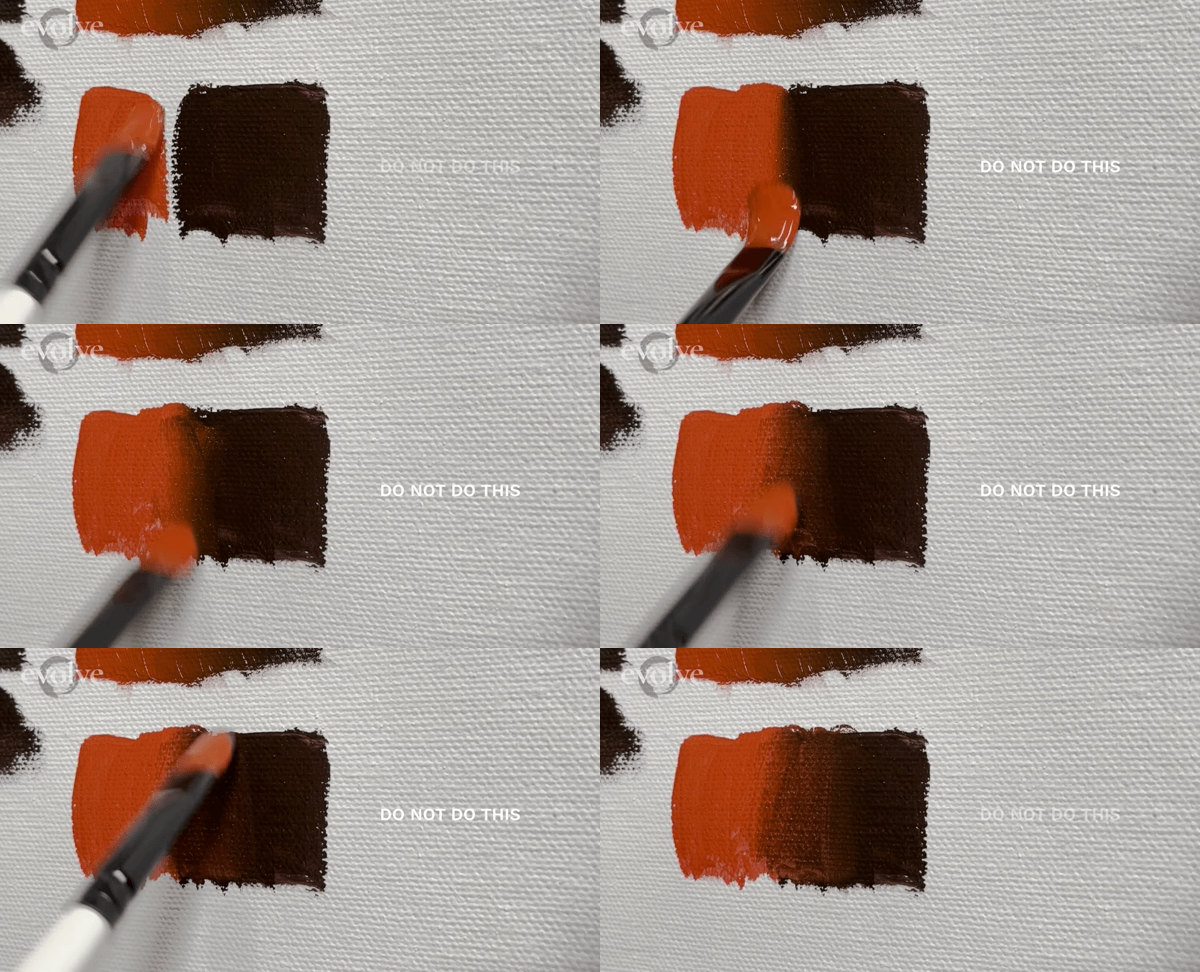
Do not simply rub two shades together to create gradients. Brush strokes should add paint and not just push it around.
When it comes to learning oil painting for beginners, it's tempting to just put two shades next to each other and then rub the brush back and forth to blend them together. But please do not do this. You’ll be setting yourself up for failure. This is because when you get into color and more detailed work, you’ll want to make sure that your brushstrokes are adding paint, not just pushing it around.
How to Paint a Gradient
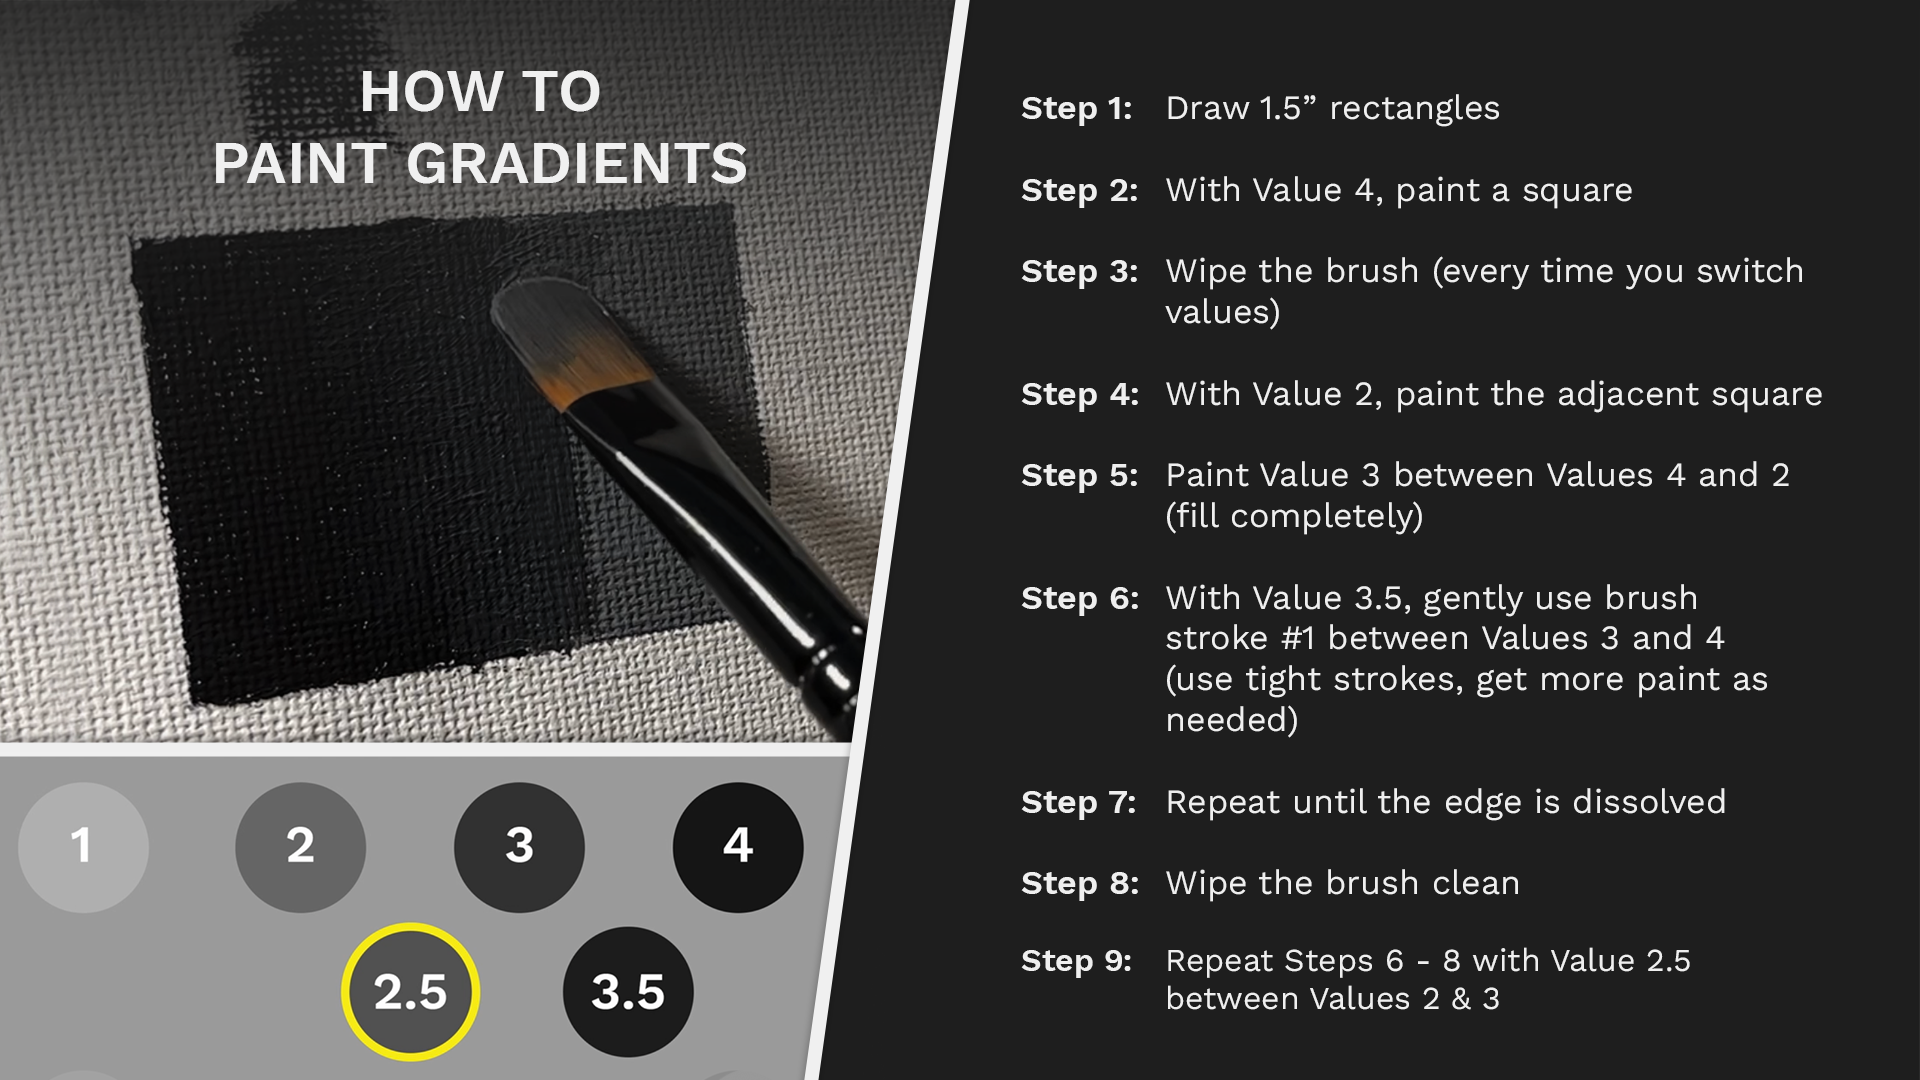
Follow these steps to learn how to make smooth gradients using oil paints.

Use more than two values to create a gradient effectively.
Step 1: Draw 1.5” Rectangles
Step 2: With value 4, paint a square
Step 3: Wipe the brush every time you switch values
Step 4: With value 2, paint the adjacent square
Step 5: Paint value 3 between values 4 and 2
Step 6: Fill completely
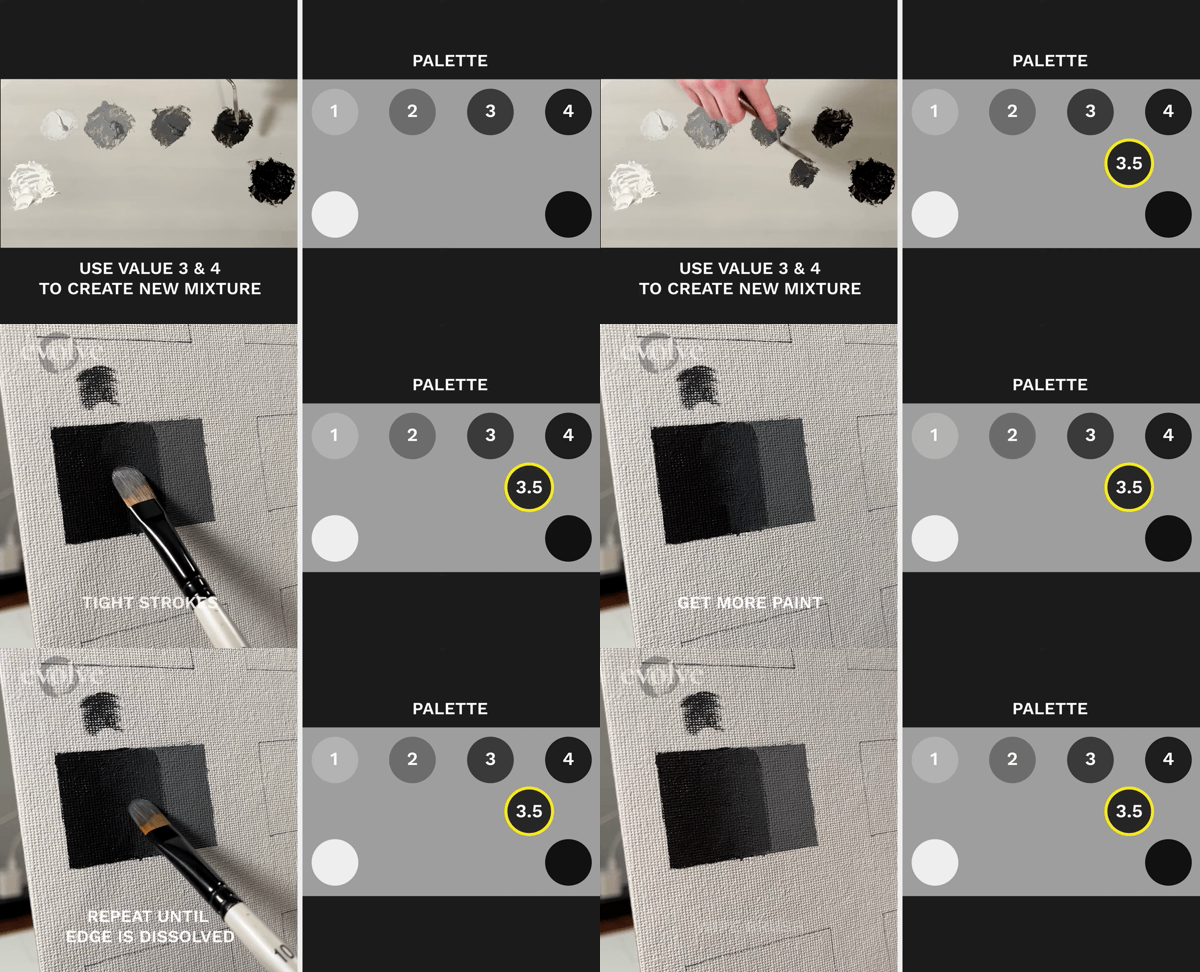
To make your gradient as smooth as possible, create a new mixture, value 3.5, by using values 3 and 4 and mixing them together.
Step 7: Use value 3 and 4 to create a new mixture: value 3.5
Step 8: With value 3.5, gently use brush stroke #1 between values 3 and 4
Step 9: Use tight strokes
Step 10: Get more paint
Step 11: Continue gently using brush stroke #1
Step 12: Repeat until the edge is dissolved
Step 13: Wipe the brush clean
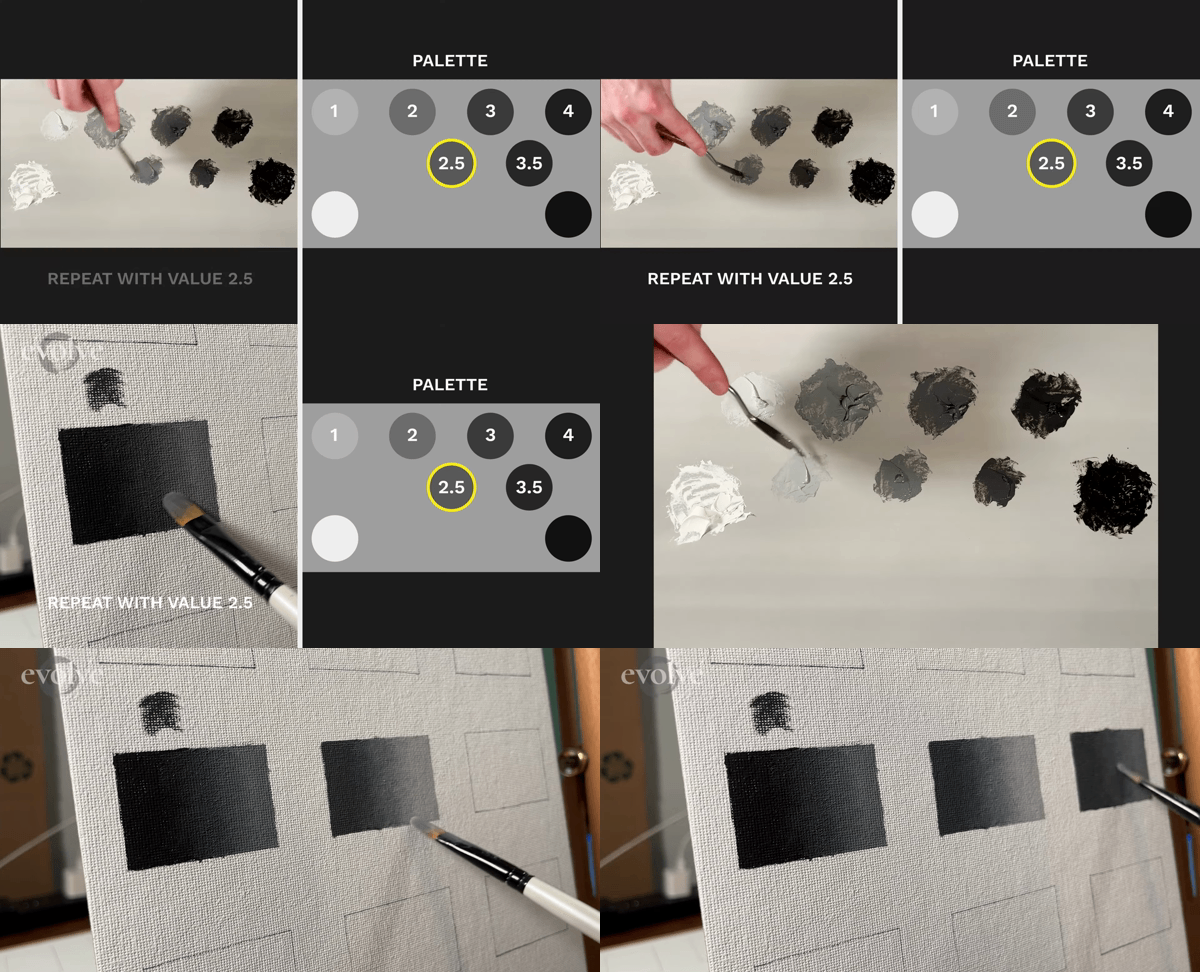
Create a new mixture, value 2.5, to make the gradient between the values 2 and 3 more smooth.
Step 14: Repeat by use value 2 and 3 to create a new mixture: value 2.5
Step 15: With value 2.5, gently use brush stroke #1 between values 2 and 3
Step 16: Use tight strokes
Step 17: Get more paint
Step 18: Continue gently using brush stroke #1
Step 19: Repeat until the edge is dissolved
Step 20: Wipe the brush clean
Easy Realistic Walkthrough in Oil Painting for Beginners
At this point in your tutorial for oil painting for beginners, I’ve shown you how to mix paint with a palette knife, how to use the three brush strokes for painting any shape, and how to create sharp and soft edges. Now, we just need to know how to utilize these tools in a process for making paintings. This process works for any subject matter, so follow closely. Here we go.
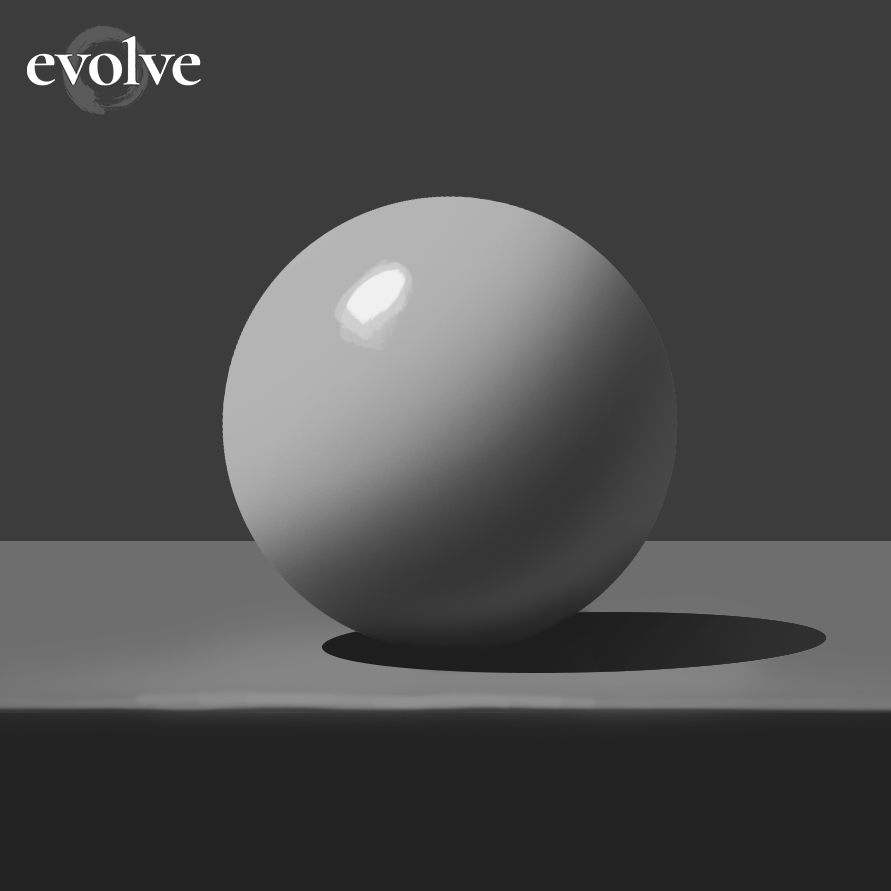
An important tip for oil painting for beginners is to use a quality reference that has clear light and shadow.
Before we start, we need to make sure that we are using a quality reference that has clear light and shadow. I’ll be using this image which you can also DOWNLOAD and print out for an image transfer. Alternatively, you can just get creative with a can of beans or a simple object in your home.
How to Make an Image Transfer
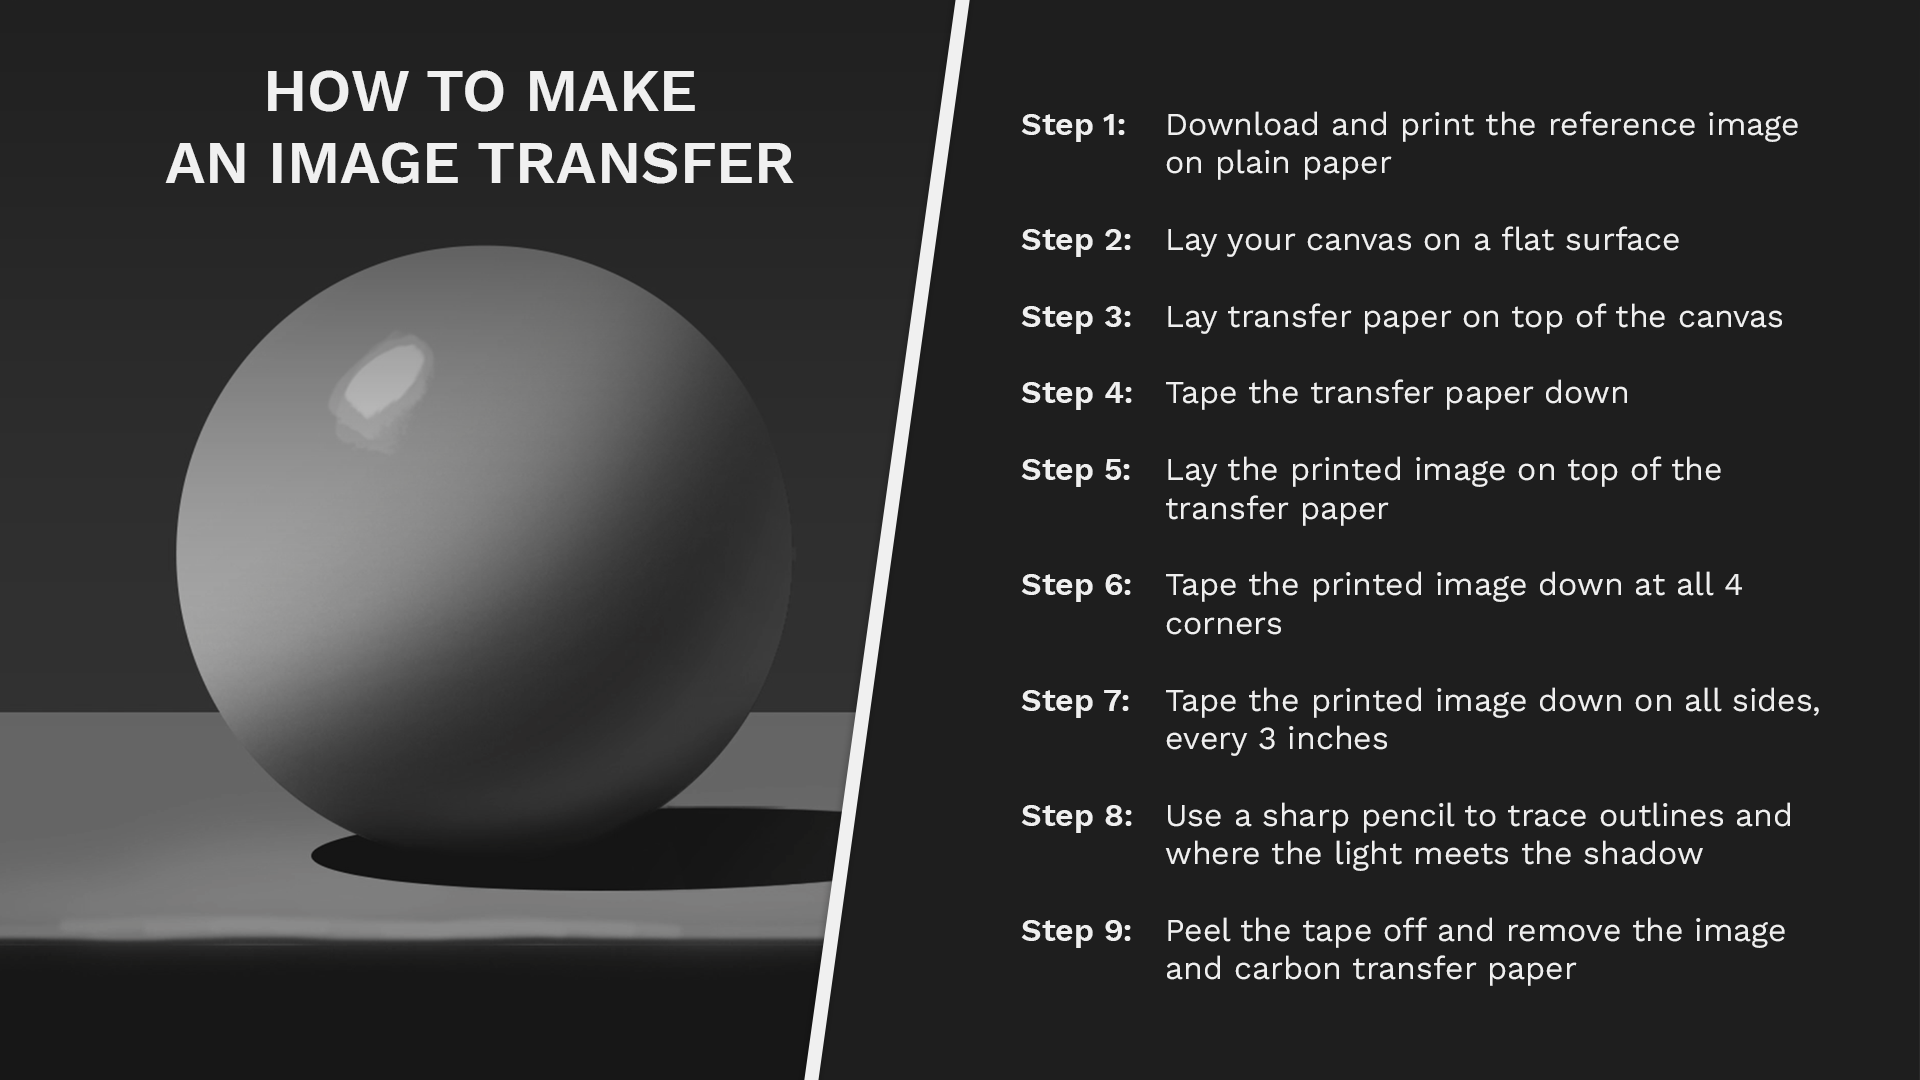
Learn how to transfer an image onto your canvas to help you get started on the exercises for oil painting for beginners.
Step 1: Download and print the reference image on regular paper.
Step 2: Lay your canvas on a flat surface.
Step 3: Lay carbon transfer paper on top of the canvas.
Step 4: Tape the carbon transfer paper down.
Step 5: Lay the printed reference image on top of the carbon transfer paper.
Step 6: Tape the printed reference down at all 4 corners
Step 7: Tape the printed reference down on all sides, at every 3 inches.
Step 8: Use a sharp pencil to trace outlines as well as where the light meets the shadow on the reference image.
Step 9: When you’re done, peel the tape off and remove the reference image and carbon transfer paper.
Marking Lights and Shadows
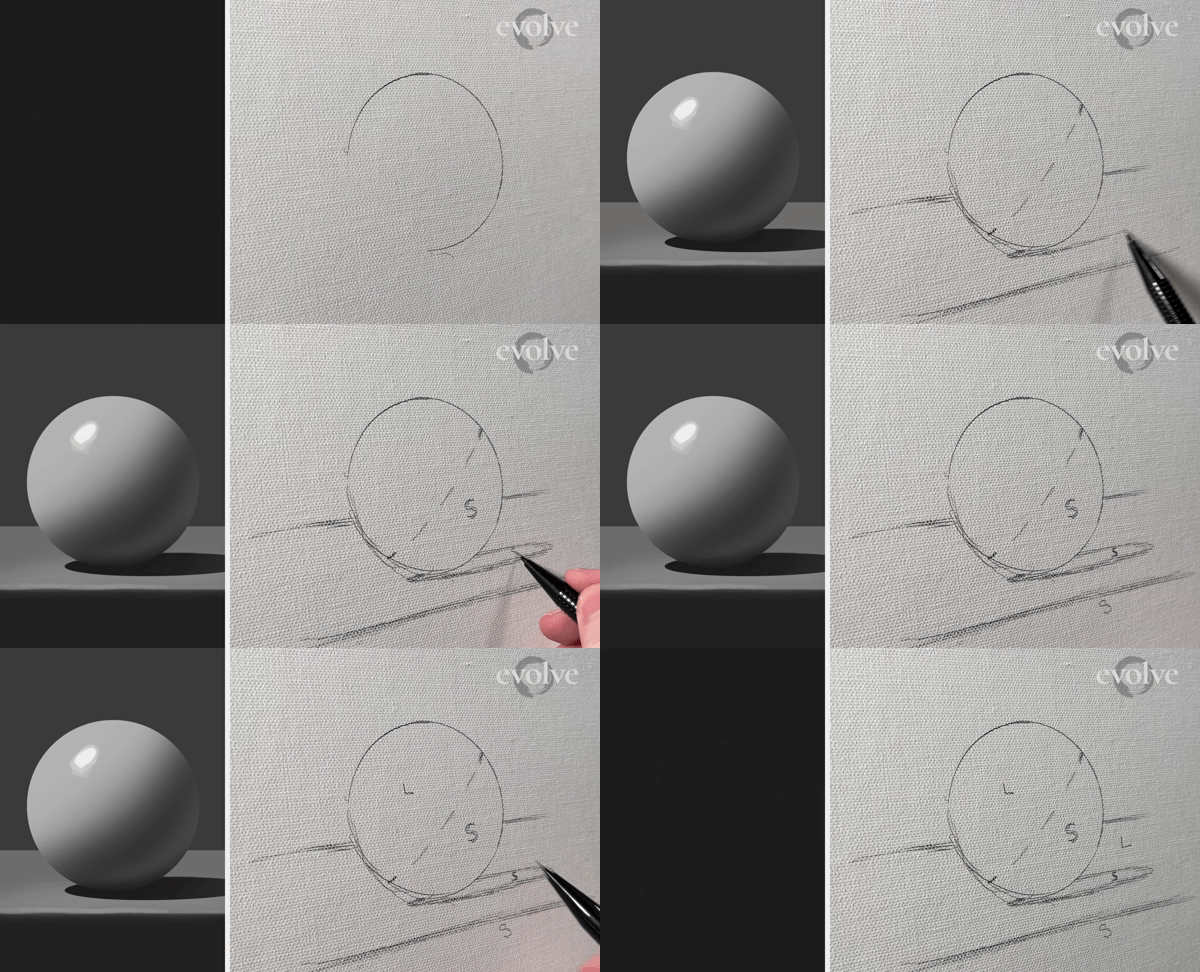
Before painting, break down the image into light and shadow by marking “S” for shadows and “L” for lights.
As I'm drawing this outline, I'm making marks where the light and shadow meet. Before we begin painting we need to break the image down into light and shadow for each shape. As you follow along with me, mark “S” for your shadows and “L” for your lights.
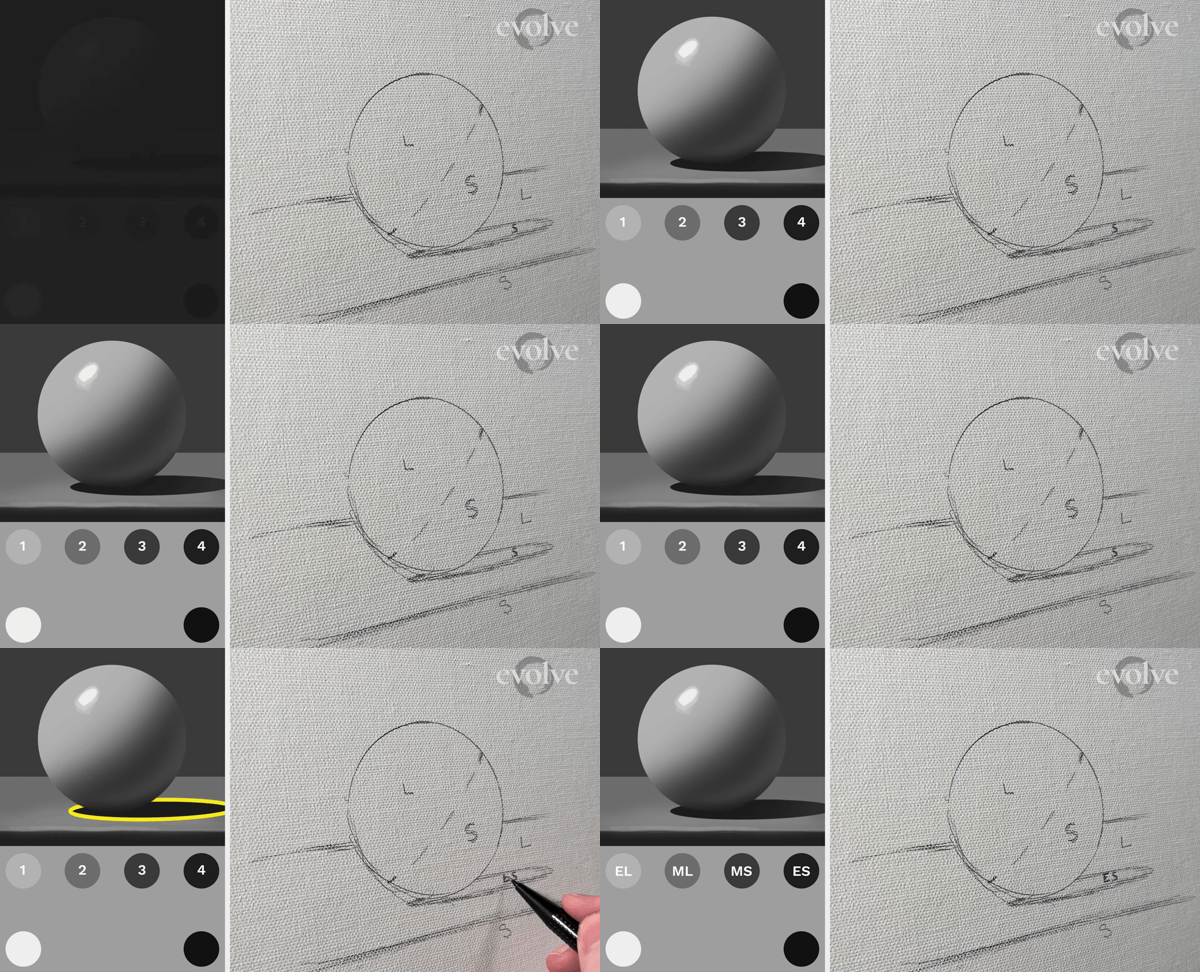
Mark the darkest shadow as “ES” for extreme shadow.
Once that's done, we can assign the four values. We’ll start by looking at all of our shadows and find the darkest shadow beneath the sphere. Mark this ES for extreme shadow. Then, let’s find the brightest value in our shadows.
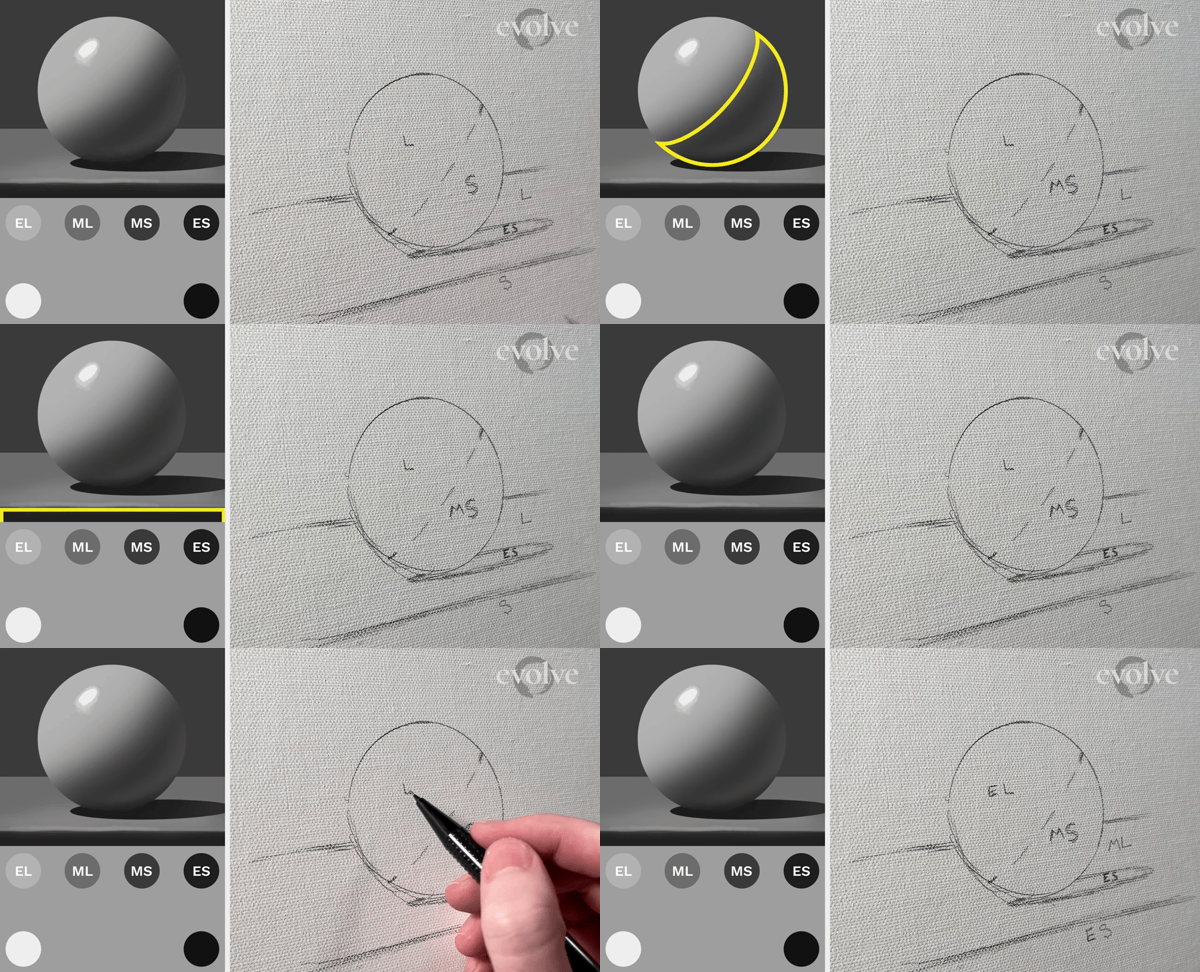
Mark the brightest shadow as “MS” for moderate shadow. Then, we’ll mark the brightest light as “EL” for extreme light and the darkest light as “ML” for moderate light.
The brightest value in the shadows is found in the lower half of the sphere. We’ll mark this as MS for moderate shadow. Now we can compare the rest of the shadows to the extreme shadow and to the moderate shadow. Whichever one it is closest to, it will become that value. Then, we’ll follow the same process for our lights.
Notice that I'm not just copying what I'm seeing. We are taking the whole painting and simplifying it by breaking it down into just two things: light and shadow. Now we can rebuild the painting through an understanding and through a process.
Painting with Four Values
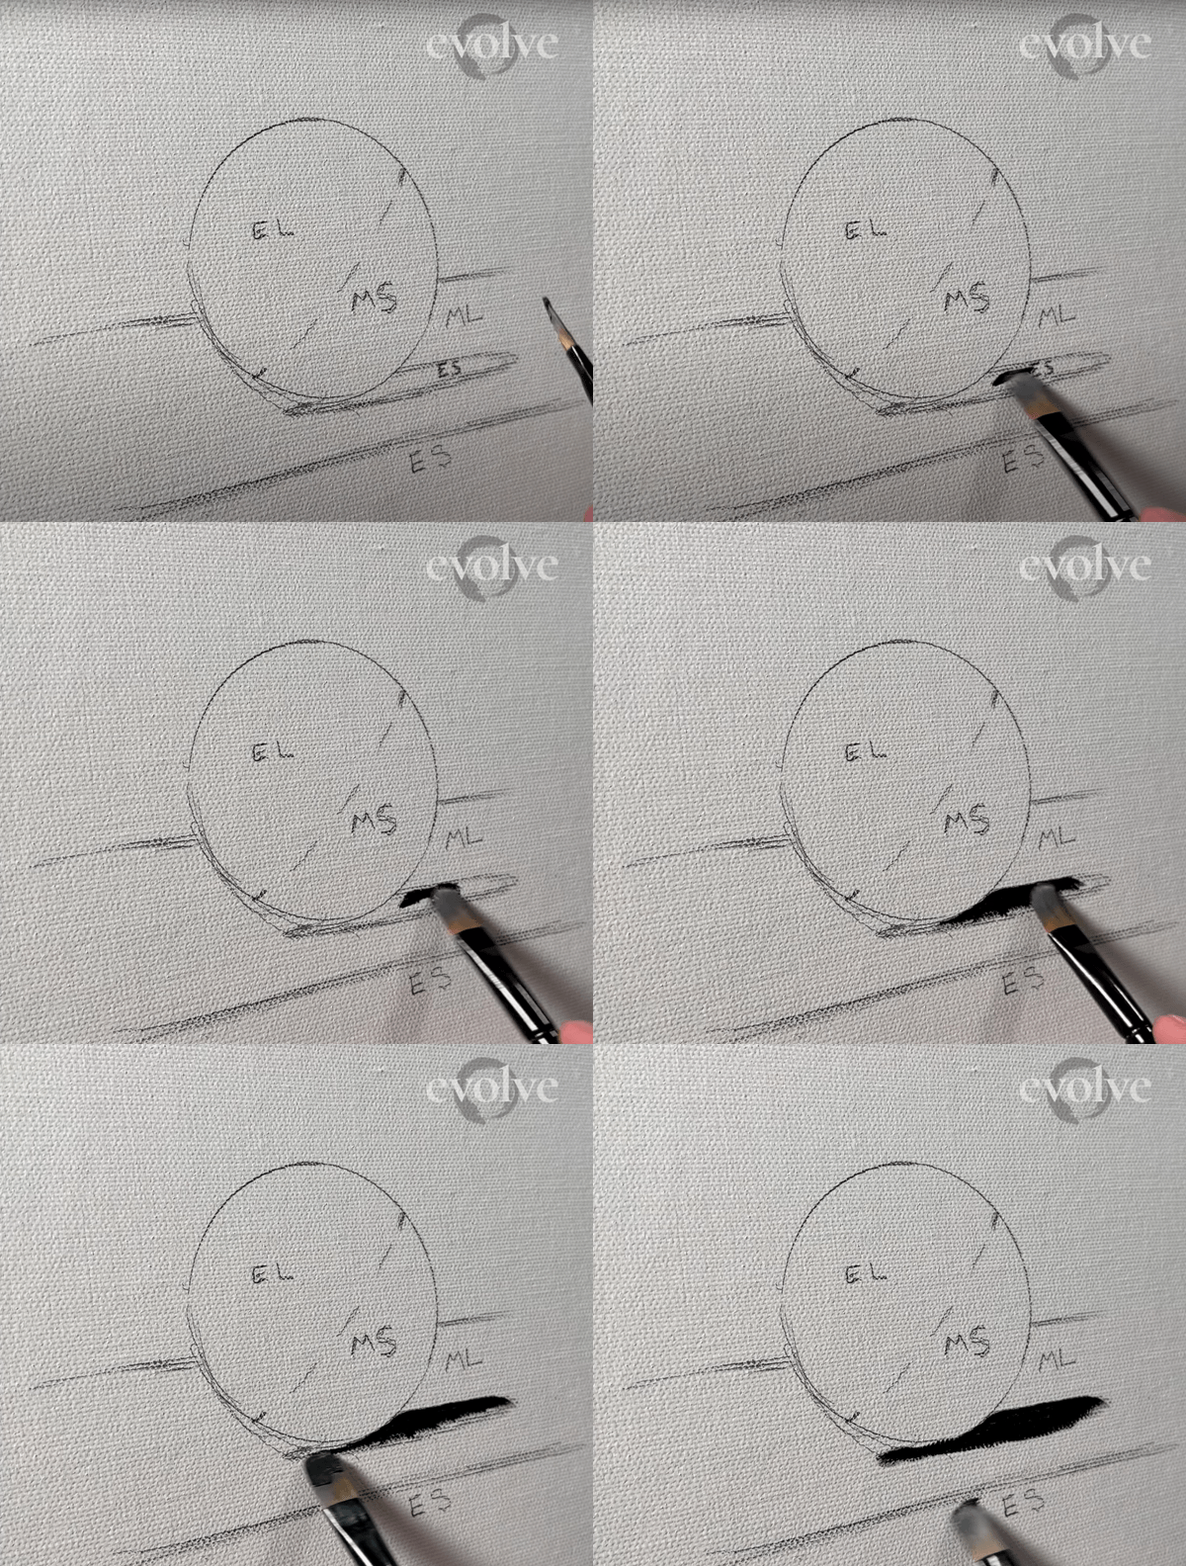
Use the darkest of the four values on your palette to paint your extreme shadows (ES).
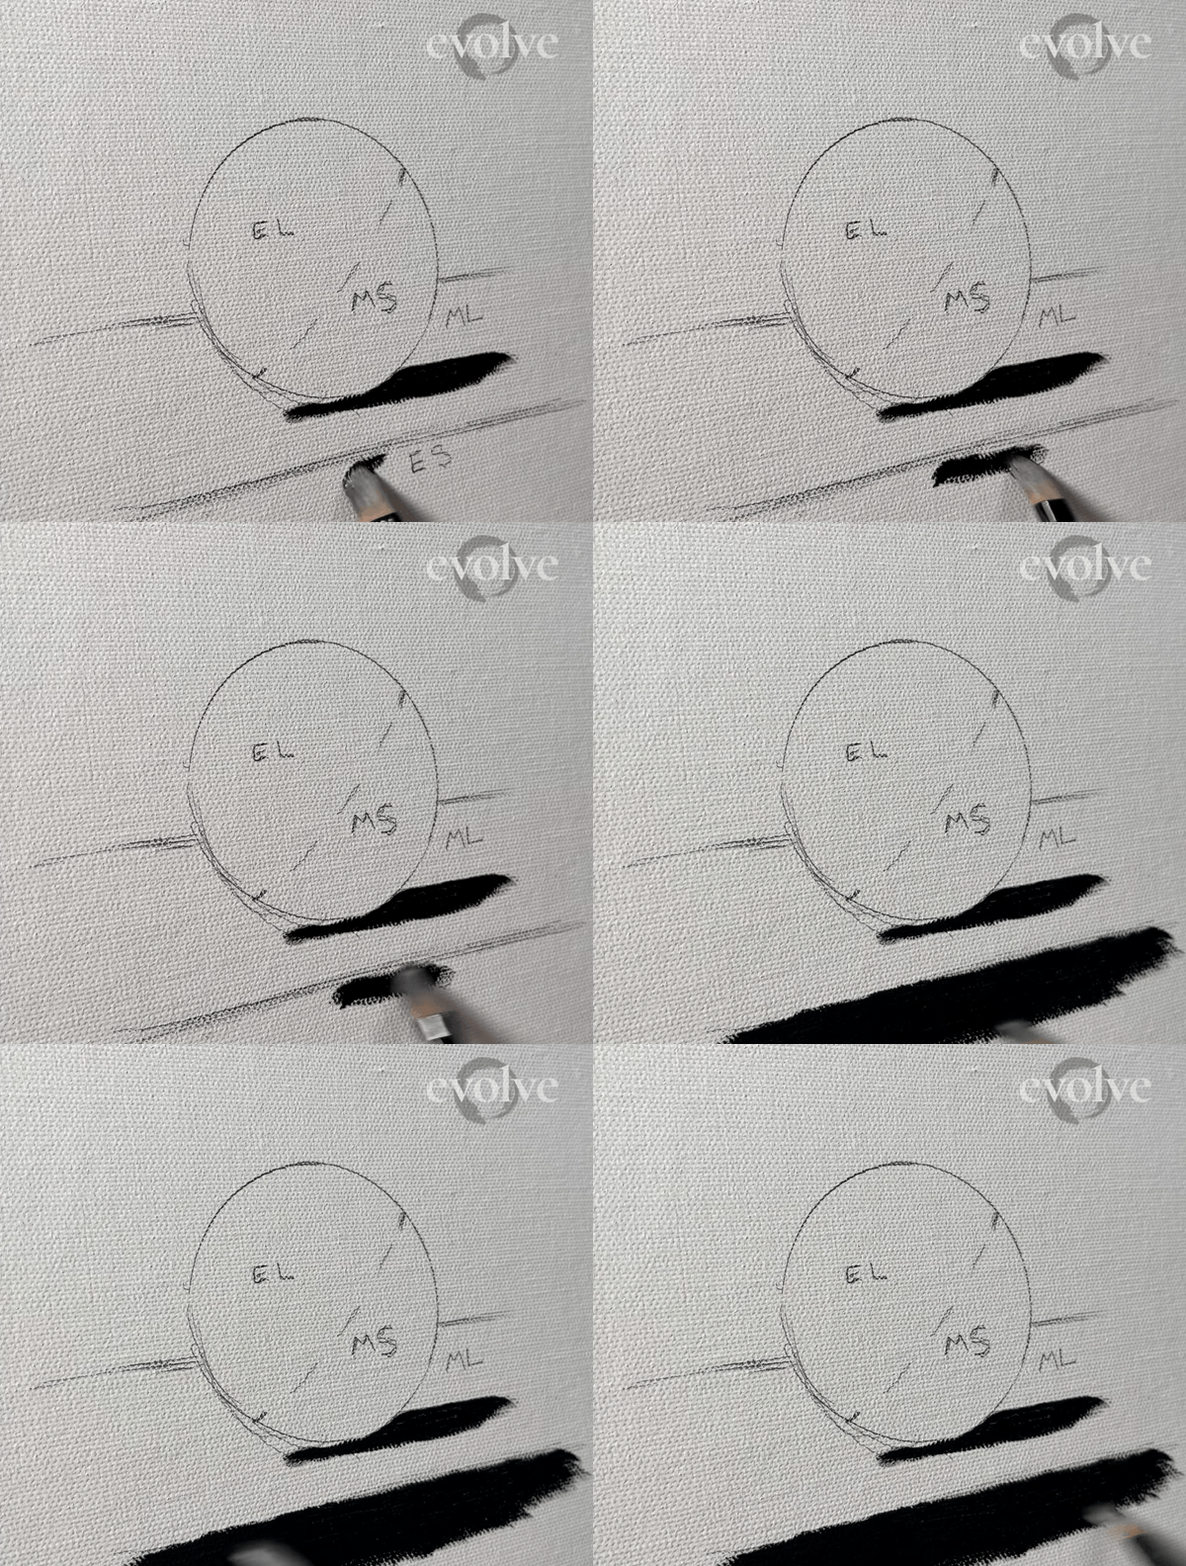
The front of the table is painted with the fourth value for extreme shadow.
We will use the third value, or second darkest of our four values to paint in the moderate shadow, or MS.
Instead of starting by trying to paint a “sphere” or a “table, we’re starting by locating the shadows and the lights. Shadows and lights are found in any subject matter because every subject matter has light or the absence of it. So if you can take any subject matter and filter it through this process, you will be able to paint it.
Next, use the second lightest of our four shades to paint in the moderate light, or ML.
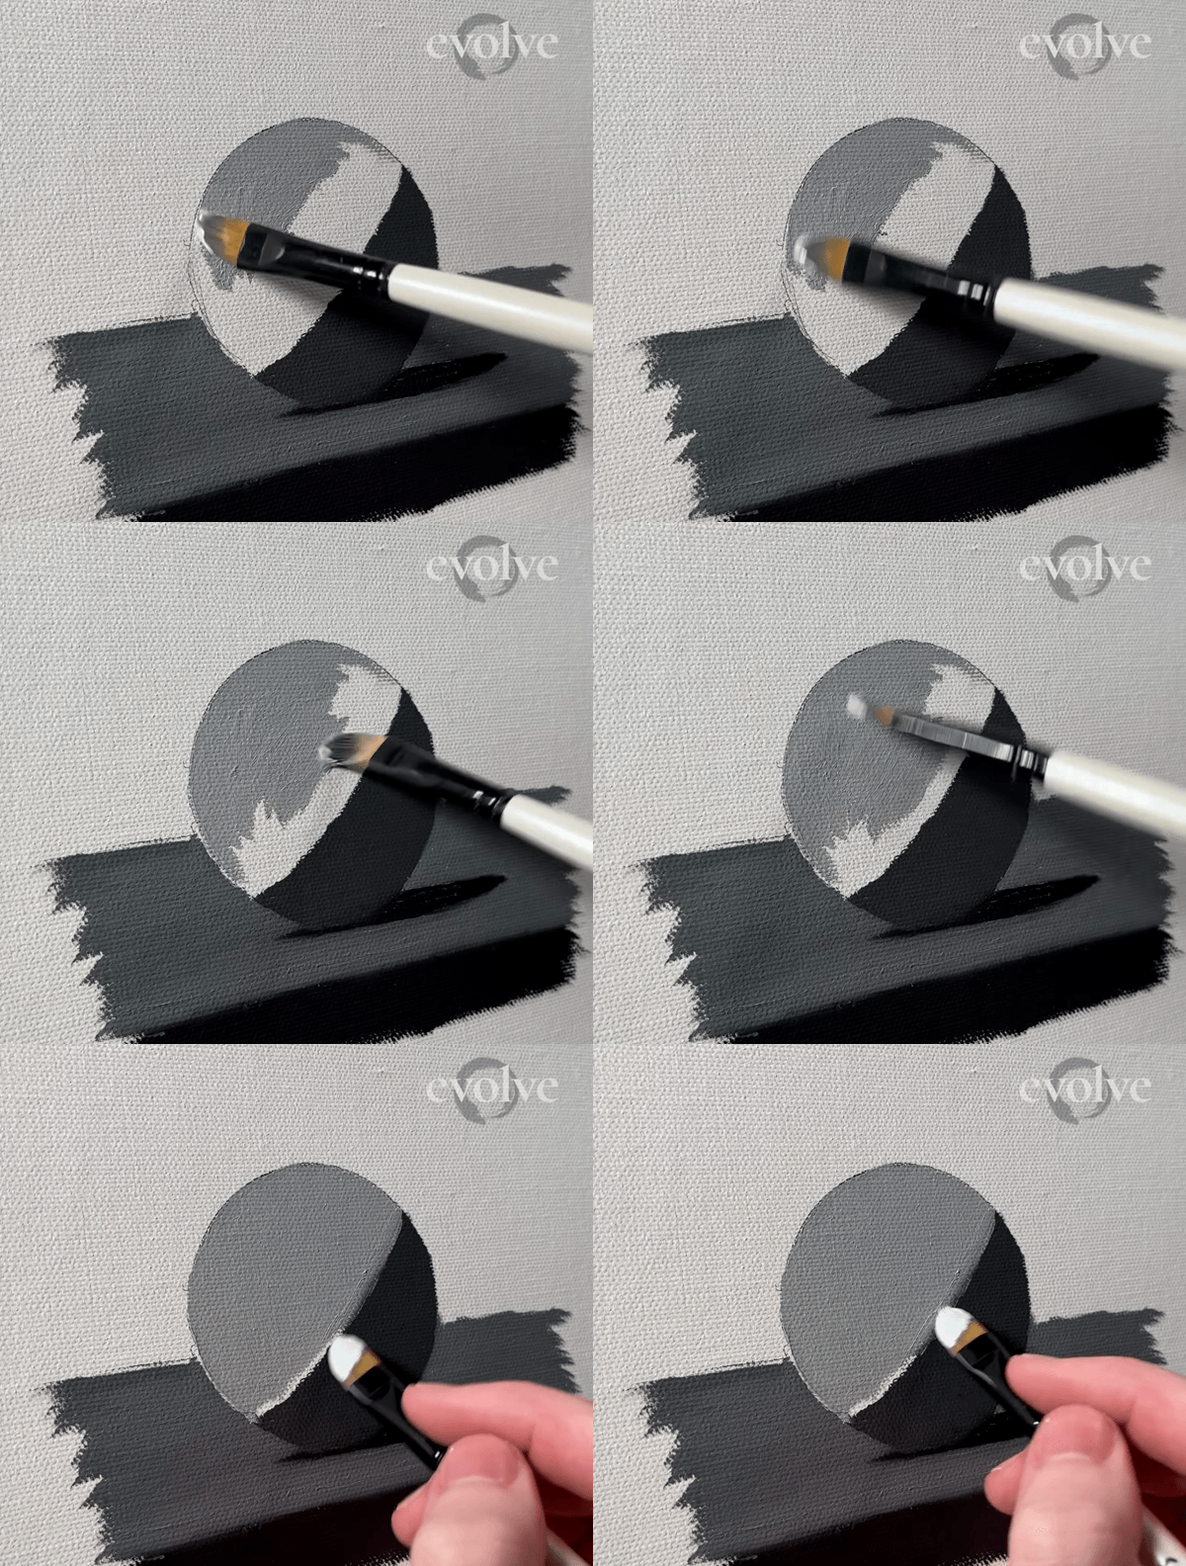
Finally, the lightest of our four values will be used to paint the extreme light, or EL.
By learning how to paint the light and shadow, suddenly we can paint anything. That's how, at Evolve Artist, we make this process, this learning journey, so fast. To see another example of the power of this process, check out THIS VIDEO of a grayscale portrait using this exact same method.
Putting in the Gradients
This next step is where the magic happens. We are going to make this sphere feel round by putting in a gradient. But how do we determine where the gradient is placed? The answer lies in form and cast shadow.
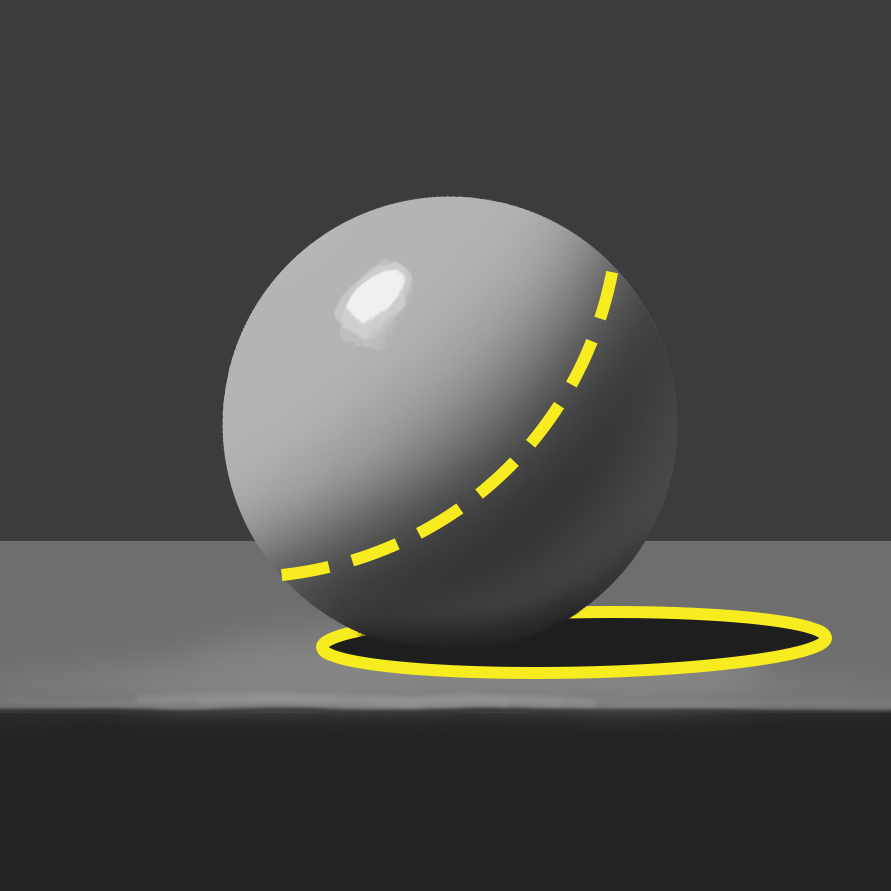
Distinguishing between the form and cast shadows in your image will help you to determine where to place your gradients.
Above, you can see a form shadow (dotted line) and a cast shadow (solid line). In a form shadow, the light is hitting the object, and as the object turns in form, less light can hit it, creating a faded effect. On the other hand, a cast shadow occurs where the object is directly blocking the light, and it changes suddenly from none of the light to all of the light.
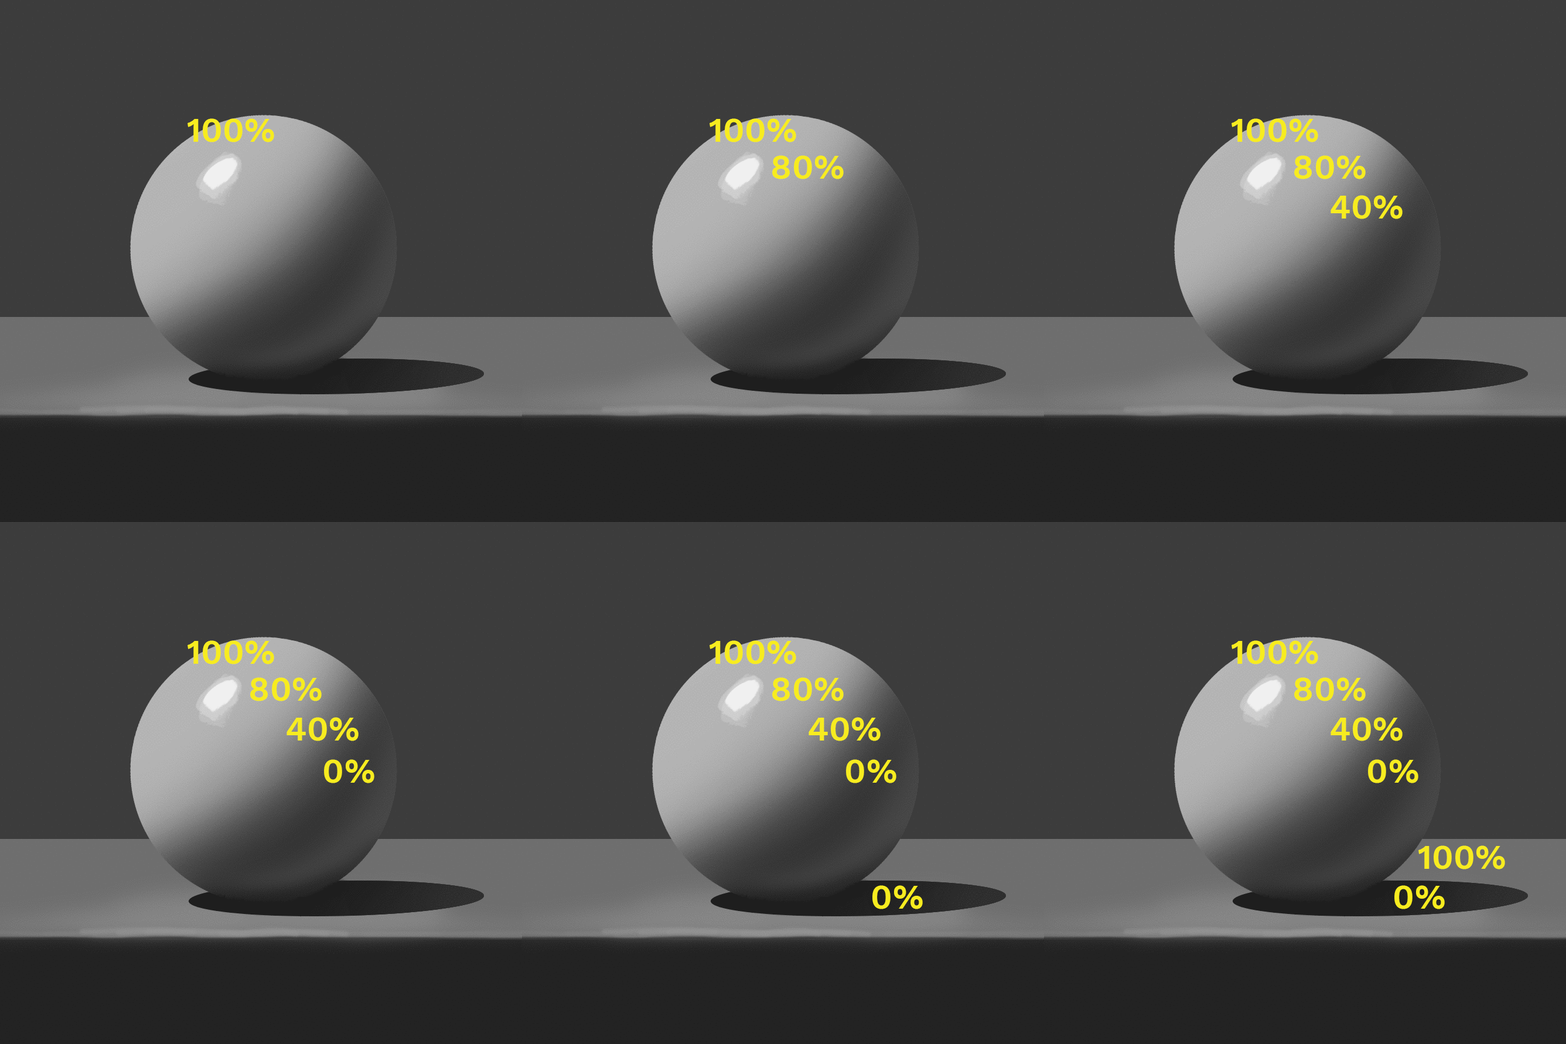
Form shadows occur where the light gradually fades around the form of an object. Cast shadows occur where an object is blocking the light.
Because of this, as a general rule, all your form shadows should be soft and all your cast shadows should be relatively sharp.
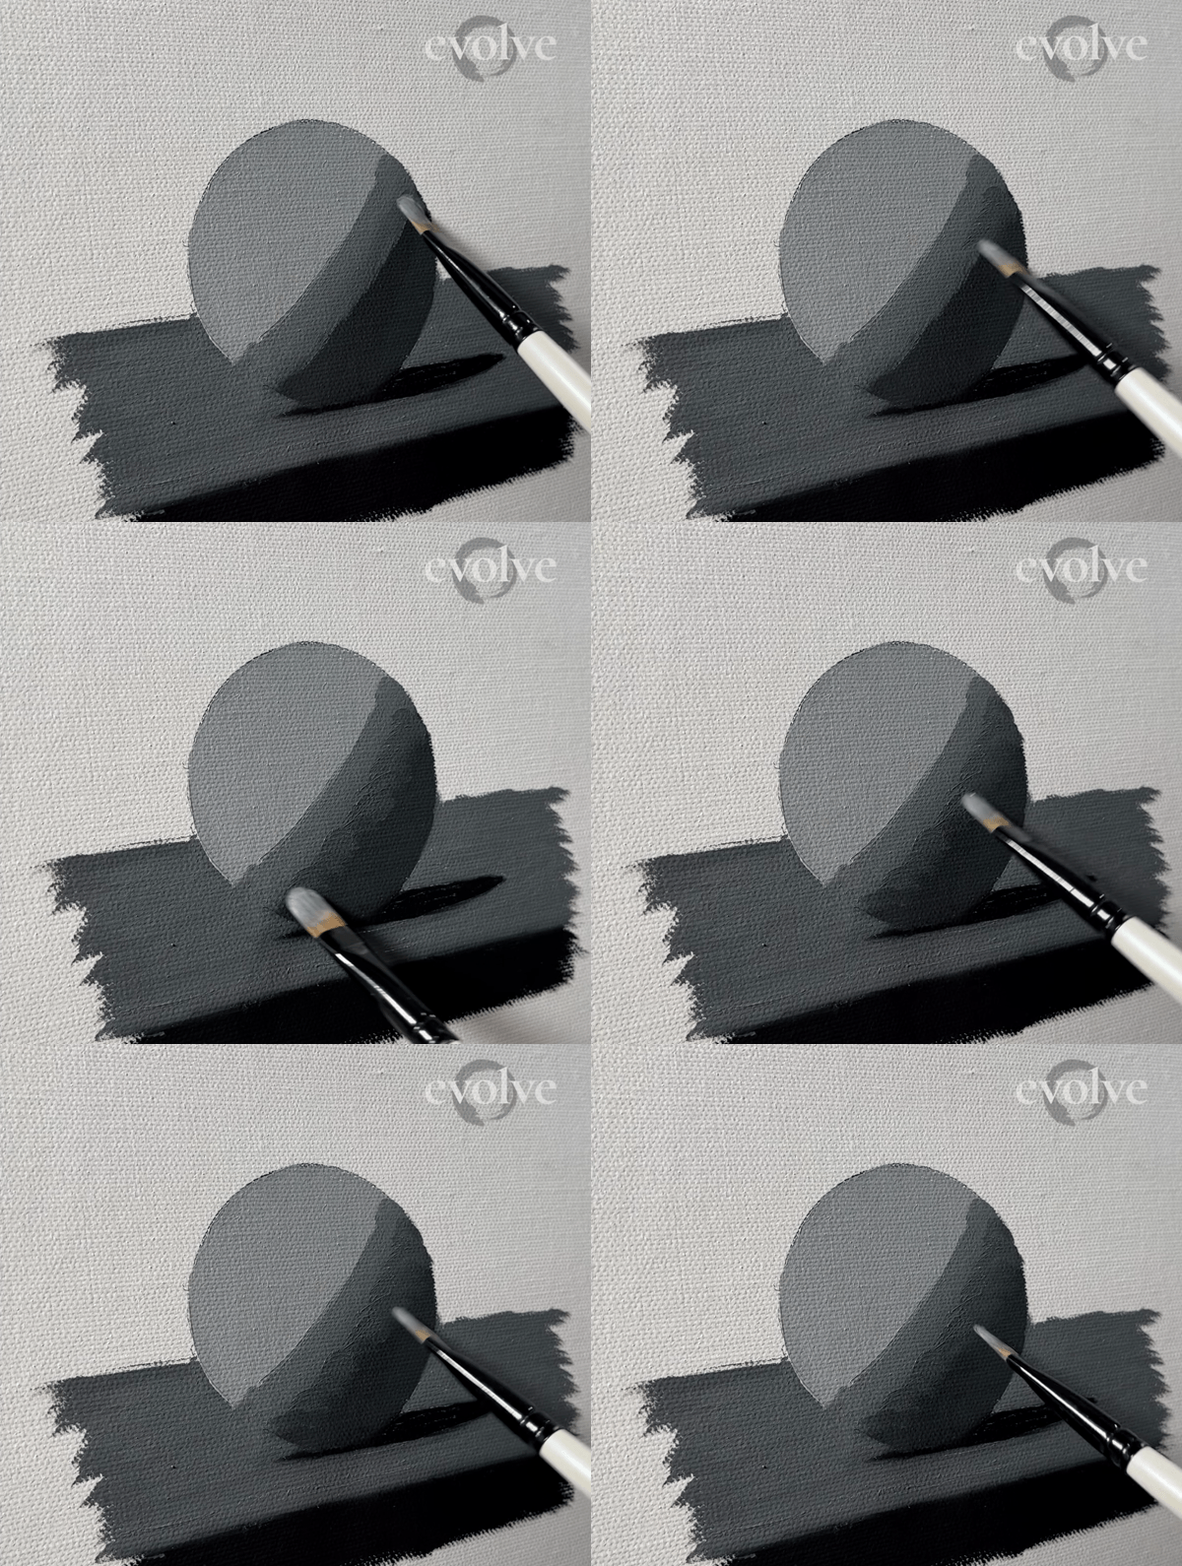
How to Paint Gradients
Step 1: Use your second value, moderate light, to paint between values 1 (extreme light) and 3 (moderate shadow).
Step 2: Use your value 2.5 mixture to blend the gradient between values 2 (moderate light) and 3 (moderate shadow).
Step 3: Use your value 1.5 to blend the gradient between values 1 (extreme light) and 2 (moderate light).
Step 1: Use your second value, moderate light, to paint between values 1 (extreme light) and 3 (moderate shadow).
Step 2: Use your value 2.5 mixture to blend the gradient between values 2 (moderate light) and 3 (moderate shadow).
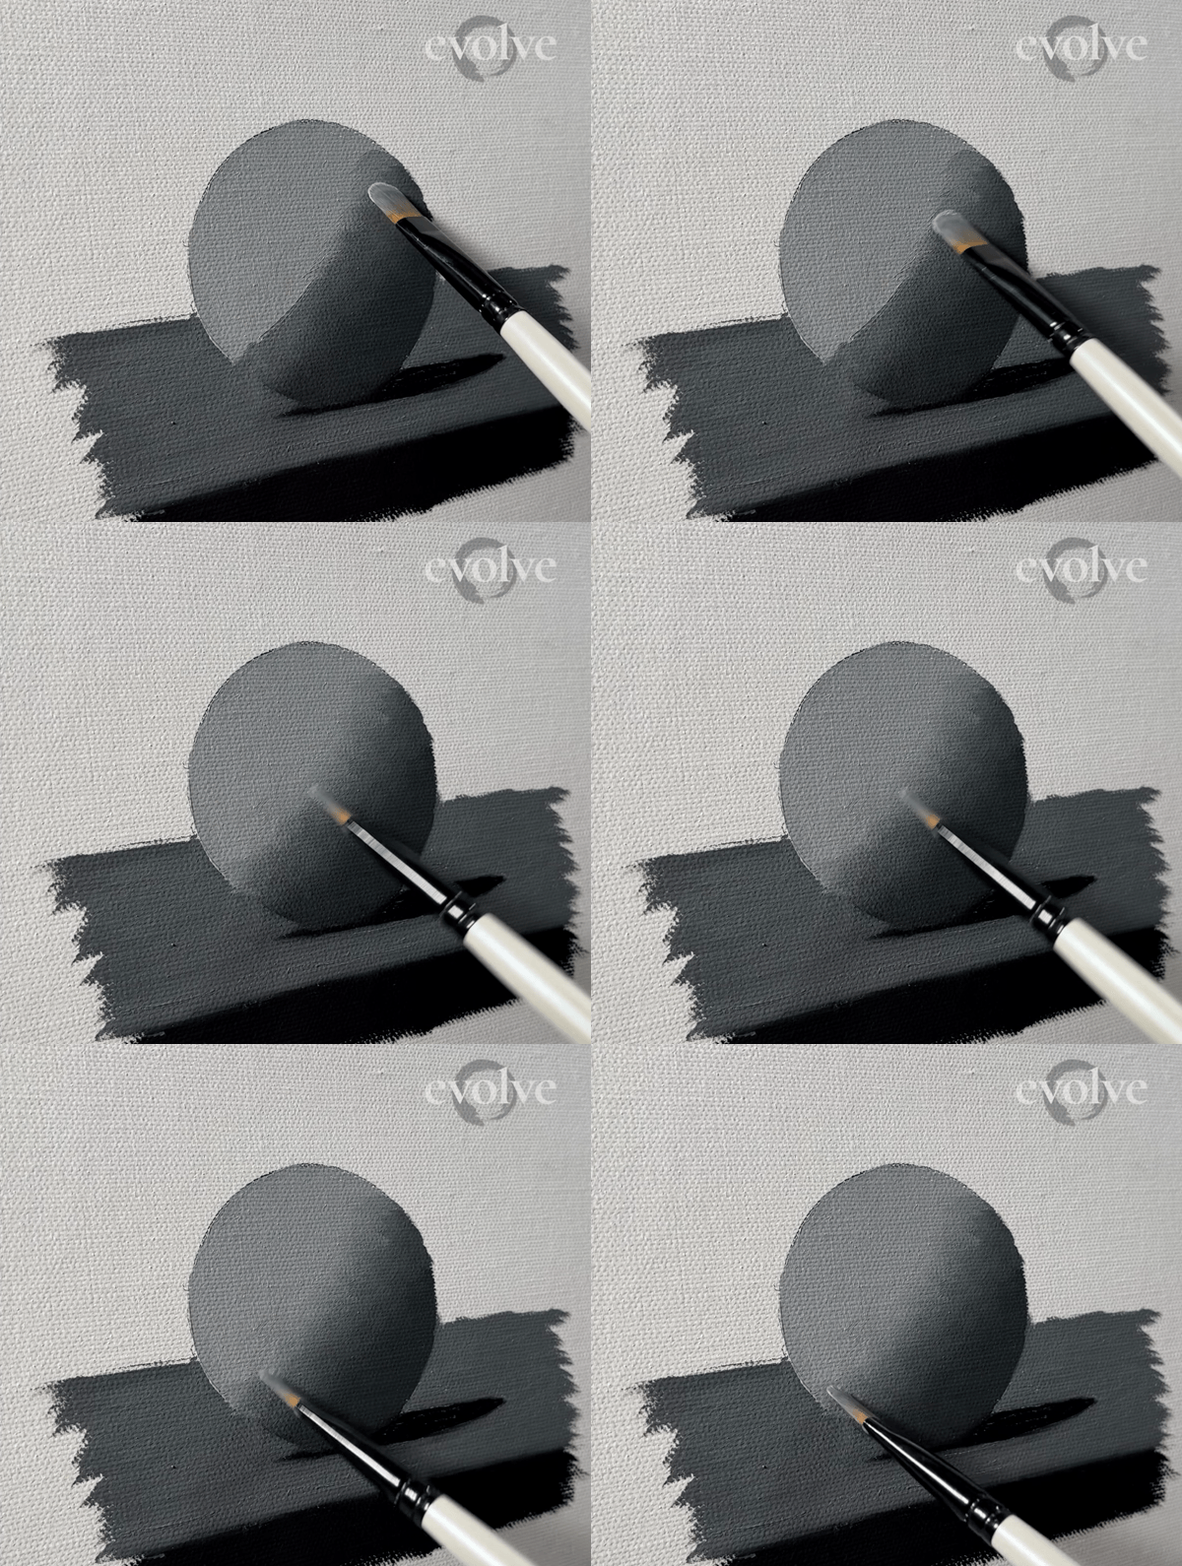
Step 3: Use your value 1.5 to blend the gradient between values 1 (extreme light) and 2 (moderate light).
Now, using the mixture that we made between the shadow values, we’ll fill in the background. You can see how I'm cleaning up the edges of the sphere as I go. I want it to be nice and sharp.
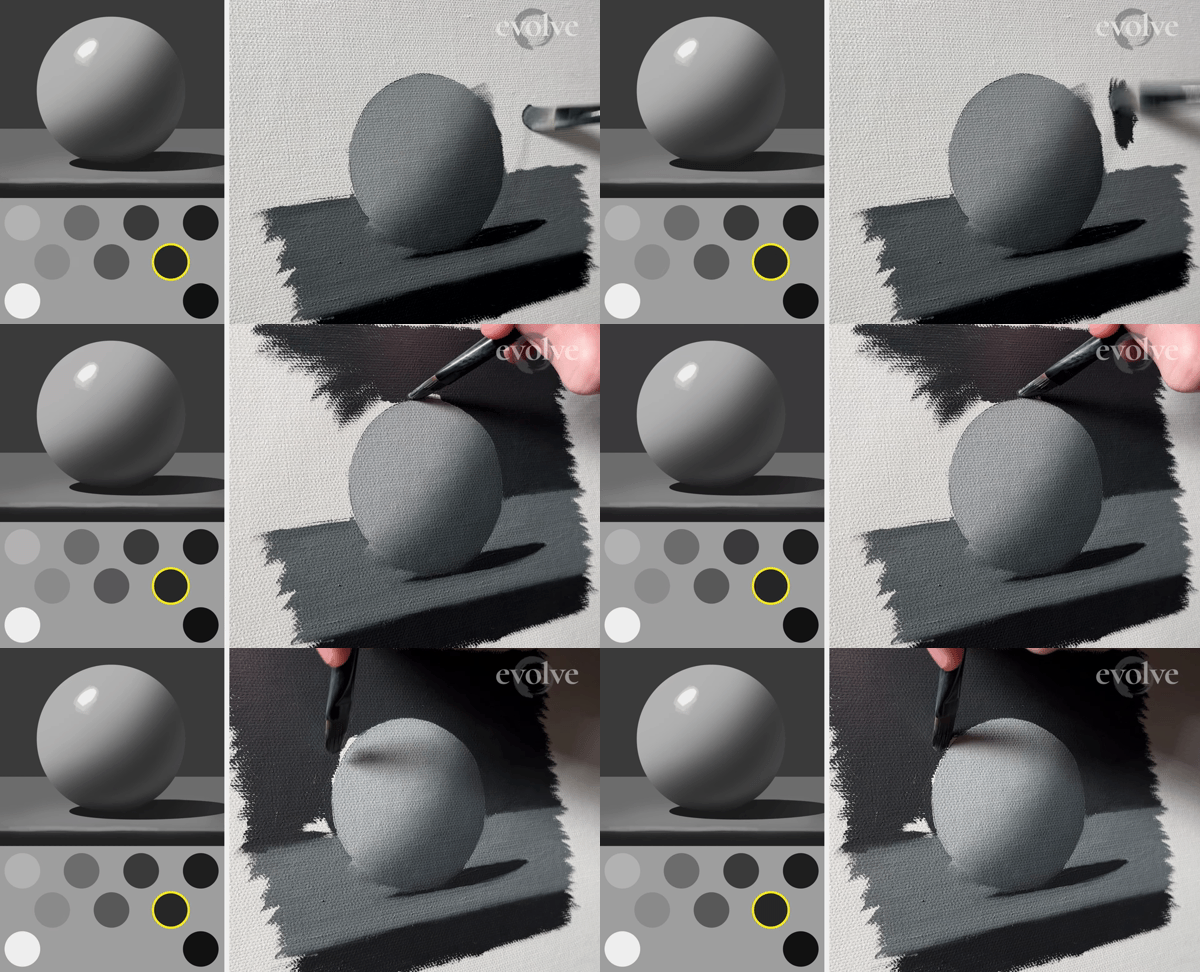
Fill in the background using the mixture between 3 and 4 (value 3.5) creating sharp edges along the way.
We’ll also make a gradient on the back edge of this table to create the impression of depth. This depth will cause the eyes to rest on the sphere, which is in front. Generally speaking, things that are softer will fall away into the distance, and things that are sharper and more in focus will come forward.
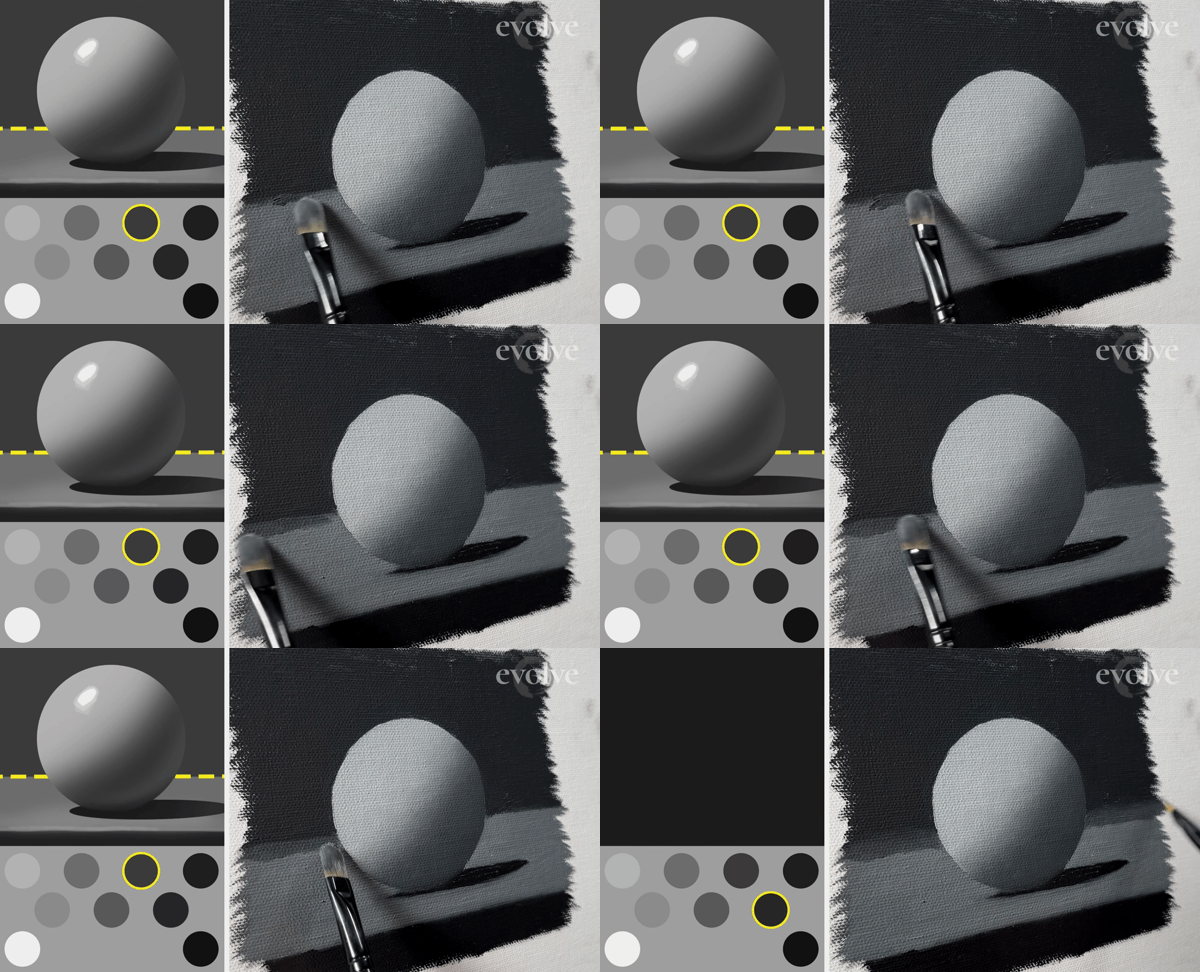
Placing a gradient on the back edge of the table helps to create the impression of depth.
Now we're creating form with our gradients with form shadows and we're also creating depth with our gradients, using soft edges to pull things back and sharp edges to push things forward. Pretty cool, huh?

These basic steps are all you need to get started in oil painting for beginners.
So at this point, we have a sphere. No details, no highlights, just a sphere in its most basic of forms. And if this is your first time, stop here. Devote your energy to making the smoothest gradients possible. Pat yourself on the back for a job well done. (Click HERE to learn how to sign your artwork). But if you're ready to take it one step further, keep following along.
Taking This Process One Step Further
The final step is to add reflections and highlights. Now, the rule here is that you can go half a step up or down for each of the four values. For my extreme shadow, I can only go a half step up, using the same mixture as the background. For the moderate shadow, I can go a half step down and a half step up, and the same for the moderate light. For the extreme light, I can go a half step down.
Adding in Reflections and Highlights
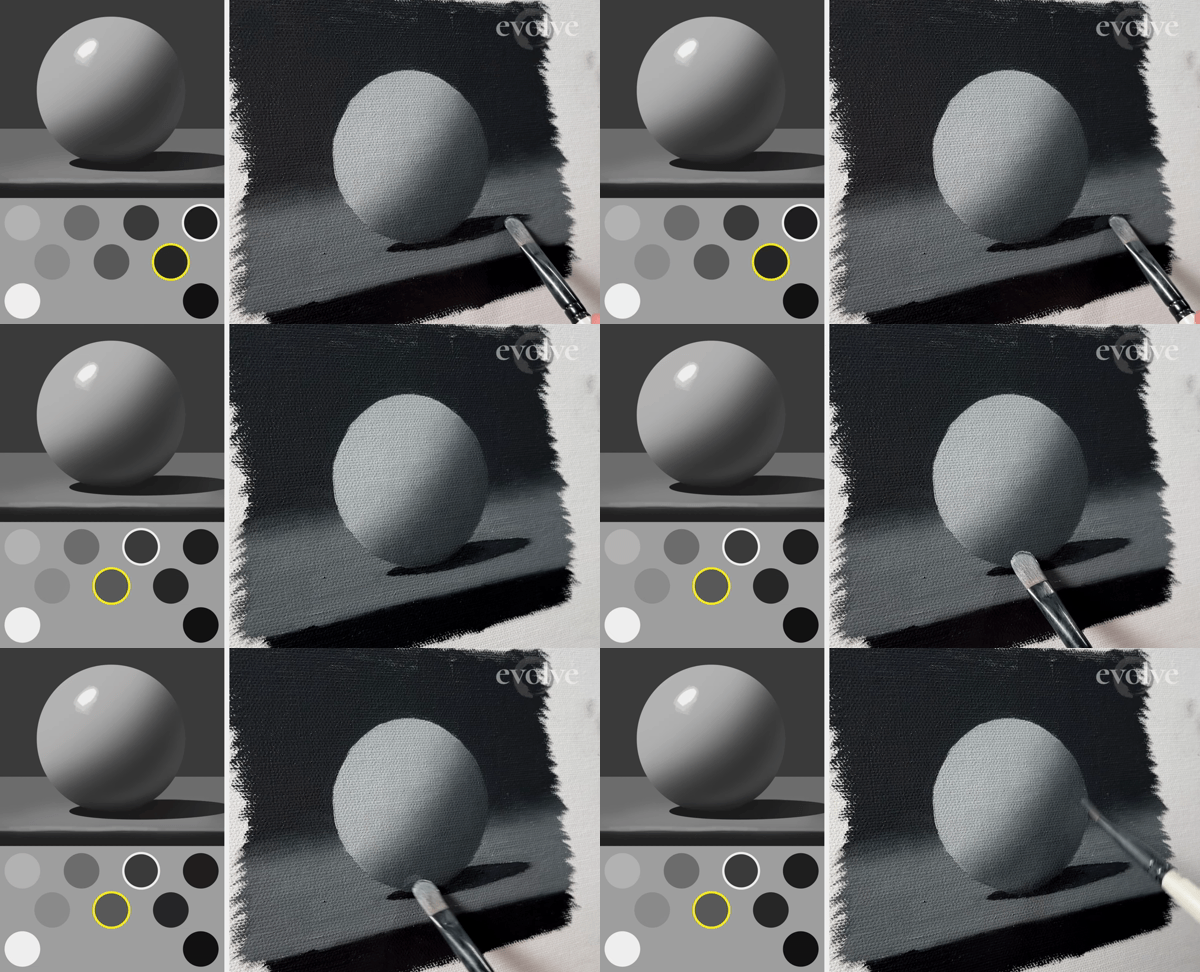
Step 1: Add a reflection using the value that is a half step up from the extreme shadow on the table (value 3.5) and the moderate shadow on the sphere (value 2.5).
For this painting, I can put reflections in the cast shadow and in the shadow on the sphere for my highlights.
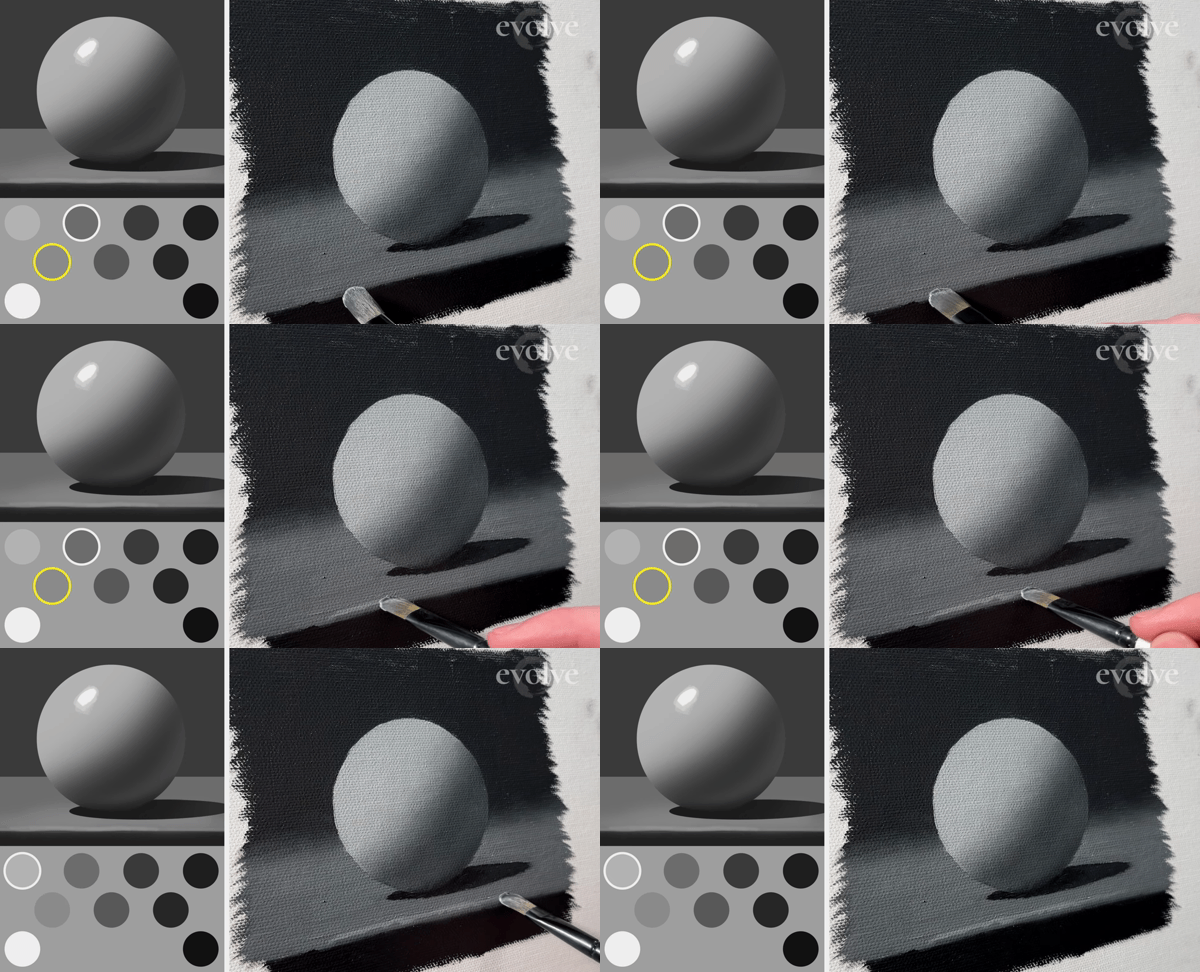
Step 2: Add a highlight on the front edge of the table using the value that is a half step up from moderate light (value 1.5).
Using my moderate light, I can go a half step up on the edge of the table to pull that forward. And since my sphere is the brightest value, I can't add in a highlight. In the first block of Evolve Artist’s program, I would stop here.
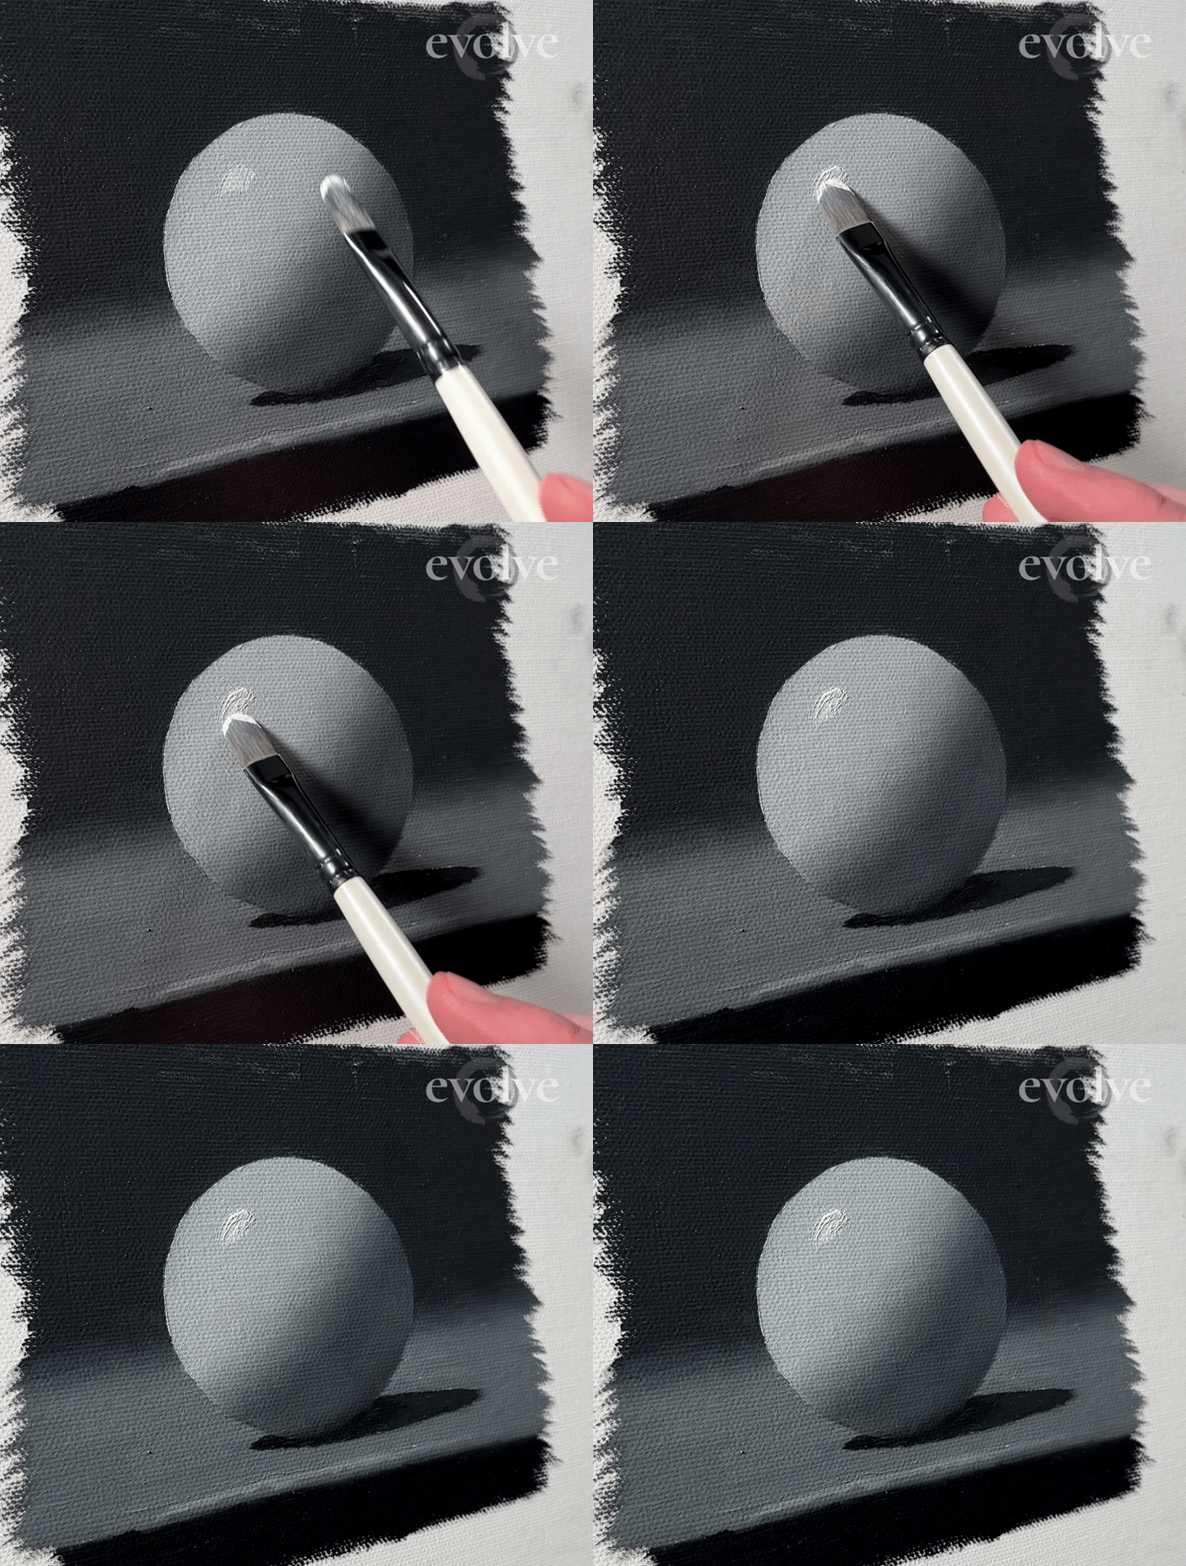
To add a highlight to the extreme light value, make a mixture between white and extreme light.
But just to show you what the sphere would look like with a highlight, I'll make a quick mixture between my white and my extreme light and add it to the sphere.
Congratulations! You just made your first oil painting.
Now it’s time to clean your oil paint brushes. Cleaning oil paint brushes is actually quite easy and doesn’t require any toxic solvents – all you need is ivory soap! Go HERE to find out how to clean your oil paint brushes WITHOUT using turpentine or toxic mineral spirits.
Final Thoughts on Oil Painting for Beginners
This is oil painting for beginners made easy. It's a very simple process, but with it, you can now paint anything, any subject matter, as long as the reference is well lit. All you need is to simplify it down into just a few parts. Instead of trying to paint and copy what you see, you're breaking it down and then reconstructing it through your own decisions. You’re becoming an artist.
This may be just a sphere, but you brought it into existence with a paintbrush because you understood the information through a process that was based on the very fundamentals of art. So if you’ve made it this far, you’ve just taken a massive step forward in your journey to creating art without limitations.
FAQs
How do you start in oil painting for beginners?
How you start matters. There is so much information about oil painting that it is overwhelming! But not all information is equal. Beginners in oil painting need to start with information that is foundational. Foundations will teach you how to break down and simplify anything that you see and make sense of it, regardless of subject matter. For example, when we teach any language, we start by breaking down words into letters; in the same way, you want to start with building blocks that you can create art with.
Any art education that starts painting in color isn’t starting you off with the essential fundamentals like values and edges. And the saying “paint what you see” is just advice. A true education will actually teach you how to see. You need a streamlined, cut-through-the-clutter education that teaches what you need when you need it and has someone to guide you and actively make sure that you are understanding the material, both as a concept and in the application of oil painting.
That’s why Evolve makes every effort to provide constructive feedback to students’ painting assignments within 24 hours of submitting their work. The instructors are available for one-on-one meetings, and we hold live classes and Q&A sessions to flesh out specific topics as a supplement to the educational videos and art supplies. Go HERE to learn more about Evolve’s program.
This mini-course is also starting you off on the right footing to focus on the things that matter and avoid things that don’t. Light, shadow, values, edges, and color. These are fundamentals that apply to any painting, for any medium, for any subject matter.
Is oil painting easy for beginners?
Yes! With the right instruction and guidance, oil painting is the EASIEST and most FORGIVING medium to learn painting with. 1) You can take as much time as you need to paint what you intend before the paint dries. 2) You can make mistakes and easily cover them or fix them. 3) Oil paint blends together easily. 4) Oil paint gives you more control. Watch my Oil Paint vs Acrylic video HERE to learn why oil paint is better for beginners.
Should I wet my brush before oil painting?
Nope! Avoid using any water with your oil paint. Start with dry paint brushes. Some artists will dip their brush in a medium like linseed oil before putting paint on their brush, but as a beginner it is better to ignore that step for now. Most oil paint is ready to go straight off the brush, without requiring the addition of oil or other mediums.
What should a beginner paint first?
Start by painting simple squares so that you can practice your brush strokes, like we showed you (see above). Once you are confident that you can fill in a square with the 3 brush strokes, then practice painting gradients so that you can make soft and sharp edges. Finally, paint your first sphere in grayscale. Once you have painted these, try another grayscale painting of a simple, opaque object, like a cylinder under a single, bright light on a table. Follow the same process you learned with the sphere to assign your values and create form and depth. Keep practicing paintings like these in grayscale. Let your painting process stay the same as you hone your skills and tackle more complex subject matter with each painting.
What do I need to get started with oil painting?
You don’t need much to get started (see HERE for a minimum art supply list), but for those looking for a complete oil painting studio, you’ll need a set of high-quality oil paint that can capture most colors when mixed together. Even beginners should start with high quality materials (read why HERE). You also might need a medium to thin paint or change the drying time. Here is what Evolve provides to their students for their Foundation Program (Click HERE to watch an unboxing video explain all the materials):
Art Supplies Included with the Evolve Artist Foundation Program:
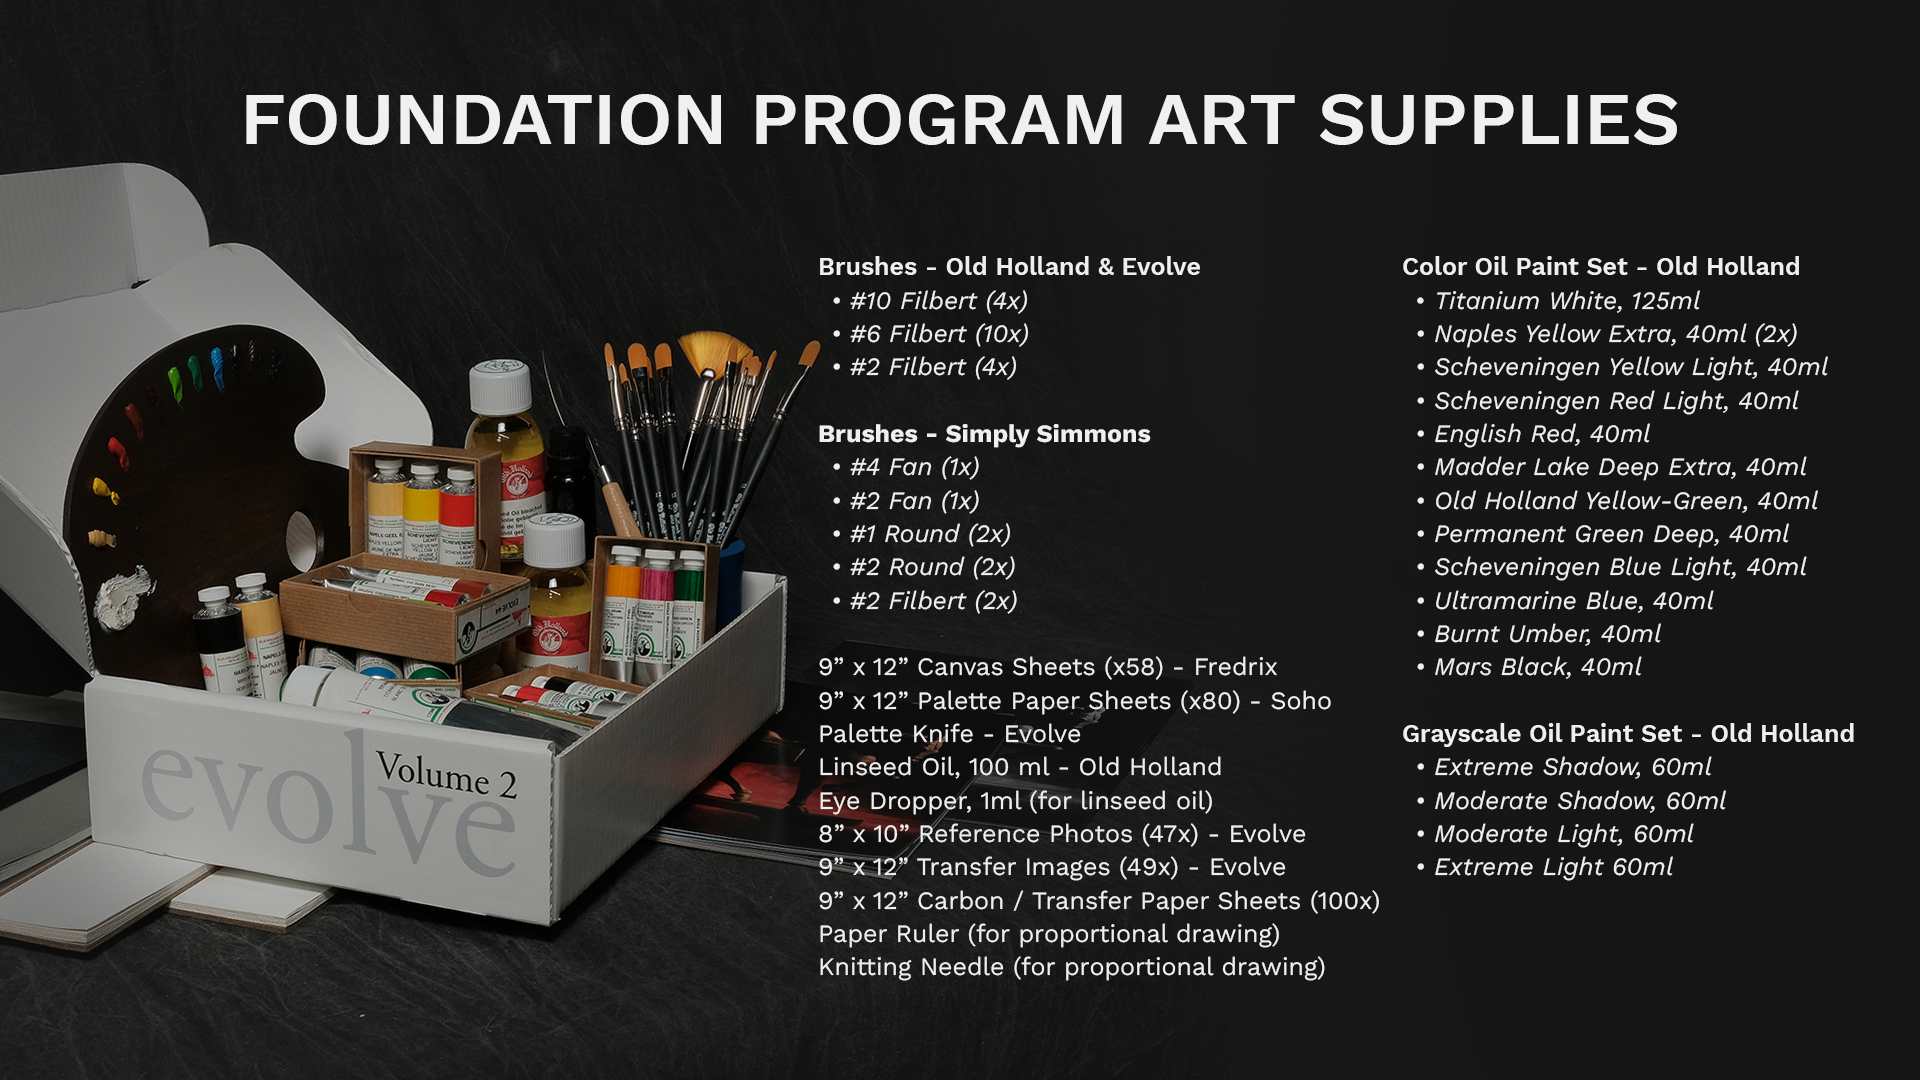
Evolve Artist supplies its students with all the materials they need to begin their learning journey.
- Color Oil Paint Set (Old Holland)
- Titanium White, 125ml
- Naples Yellow Extra, 40ml (2x)
- Scheveningen Yellow Light, 40ml
- Scheveningen Red Light, 40ml
- English Red, 40ml
- Madder (Crimson) Lake Deep Extra, 40ml
- Old Holland Yellow-Green, 40ml
- Permanent Green Deep, 40ml
- Scheveningen Blue Light, 40ml
- Ultramarine Blue, 40ml
- Burnt Umber, 40ml
- Mars Black, 40ml
- Grayscale Oil Paint Set (Old Holland)
- Extreme Shadow, 60ml
- Moderate Shadow, 60ml
- Moderate Light, 60ml
- Extreme Light 60ml
- Brushes (Old Holland & Evolve)
- #10 Filbert (4x)
- #6 Filbert (10x)
- #2 Filbert (4x)
- Brushes (Simply Simmons)
- #4 Fan (1x)
- #2 Fan (1x)
- #1 Round (2x)
- #2 Round (2x)
- #2 Filbert (2x)
- 9” x 12” Canvas Sheets (x58) (Fredrix)
- 9” x 12” Palette Paper Sheets (x80) (Soho)
- Palette Knife (Evolve)
- Linseed Oil, 100 ml (Old Holland)
- Eye Dropper, 1ml (for linseed oil)
- 8” x 10” Reference Photos (47x) (Evolve)
- 9” x 12” Transfer Images (49x) (Evolve)
- 9” x 12” Carbon / Transfer Paper Sheets (100x)
- Paper Ruler (for proportional drawing)
- Knitting Needle (for proportional drawing)
In addition to these items, you’ll need an easel, paper towels, painter’s tape and other miscellaneous household items. All of the above items come included (free) when you join Evolve’s Foundation Program and ships right to your door. Read HERE to learn more about Evolve’s Program.
Learning with Evolve Artist
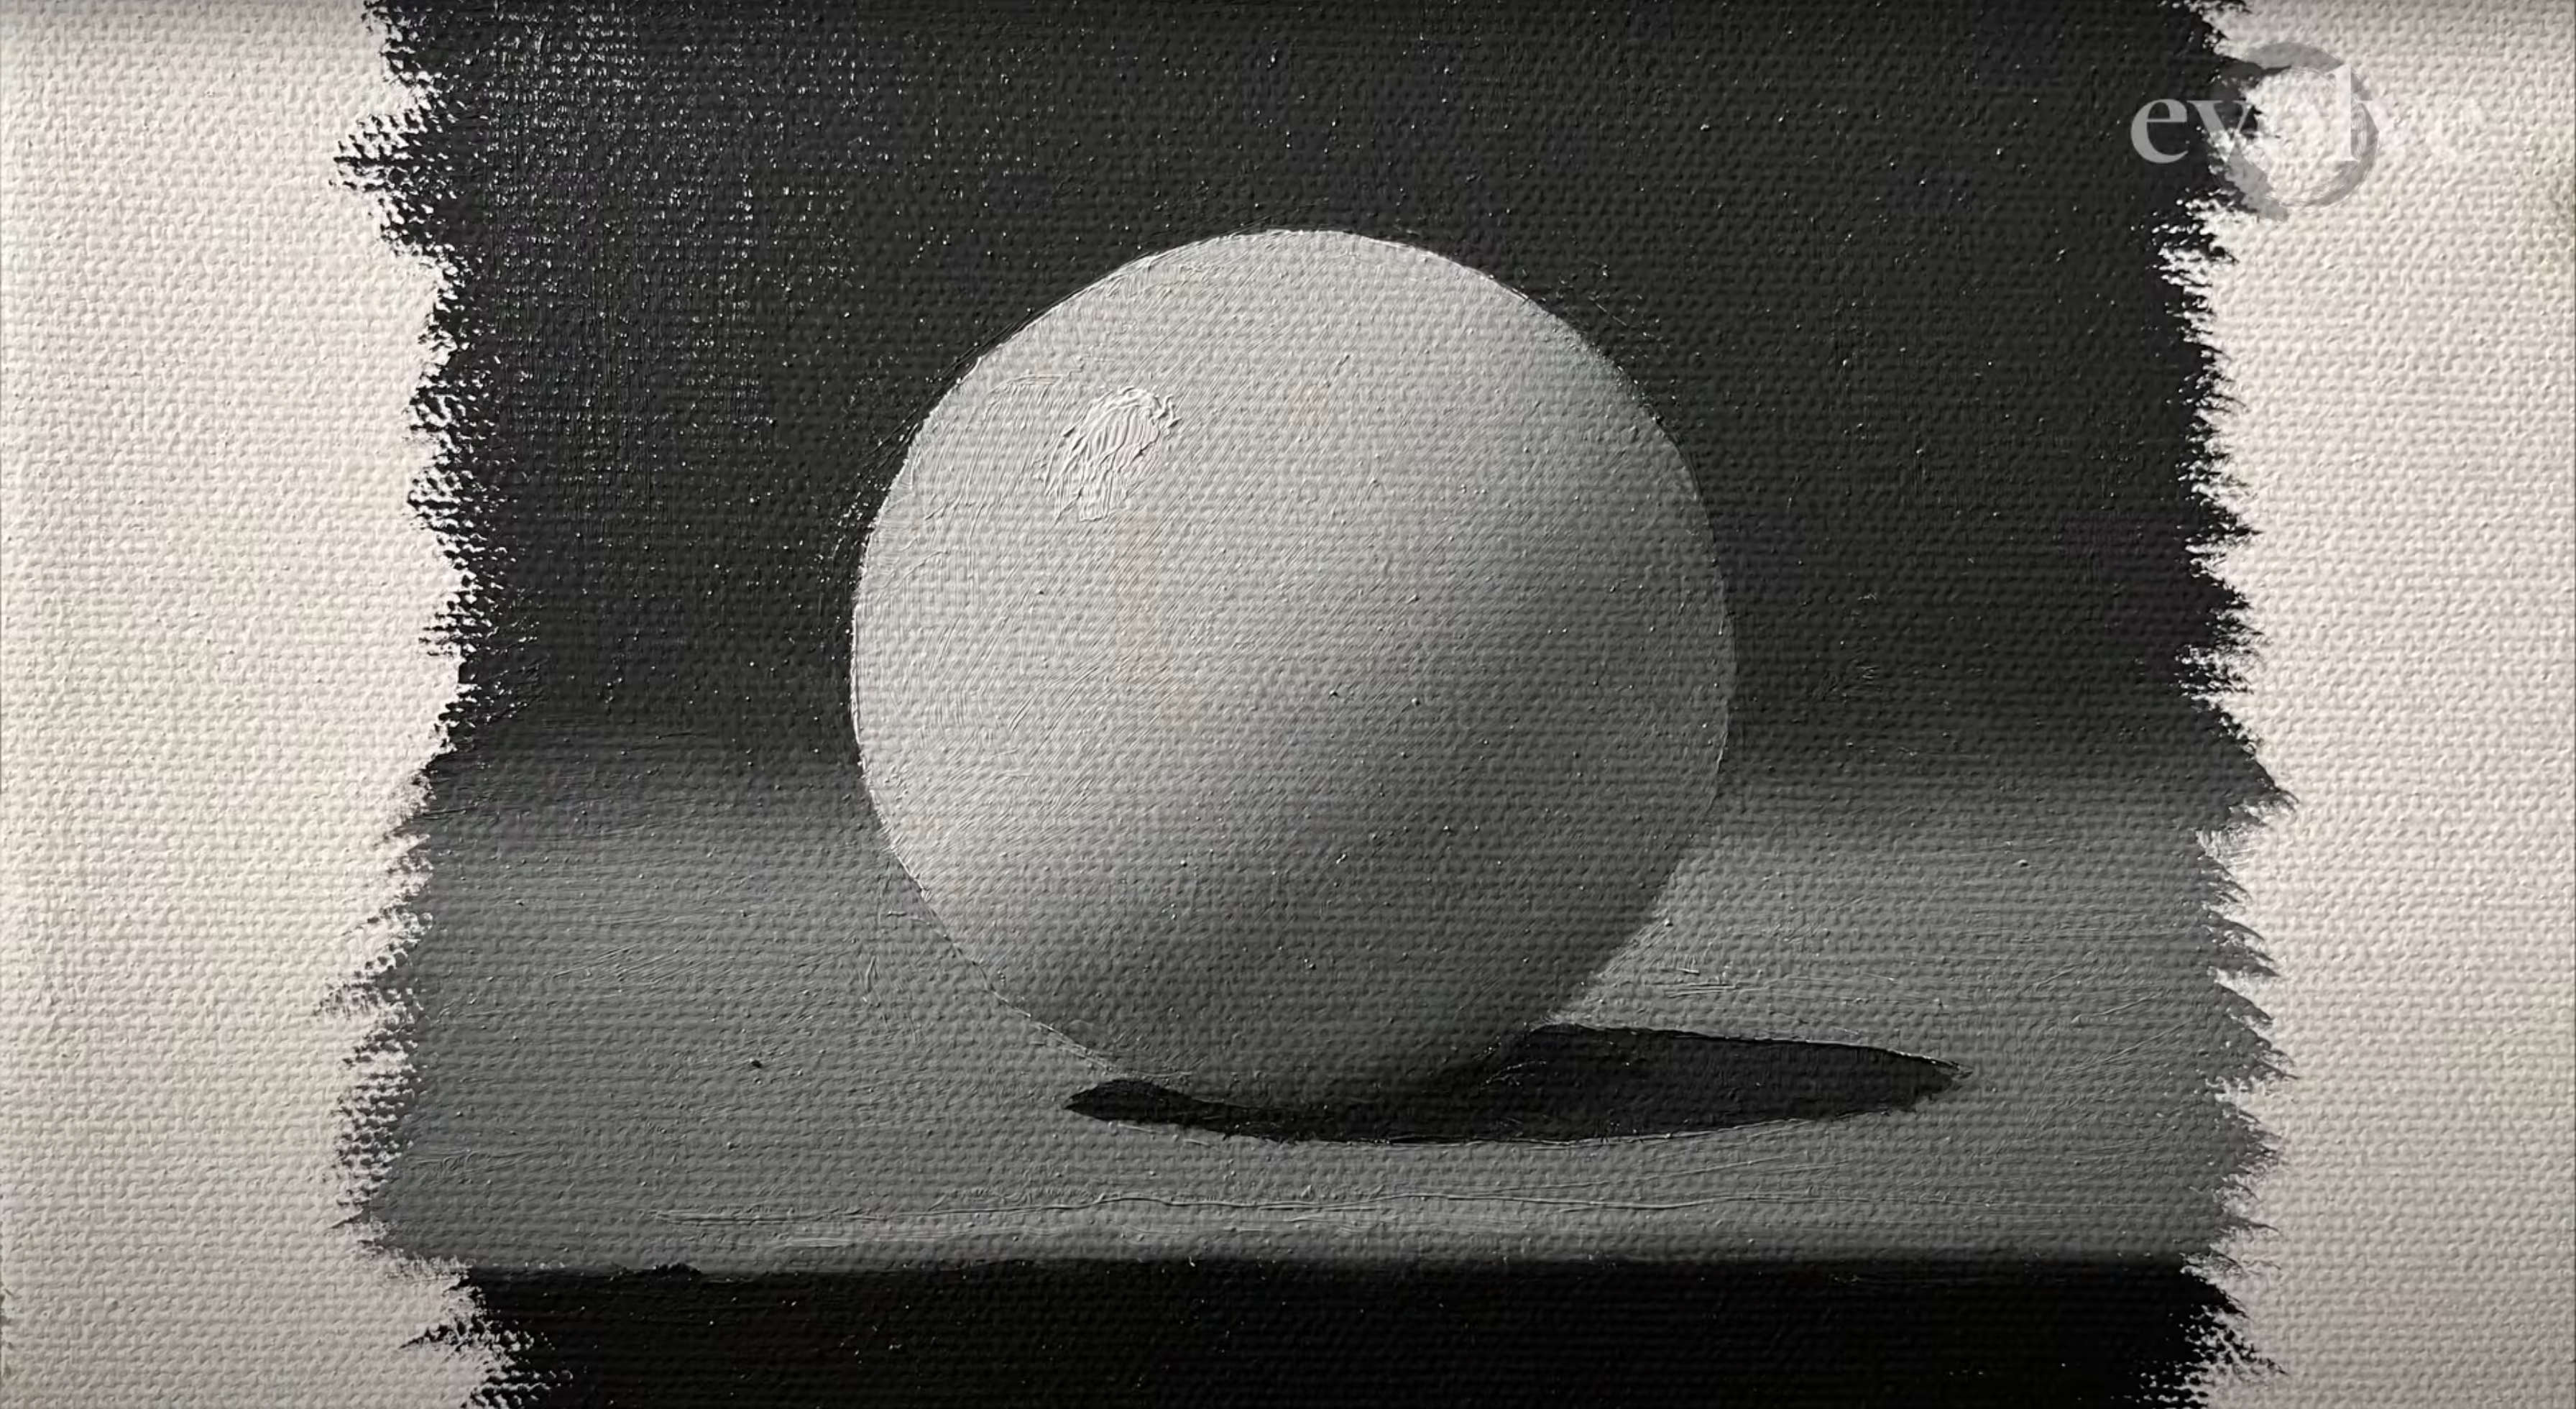
At Evolve Artist, we walk alongside our students every step of the way to learning oil painting for beginners.
Now you have everything you need to know to start oil painting. As you’re learning, keep working in grayscale. Stick with simple subjects so that you're not biting off more than you can chew.
This is a summary of what we do in Evolve, where we start our students in oil painting. Of course, we are way more thorough in the Evolve program, but it's the beginning of the journey for new artists and we walk along with our students every step of the way, giving feedback on all their assignments and sending all the materials they need.
If you are interested in the Evolve program, this process is a great way to test the program out and to see what Evolve is all about.
I wish you all happy painting!
